The XML framework makes use of it to comprehend data dynamically. It is largely concerned with building web pages with data that follows a predetermined format. XML, also referred to as an XML document, is used to generate a page. A simple, hierarchical structure resembling a tree is produced using XML. The main objective of this post is to show you how to read and understand files using Python.
The sample data for this part will be taken from the following XML document:
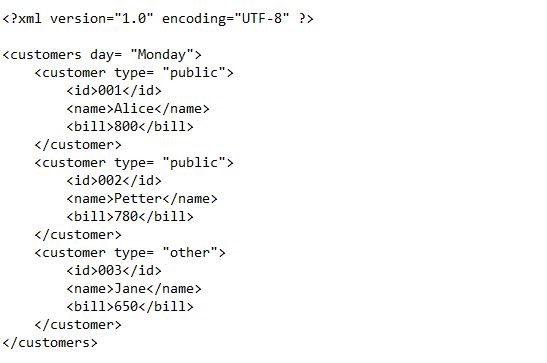
From what you have read in the xml file, you can see that the root element is called “customer” which contains all other elements, such as “customers,” which are considered to be “child elements” or “subelements.” It should be noted that these child components have the ability to parent other child elements, which are known as “sub-child elements,” and act as their own parents.
You will observe, for instance, that the customer element contains a few “attributes,” such as ids, names, and bills, that provide even more details. Now, we are going to read this xml file information by using the different codes given below.
Example 1:
We can get the name of the root tag from the specified xml file in Python by utilizing the getroot function from the ElementTree module.
file_root = ET.parse('customer.xml').getroot()
file_tag = file_root.tag
print(file_tag)
We have included the module ElementTree which is assigned an alias as ET. Then, we declared an object as file_root. Inside that object, we have a parse function that takes the xml file name. At the same time, we have called the getroot method to get the name of the root. We have created another object as file_tag where we have called the tag with the file_root object. The file_tag outcome will be printed on the screen.
You can see the name of the root tag generated is customers as given in the xml file.

Example 2:
We can also get the root of the attributes that existed in the xml file. With this example, we can accomplish the root of the attribute.
f_root = ET.parse('customer.xml').getroot()
f_attributes = f_root.attrib
print(f_attributes)
day = f_attributes.get('day')
print('Day : ',day)
As we have inserted the module ElementTree module, we have created an object as f_root where we have defined the xml file inside the parse method. We have also defined the getroot method inside that object to get the root name. Then, we created an object as f_attributes for the root of the attribute and printed its value. To get the particular attribute, we have defined an object as a day and assigned the attribute to the get method inside it. The specific attribute will be printed by the print function.
The results of the above code are as follows:

Example 3:
We can access the attributes of the child nodes of the root by implementing the following code.
root = ET.parse('customer.xml').getroot()
for customer in root.findall('customer'):
attributes = customer.attrib
print(attributes)
type = attributes.get('type')
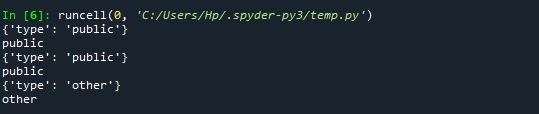
The first two-step of the code is the same as the above-specified code. Then, we have a for loop which recapitulates over each child node ‘customer’. After that iteration, we created a variable attribute that gets all the nodes of the attributes. We have fetched the type of the attributes by assigning ‘type’ inside the get method.
The types of the attributes in the child nodes are displayed as follows:
Example 4:
The example is to access the node of the element from the xml file without knowing the tag name against the corresponding node element.
root = ET.parse('customer.xml').getroot()
for customer in root.findall('customer'):
id = customer.find('id').text
print('id : ', id)
name = customer.find('name').text
print('name : ', name)
bill = customer.find('bill').text
print('bill : ', bill)
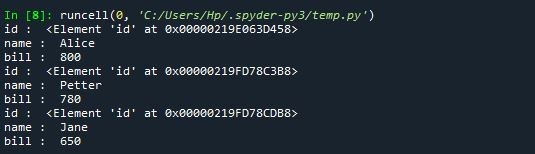
Begin with the for loop, we have iterated the for loop over each node in the xml file. Then, we get the element id, name, and bill by passing them to the find method and printing each element with its value.
The element nodes obtained from the above code are as follows:
Example 5:
Let’s see the last example where we are accessing the name of the root tag from the customer xml file.
root = ET.parse('customer.xml').getroot()
for customer in root.findall('customer'):
for items in customer:
i_name = items.tag
i_value = customer.find(items.tag).text
print(i_name, ' : ', i_value)
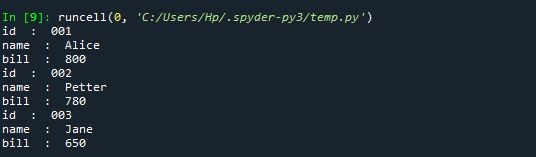
From the for loop first, we iterated over each of the nodes. Then, we again used the for loop to get all items of the customer node. The items are accessed by calling the tag object and passing it to the find method.
All the item tag from the customer tag is displayed as follows:
Conclusion
An essential Python package called ElementTree makes it possible to traverse and read XML documents. The XML document is broken down into a manageable tree structure using ElementTree. When in doubt, print it out using the handy print command print(ET.tostring(root, encoding=’utf8′).decode(‘utf8’)) to examine the entire XML document at once. When modifying, adding to, or eliminating from an XML, checking is helpful. The use of ElementTree and XMLs has several important considerations. Tags define what values should be outlined in the tree structure and help build it. The ability to read and write to an XML can be facilitated by clever structuring. The parent-child relationship must always be shown in the opening and closing brackets on tags. When validating tags or allowing for Boolean designations, attributes provide further instructions.