A programming software named TensorFlow is designed to build deep learning and machine-learning applications. Tensors have the functionality of multidimensional structures that hold data. The TensorFlow libraries support JavaScript and Python. TensorFlow, which was created by Google, is currently an open-source approach to ML and AI issues relating to Big Data. It’s a flexible system, especially given its capacity to function simultaneously on mobile devices, GPUs, and CPUs.
The future holds enormous growth for TensorFlow technology. It is entirely regarded to be the direction of deep-learning modeling. It is used for scientific purposes by several prestigious companies. They are best renowned for participating in big businesses, research, and especially Google products. Even they started using mobile devices and the cloud for their tasks.
The essential parts of TensorFlow are tensors. The basic data structures of the TensorFlow language are represented as a multidimensional collection or list. Any flow diagram’s connecting edges are Tensors, which are referred to as the Data Flow Graph. Tensors are the linking connections in any flow chart, often known as the data flow graph. Multi-linear maps can be anything, including vector spaces and real numbers.
A tensor can therefore be a scalar, vector, or matrix. TensorFlow applications are often divided into two phases: building by disassembling a graph and execution using a session. This session is beneficial for people concerned about Python and focused on development and research using a variety of machine learning and data learning algorithms. Python is the only language that TensorFlow uses. Having a strong comprehension of Python is therefore required. TensorFlow can be easily understood if we have a basic understanding of fundamental mathematics and AI concepts.
Applications of TensorFlow
- For video detection, the deep learning method is employed. Motion detection, real-time danger detection, airport security, and UI/UX fields use it.
- The most well-known deep-learning applications involve voice and sound detection. The ability of neural networks to recognize audio signals depends on their input data feed.
- Image recognition is also a popular application of TensorFlow. Image recognition is utilized to recognize and identify individuals and things from photographs. Any image’s context and content can be understood via image recognition.
- Another well-liked deep learning approach uses text as input. Text-based applications include, for instance, text analytics, social networking sites, threat identification, and fraud detection.
Structure of TensorFlow
Multiple APIs that fall into the low-level and high-level categories help compensate for the TensorFlow libraries.
Low-Level TensorFlow API: The significant element of TensorFlow is its Core API. To build effective machine learning applications, developers combined the Python or JavaScript programs by incorporating TensorFlow Core. Effective, but TensorFlow Core has a high learning curve. Any person working with Core must be familiar with the fundamental data concepts and the core API that comprise TensorFlow.
High-Level TensorFlow API: These include a set of advanced software programs and libraries that utilize TensorFlow. Some assist in creating models that can serve as the core principle of a graph. Others give a scalable layer that enables customization without being fully trained with TensorFlow. The learning curve for most of these APIs is far more accommodating, and they are frequently smaller and more reliable than the Core API.
Features of TensorFlow
As opposed to other deep-learning platforms that are currently available, TensorFlow offers an interactive, multiplatform programming interface that is scalable and reliable. We have some well-known aspect regarding TensorFlow, which includes:
- We can display every aspect of the graph, which frameworks like NumPy or SciKit do not offer. To design deep-learning software, you must first have a few components and a programming language.
- It permits you to examine each node or operation in terms of its analysis independently. Tensor Board uses its dashboard to see how it functions via a graph. It offers statistical graphing approaches that aid with a simple paradigm.
- The machine learning library’s primary characteristic is that anyone with an internet connection can use it because it is open-source. So, by modifying the library, users can create a wide range of valuable services.
- Model development and training are offered on both CPU and GPU by TensorFlow. Both the CPU and the GPU are capable of performing calculations, and they can also be contrasted.
- In a nutshell, TensorFlow’s feature columns function as a link between input data and our network by operating as intermediaries between estimators and raw data.
- TensorFlow provides a particular level of abstraction by shortening the implementation and accelerating the development. The user must pay attention to logic rather than the correct manner to input data into functions. The user can set the model that perfectly represents the system’s needs.
TensorFlow Architecture
The architecture of TensorFlow is completed by several additional internal parts.
Servables: The abstract unit used by TensorFlow to assist in providing tasks is known as a servable. These are the core components that facilitate computation. It delivers a high level of sizing and resolution customization. The components of a TensorFlow Servable can range from a set of tables to a distinct tuple with API models. The servables can have any form of interface, allowing for flexibility and future advancement.
- Connections of experimental API
- Streaming outcomes
- Processing asynchronous methodologies
Servables Versions: This makes it possible to progressively load new algorithm setups, rates, and other data. Moreover, they enable the synchronous loading of many versions of a servable, enabling experimentation and a phased roll-out.
TensorFlow Manager: The Manager tracks all versions while retaining the sources. Despite the Manager’s attempts, an Aspired version may not always be loaded. Another option for managers is to delay an “unload.” TensorFlow managers control a servable’s overall lifecycle, which includes loading, unloading, and serving servables.
TensorFlow Core: TensorFlow Core incorporates lifecycle metrics, and the serving core of TensorFlow accepts servables and loaders as objects.
TensorFlow Lifecycle: The Manager loads and runs the Loaders that the Sources have developed for Servable Versions. After this, they are delivered as Aspired Versions to the Clients as Client Requests. To load the Servable, the Loader has all the required metadata. The source sends the source to the Manager of Aspired version through a callback. The Manager implements the current version policy for the next action to be taken. The Manager directs the loader to acquire the up-to-date version and provides the required resources if they consider it safe.
Clients can request the most recent version of the Servable or specify a version when asking for it from the management. The Manager gives the Servable’s handle back. Then, enough memory message is informed by the dynamic Manager to the loader. The dynamic Manager responds with a handle to the most current version of servable when a client requests a handle for the newest model.
Servables Streams: It comprises several Servables in diverse types. It is retained in an escalating sequence of iterations.
TensorFlow Loaders: The maintenance of the TensorFlow Servable’s entire lifecycle is done through the TensorFlow loader API. It provides a shared infrastructure for certain algorithms.
TensorFlow Batcher: When GPUs and hardware accelerators are accessible, batching TensorFlow responses into a unified application can significantly decrease the cost of running inference. A more batch widget is available in the TensorFlow servable, enabling clients to batch their various individual inference queries into one query batch with ease to effectively carry out this operation.
TensorFlow models: A serving is a rendering of a paradigm in one or even more servables. A servable also performs as a component of a model, such that a big searchable table can be used as multiple instances.
TensorFlow Advantages
Open-Source: It is accessible to all users and prepared for creating any system due to its open-source platform.
Parallelism: TensorFlow uses both GPU and CPU devices to operate. The user may utilize any of the layouts by their needs. If not specifically stated, a system uses GPU. Memory use is somewhat decreased by this technique. TensorFlow is considered a hardware speeding library because of its capability.
Architectural Support: As compared to CPU and GPU, the TensorFlow architecture incorporates TPU to accelerate the operation. In contrast to the other two, developed models using TPU can be deployed over clouds with ease.
Debugging: We can acquire and obtain discrete data due to its cooperation in executing subpoints of a graph by giving it the advantage.
Scalable: This platform enables the execution of almost all operations. TensorFlow enables its users to create any system because of its ability to be installed on any machine and its graphical model representation.
Graphical Support: TensorFlow is used for deep-learning development because it enables the construction of neural networks using graphs that have nodes for operations. TensorFlow functions in various domains, including time series, motion detection, voice identification, and picture recognition, so it may be used to meet a user’s needs.
TensorFlow Disadvantages
No Window Support: Despite TensorFlow’s many benefits, Windows users can only reach a limited number of its functions. Linux users have access to an extensive range of capabilities.
Dependency: TensorFlow reduces the amount of script and makes it simpler for users to access, but it also renders using the code more complex. Each code must be performed on a diverse platform to be enabled for increasing the execution’s dependencies.
Inconsistency: Homonyms are used in the titles of TensorFlow’s modules, rendering it difficult for users to retain and use. The problem comes from adopting a single name for multiple diverse contexts.
Speed: TensorFlow moves at a slow pace when compared to its opponents. Comparative to other frameworks, it is less usable.
Symbolic Loop: The feature is more essential when discussing variable-length sequences. TensorFlow does not include functionality. However, finite layering is the suitable solution.
How To Install Python TensorFlow in Ubuntu 20.04
The TensorFlow library is open-source software for machine learning and developing deep neural networks. The TensorFlow library can be installed in the virtual environment of Python. In this article, we are installing the TensorFlow library, and all the installation instructions are for Ubuntu 20.04. However, all the Linux variants use the same methodology for installing the TensorFlow library. We have demonstrated every step with executed commands to install the TensorFlow package successfully.
Step 1: The first step is to make sure that Python should be installed in Ubuntu 20.04. We can verify the Python version by giving the command “python3 -V”. As we have already installed Python3, the version is displayed inside the following image:
![]()
Step 2: Now, we are confirmed that Python is installed in our system. Then, moving ahead with the next step. We have implemented the venv package from the Python3-venv package, which is the preferred method for building a virtual environment. To obtain the venv module, enter the command that follows:
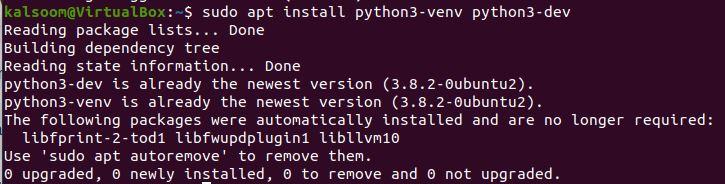
Step 3: We have successfully installed the venv package in our system. Now, we can easily create a virtual environment for the TensorFlow project. For this, we have created the directory where we want our Python3 virtual environment to be located. The created director should have read and write privileges for the users you want to allow. We have created the “py_tensorflow” directory, and with the “cd” command, we have entered that particular directory.

To build the virtual environment from the venv module, we have used the following command inside the py_tensorflow directory. Here, we have chosen the “Venv” name for our virtual environment, but it can be a different name. This command generated the venv directory that includes Python default modules, pip package manager, copies of Python binaries, and other supporting files.
![]()
We have entered our virtual environment by activating the activate script from the following command format. The bin directory will be added to the system’s $PATH variable for the virtual environment after it is activated. The virtual environment name is now displayed in the terminal prompt, which will also change. As we have selected “venv” for our virtual environment, so it is shown, as follows:
![]()
Now, we are at the stage where we can install the TensorFlow module. We have to upgrade the pip version with the latest version, which is required to install the TensorFlow library in our virtual environment. The pip module in our current venv virtual environment will be upgraded with the following command:
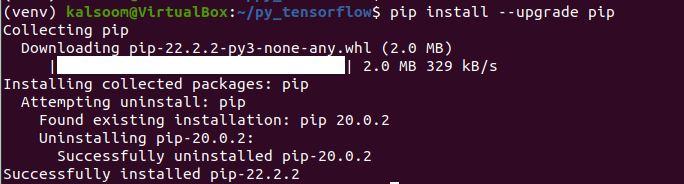
We have successfully upgraded the pip version, as the prompt shows this in the snap taken by us. Through the deactivate command, we can leave the virtual environment whenever we want to. The source activates a command that can be used to revitalize it at a later time. While using TensorFlow, we suggest staying inside the virtual environment. The TensorFlow module installation is now ready to go. With the pip command, we have installed the “TensorFlow” library. The following command retrieves the most recent stable version and each TensorFlow package’s dependencies:

As TensorFlow begins to install, we will see a statement indicating that the installation of TensorFlow and any necessary dependent packages were successful.
Python TensorFlow Data Types
TensorFlow supports unique data types. We will go through the usage of data types in TensorFlow. TensorFlow accepts native Python data types like strings, Booleans, and numbers (int, float). NumPy gets along well with TensorFlow 2.x, too. Data type changing between NumPy and Tensor is supported properly. Both 32-bit and 64-bit numbers, as well as other data types, are available in Python TensorFlow. We have shown data types of examples of a tensor which include:
Generally, we used “dtype” to acquire the data type of the specified value. The TensorFlow “dtype” are used to verify the present Tensor’s data type or provide the data type output for computations that need it.
Example
First, we have fetched the integer data type. An “int” data type performs similarly to other modules. It describes a certain range of integers in mathematics. Different size restrictions apply to integral data types, and negative values may or may not be permitted. For this, we have provided the TensorFlow as “tf” and invoked the constant that takes the numeric value “3”. With this, we have called the “dtype”. When we press enter for the REPL statement, the “int32” data type is executed. This is how we print the data type of any given value.
![]()
Example
In the next instance, we have checked the data type of the decimal number. To the constant(), we have passed the decimal number “1.5” and called the dtype. When we execute this, the tf.float32 is displayed by the Python TensorFlow REPL.
![]()
Example
Next, we displayed the data type by passing the imaginary number “2+2j”, and TensorFlow dtype returned the data type complex128. The data type complex128 represents the two 64bits float data types.
![]()
Example
A string is a common and useful data type supported by every Python library. A string data type consists of a collection of characters. Similarly, Python TensorFlow also has the string data type, which we have shown in the following example. We have passed the “Hello world” string, and upon execution, the “tf.string” is shown in the output.
![]()
Example
The Boolean data type, frequently abbreviated to Bool, represents the true and false logical values. Here, we have passed the logical value “True” for the data type operation, and it returned the tf.bool value as the data type value. This means this well-known Bool data type is also supported in Python TensorFlow.
![]()
Python TensorFlow Variables
The best approach to represent the shared, constant state that the program works with is using a TensorFlow variable. Tensor-containing in-memory buffers serve as variables. They can be saved to disc during and after training but must be manually initialized. Through the “tf.Variable” class, variables are generated and tracked. It is possible to alter a tensor value by implementing operations represented by the class “tf.Variable”. We can read and revise this tensor’s values using specific operations.
Once they have been built, the variables and shapes cannot be updated. Let’s look at a few examples of variable formation using TensorFlow.
Example
We have an example below where we have created a Python TensorFlow variable that displays the shape, dimensions, size, and data type of the value passed in as an input in the variable() constructor. First, we have imported the TensorFlow module with the alias “tf”. Then, we set the variable name as “tensor” and declared it with the variable() constructor.
To the variable() constructor, we have passed the two numeric values. Then, we printed the shape of the TensorFlow variable by invoking the “tf.shape” object. After that, we printed the “Dimension” of the variable by passing the “tensor” to the “tf.rank” method and also invoked the numpy() function. Next, we printed the size of the variable by passing the “tensor” in the size method, and finally, we obtained the data type from the dtype method, which is already discussed in the previous section.

Example
Through the use of the Variable constructor, we understand how to establish a variable. Now, we have to change the shape of the variable by using the new Python TensorFlow method called reshape() method. This reshape() method takes the parameter “shape” and the variable name. Now, we have implemented the example of the reshape method. We have declared the variable “tensor” and set the value for it with the variable() constructor.
After that, we employed the “tf.reshape()” method and passed the “tensor” variable and the shape method, which has been set with the value to be shaped for the specified values in the variable() constructor. Then, we executed the previous program, which reshaped the variable shape. The code and the output have been affixed to the subsequent image:

Example
Now, we have done the broadcasting of TensorFlow variables. The smaller variables can instantly broaden out to fit the larger variables when we try to run paired operations with multiple Variable objects, much like we can with Tensor objects. This is very much comparable to how NumPy arrays operate. A scalar variable is scaled to multiply each member of the variable when you seek to multiply it with another variable.
We need to import the TensorFlow module because we cannot access the TensorFlow variable. After that, we declared the “Variable()” constructor inside the variable “t1” and “t2”. To the variable “t1”, we have passed the two numerical values, which are to be multiplied by the numeric value of the variable “t1”. Then, within the “result” object, we multiplied the two variables and showed the resultant values with the print statement. The code and the output have been affixed in the subsequent image.

Example
We could use it to identify the form of hardware (a CPU) used to execute our variable. For this, the “.device” attribute is employed. In the following implementation, we have defined the variable name “tf1” and assigned the Variable constructor inside it, which passed two values as an input. After that, we utilize the print statement where the “.device” attributes are called with the variable “tf1”. The hardware variable type is displayed on the terminal.

Python TensorFlow Placeholder
The TensorFlow variables that acquire data at a later time are known as a placeholder. We are capable of creating procedures without the need for data. As the session begins and operates, data is inserted into the placeholder. Through the use of placeholders, we can add data to TensorFlow graphs.
Example
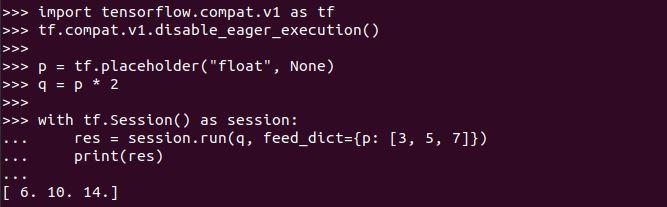
We have imported the TensorFlow module differently as the placeholder attribute is not found, and an error has occurred. Then, we have the variable “p” and set the placeholder() method inside it. The placeholder takes the “float” and “None” parameters. We have initialized the values for the placeholder. But we have set the operation of multiplication as “p*2” inside the “q” variable.
Now, we have implemented the session object from the TensorFlow session(). Here, even if a much larger plot of operations were created, only a small portion of the plot could be executed. This subgraph assessment is one of TensorFlow’s major benefits because few other libraries that perform related tasks offer it. Then, we passed the variable “q” and set the feed_dict by assigning the value for the “p” variable in the session run(). Here, the output gives the expected results after execution. The code and the output have been affixed in the subsequent image:
Example
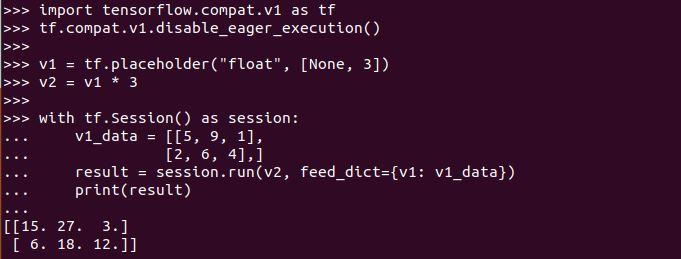
Furthermore, placeholders with various dimensions can store arrays. The following case includes the placement of several integers in a matrix. Then, employing the same technique as before, we multiply the integer element by two. Inside the following program, we have called the placeholder within the variable “v1”. The placeholder defines the dimension as “None” and the second dimension as “3”. This means the column should be three for the matrix.
After that, we multiplied the variable “v1” by “3” and created the session. We have passed the “v2” and “feed_dict” as an argument in the session run, and the values for variable “v1” are also set inside the feed_dict input. We have printed the matrix of 3 by 2 in the following image along with the code:
Python TensorFlow Sparse Tensor
The speedy processing and caching of tensors in TensorFlow is made possible by sparse tensors and employed in applications for natural language processing and computer vision, as well as for pre-processing photographs with dark pixels. We will use the “tf.sparse.SparseTensor()” function to represent a sparse tensor, which will be utilized to carry out this specific task.
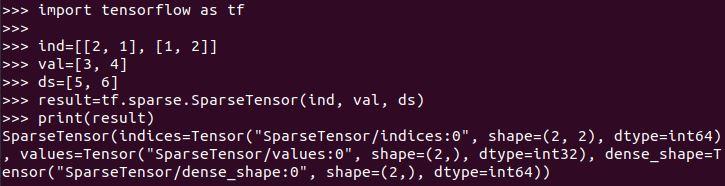
Example
Here, we have set the values for the sparse parameters. The “ind” represents the indices that have all non-zero values. The “val” is the value specified by the tensor’s shape for each previous indices. Then, we have a dense shape parameter as “ds”, which is also initialized with the list. Then, we passed all these parameters inside the tf.sparse.SparseTensor() function as an argument. The following snap shows the function’s outcome as well. The code and the output have been affixed in the subsequent image:
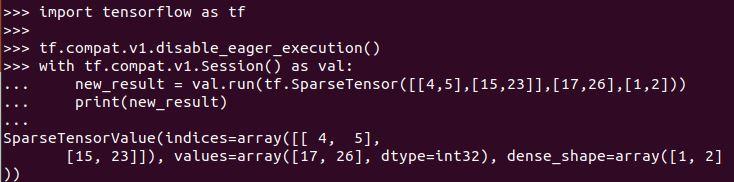
Example
Now, we will see the conversion of TensorFlow to the NumPy value. To accomplish this, we will use the eager execution function to operate the session. The tf.compat.v1. The session() function is used to construct the session after importing the TensorFlow module, and the tf.sparse tensor() function is used after that. After that, we defined the “new_result” variable and assigned the integer value in the form of a list to the tf.sparseTensor function. After printing the function operation, we can see the output.
Example
We have seen the sparse conversion to NumPy. Now, we have converted the sparse to dense. For this, we have implemented the following program. We have assigned the dense shape to the tf.SparseTensor function, value, and indices parameters and also initialized them. After that, we invoked the TensorFlow “to_dense” function that takes the “tf.SparseTensor” function and displays the results. The code and the output has been affixed in the subsequent image:

TensorFlow Transpose Function
The TensorFlow transpose function is a feature of the Python Deep Learning domain’s TensorFlow package. This function enables us to determine the transpose of the given data whenever we pass it to the TensorFlow paradigm. The input matrix of the tensor will be reversed by the transpose function, resulting in a diagonal flipping of the rows and columns.
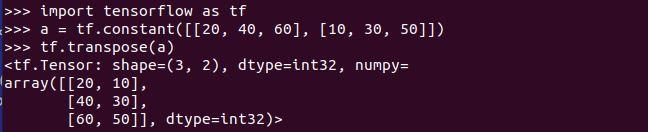
Example
We have a TensorFlow package inside our script, which is assigned a symbolic name, “tf”. Then, we declared the variable “a”, where we created the list of numeric values. After creating the two lists inside the constant method, we employed the “tf.transpose” method and passed the input variable “a” inside it. The transpose function has changed the position of the horizontal list into the vertical list, as shown inside the following screenshot:
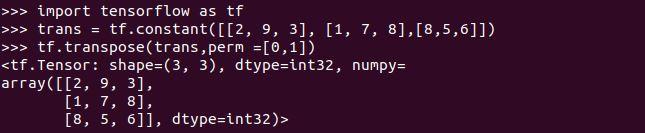
Example
The specified array as an input will be transposed by the size indicated if the perm argument is given. Consider the perm parameter of the transpose function in the following example. After inserting the package TensorFlow, we have specified the two lists of numbers inside the TensorFlow constant method in the variable “trans”. Then, we have called the TensorFlow method, where the “trans” is assigned as input, and the perm parameter is also set with dimensions for 3×3 metric. The transpose function generates the new transformed metric.
Example
The new parameter “conjugate” is introduced in this example. We can transpose a tensor if it is conjugate in the input. We must give the “tf.transpose()” argument conjugate equal to True to achieve this. Inside the program, we have set the variable “img” for creating the list with the help of the “tf.constant” method. We have assigned a complex number to the list. After that, we utilized the transpose function where the conjugate argument is called and set with the Bool value “True”. When the transpose function statement is executed, the output displays the conjugate transpose metric, as follows:

TensorFlow ArgMax Function
The TensorFlow argmax function is used to determine the greatest value among the values of the axes and is a part of the math package of the TensorFlow library. The technology field defined as TensorFlow Keras is presently one of the most widely used and rapidly developing because it can change the path of technology.
Example
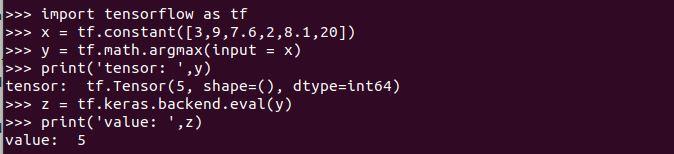
We have employed the TensorFlow module to use the argmax function. Then, we have set the value with the constant method inside the variable “x”. We have invoked the argmax function from the Python math library inside the variable “y”. The TensorFlow argmax function takes the input parameter “x”, and then we have displayed the tensor with the print method. After that, we computed the value of the obtained tensor through the tf.Keras.backend.eval() method as we passed the variable “y” to it. It has the maximum value index in the output, as the last index value has the max value. So the maximum value of the index is generated.
Example
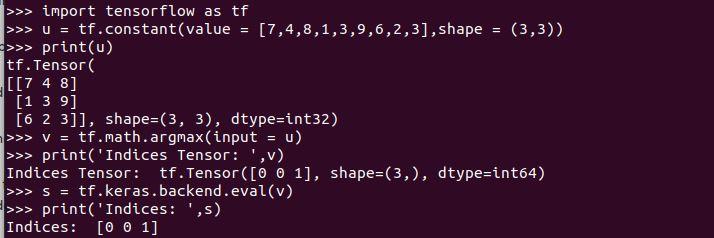
Here, with the shape method of the TensorFlow, we have implemented the argmax function. The initial step of including the TensorFlow is done. Then, we have defined the variable “u”, where the constant function takes the parameter “value” and sets the list of integers inside it. Also, we have set the “shape” argument inside the constant function and the shape “3X3”. We have printed the shape of the specified list in 3×3 dimensions. Next, we constructed another variable, “v”, where the argmax function deployed by assigning the “input” argument as “x”. When the tensor is printed, it outputs the indices value, and with the Keras module, we have evaluated the value which displayed the maximum indices respectively.
TensorFlow ArgMin Function
Earlier, we discussed the TensorFlow argmax function. The TensorFlow argmin function is implemented the same as the argmax function. The output values are the only thing that differs. The TensorFlow library’s math module contains the TensorFlow argmax method, which determines the value with the minimum value among the axes’ values.
Example
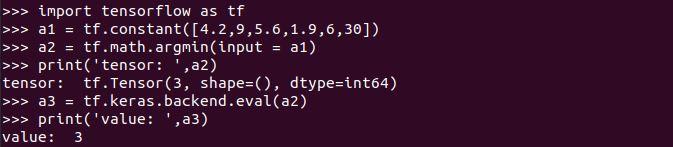
The TensorFlow module has been designated in the example below. Then, we have initialized some numeric values in the form of the array, which is present inside the variable “a1”. With the help of the math package, we have employed the argmin function and set the “input” argument with the variable of tensor “x”. After that, we displayed the evaluated tensor from the argmin function. Finally, we have determined the value of the tensor from the Keras.backend.eval method, as the number “1.9” is a minimum number. So in the output, we have the index value “3” against this number.
Example
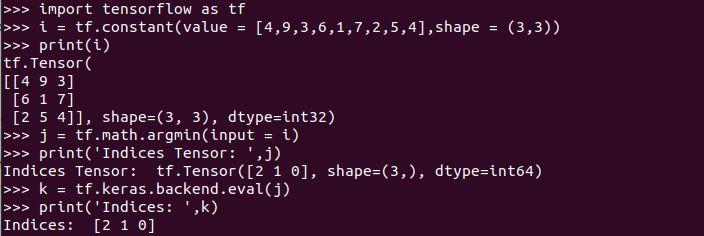
Now, we used the shape method of the TensorFlow. This will generate the shaped indices value of the minimum values. We have established the variable “i” and declared it with the constant function. The constant function takes the value and shape as an argument. These specified arguments are set with their value. Then we have shown the tensor and the indices of the number with minimum values.
Conclusion
A deep-learning library that is widely used is TensorFlow. It is mostly utilized in the construction of neural networks, and both small and large businesses use it. TensorFlow is also utilized in most of Google’s products, including Gmail and the search engine, as seen above; Google also uses it for internal purposes. An introduction to TensorFlow has been provided in this manual.
Here, we’ve discussed TensorFlow’s introduction of its key elements, traits, benefits, and drawbacks. We have addressed each aspect of Python TensorFlow and the implementation of TensorFlow code with the Linux server. We have demonstrated how to set up TensorFlow on Ubuntu 20.04 in a virtual environment. Then, we see the TensorFlow data type. We have fetched the data type with the dtype function call in TensorFlow.
Next, we have explored the declaration and initialization of the Variable() constructor. Tensor-based in-memory buffers called TensorFlow Variables remain active after one graph execution and are used repeatedly. Next, we have a TensorFlow placeholder explanation. They enable us to define restrictions on the values size and data types being passed in. Then, we have another TensorFlow function’s implementation, which is called the Sparse Tensor function. We used the “tf.sparse.SparseTensor” function to display the sparse tensor values. We have also utilized the TensorFlow transpose method.
TensorFlow’s transpose function aids in flipping the input tensor, which causes the rows and columns of the matrix to alternate. Moreover, this tutorial explains two more functions, argmax and argmin, supported by the TensorFlow module. These methods help in locating the highest and the lowest value within the tensor that has been supplied as input both along and across the axes. TensorFlow makes it incredibly simple to implement these methods as this topic is very vast, but we have tried to cover all the important topics as we can.