MoviePy
To install MoviePy:
Video Cutting
In the first instance, let’s learn to cut a video. First, grab the video using VideoFileClip() (as an argument, give it the name of the video). Then use subclip() to specify the time frame that you want to be cut out. Then we want to save the file we just cut out; for that, we use write_videofile() and give it the name that we want it saved as.
For example:
# use subclip() to specify the time frame you want
cut_video_1 = VideoFileClip("video.mp4").subclip(20,30)
cut_video_2 = VideoFileClip("video.Mp4").subclip(40,50)
cut_video_3 = VideoFileClip("video.Mp4").subclip(60,70)
# use write_videofile() to save the file
cut_video_1.write_videofile("cut_video_1.mp4")
cut_video_2.write_videofile("cut_video_2.mp4")
cut_video_3.write_videofile("cut_video_3.mp4")
The latter will create three videos from the main video file called “video.mp4”. It will take “video.mp4” and cut it up and then save it as cut_video_1.m4, cut_video_2.mp4, and cut_video_3.mp4.
Video Merging
Now, let’s merge the three chunks that we created in the previous section. Here, once again, choose three segments that you’d like to merge with subclip(). Then use concatenate_videoclips() to merge the files together; here, note that the files must be placed in a list! In order to save the merged file, once again, we’ll be using write_videofile(); however, here, you must be careful. If you don’t want to get a value error, then you have to specify the codecs.
The codecs are as follows:
| Extension | Codec |
|---|---|
| mp4 | libx264 |
| ogv | libtheora |
| webm | libvpx |
| ogg | libvorbis |
| mp3 | pcm_s16le |
| wav | libvorbis |
| m4a | libfdk_aac |
Please note that when naming the merged file, you have to enter an extension as well (for example, in my case, it was merged_video.mp4).
cut_video_1 = VideoFileClip("video.Mp4").subclip(20,30)
cut_video_2 = VideoFileClip("video.Mp4").subclip(40,50)
cut_video_3 = VideoFileClip("video.Mp4").subclip(70,80)
merged = concatenate_videoclips([cut_video_1, cut_video_2, cut_video_3])
merged.write_videofile("merged_video.mp4", fps=30, threads=1, codec="libx264")
If you’d like to use the existing files and not use the subclips(), then:
# read the video files
cut_video_1 = VideoFileClip("cut_video_1.mp4")
cut_video_2 = VideoFileClip("cut_video_2.mp4")
cut_video_3 = VideoFileClip("cut_video_3.mp4")
# concatenate the files
merged = concatenate_videoclips([cut_video_1, cut_video_2, cut_video_3])
# save the merged file
merged.write_videofile("merged_video_2.mp4", fps=30, threads=1, codec="libx264")
Title Insertions
Next, let’s choose a clip and add a title to it. Here, in order to accomplish this, you’ll need to have ImageMagick installed:
In order for this to work, you need to make a few changes:
Comment out the line that reads as follows:
By changing the latter to the following:
Here, you read the video file using VideoFileClip(). Then you insert the text you want using TextClip(). Here, I inserted the word “LinuxHint” with a font size of 75 and a color of white. Then you can choose the place where the text is inserted; in my case, I’ve inserted it at the center. Lastly, you can set the duration by using set_duration(). Then merge the video and the text using CompositeVideoClip(), and save it using write_videofile().
video = VideoFileClip(“cut_video_1.mp4”)
text = TextClip(“LinuxHint”, fontsize=75, color = ‘white’)
text2 = text.set_pos(‘center’).set_duration(3)
video2 = CompositeVideoClip([video, text2])
video2.write_videofile(“texted.mp4”)
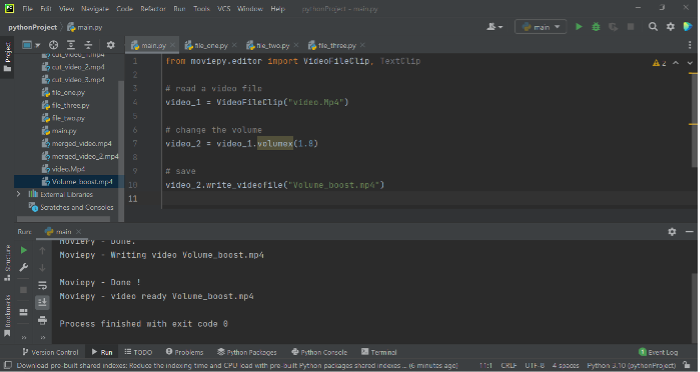
Change volume
You can also change the volume of the video. First, read the video file using VideoFileClip(), and then change the volume using volumex(). A single argument – the amount to boost or reduce – is passed to volumex(). In my case, I’ve decided to boost the volume by a factor of 1.8.
# read a video file
video_1 = VideoFileClip("video.Mp4")
# change the volume
video_2 = video_1.volumex(1.8)
# save
video_2.write_videofile("Volume_boost.mp4")
Resize Video
To resize the video, you first need to read it using VideoFileClip(), and then use fx(). Fx() takes two arguments; the second argument is the width of the video (which you can define).
# read a video file
video_1 = VideoFileClip("video.Mp4")
# resize
video_2 = video_1.fx(vfx.resize, width = 880)
# save
video_2.write_videofile("widthenlarged.mp4")
However, you can do much, much more!
For example, if you wanted to turn the video into black and white (mind you, here, things are case sensitive):
import moviepy
# read a video file
video_1 = VideoFileClip("video.Mp4")
# modify
video_2 = moviepy.video.fx.all.blackwhite(video_1, RGB=None, preserve_luminosity=True)
# save
video_2.write_videofile("black.mp4")
Many more options can be found at https://zulko.github.io/moviepy/ref/videofx.html.
To GIF
You can also create GIFs. In this case, you do what you want to do to the video (ex: cut, black and white, resize, etc…) and then use write_gif() to create a gif.
import moviepy
# read a video file
video_1 = VideoFileClip("cut_video_1.mp4")
# modify
video_2 = moviepy.video.fx.all.blackwhite(video_1, RGB=None, preserve_luminosity=True)
# save
video_2.write_gif("gif.gif")
Without Audio
Another interesting feature is to remove the audio from the video. To remove the audio, pass the video to without_audio().
import moviepy
# read a video file
video_1 = VideoFileClip("cut_video_1.mp4")
# modify
video_2 = video_1.without_audio()
# save
video_2.write_videofile("woaudio.mp4")
Audio
Audio wise, MoviePy offers audio_fadein(), audio_fadeout(), audio_loop(), audio_normalize() and volumex(). More about this can be found at https://zulko.github.io/moviepy/ref/audiofx.html.
More information about how to use this module can be found at https://zulko.github.io/moviepy/ref/ref.html.
MoviePy is a Python library that was designed to edit videos. MoviePy is based on FFMPEG and ImageMagick. And what’s more, it uses FFMPEG and ImageMagick and so it’s very, very powerful! This also means that both need to be installed and working. MoviePy does a fantastic job of editing videos! There were so many things one could do to the video that I was just in awe! MoviePy can cut videos, merge videos, add titles, etc… It’s quite a little package!
Happy Coding!