Microsoft Defender protects the system from malware or malicious threats that can harm the system files resulting in corrupting the Windows. It blocks every folder that contains virus-infected files. Until the third-party antivirus program is installed it continues to rescue the Windows OS.
In the legacy version of Windows, turning off the real-time protection was all needed to disable the Microsoft Defender completely. However, with the passage of time, Microsoft recognized that disabling the Microsoft Defender completely causes the users to get exposed to attackers and viruses. So, it now has the fail-safe method, which turns back on the Microsoft Defender whenever it is turned off. However, it can still be disabled by going through some tweaks and configurations.
Quick Outline:
- How to Disable the Tamper Protection
- How to Disable Microsoft Defender on Windows (Easy-Way)
- Permanently Disable Microsoft Defender on Windows (Hard-Way)
- Conclusion
How to Disable the Tamper Protection?
It is recommended to turn off the Tamper Protection prior to turning off the Microsoft Defender. If the Tamper Protection is enabled, then no other app can make any changes to the Windows Defender settings. Furthermore, it is also necessary to disable Tamper Protection in order to completely turn off the Microsoft Defender.
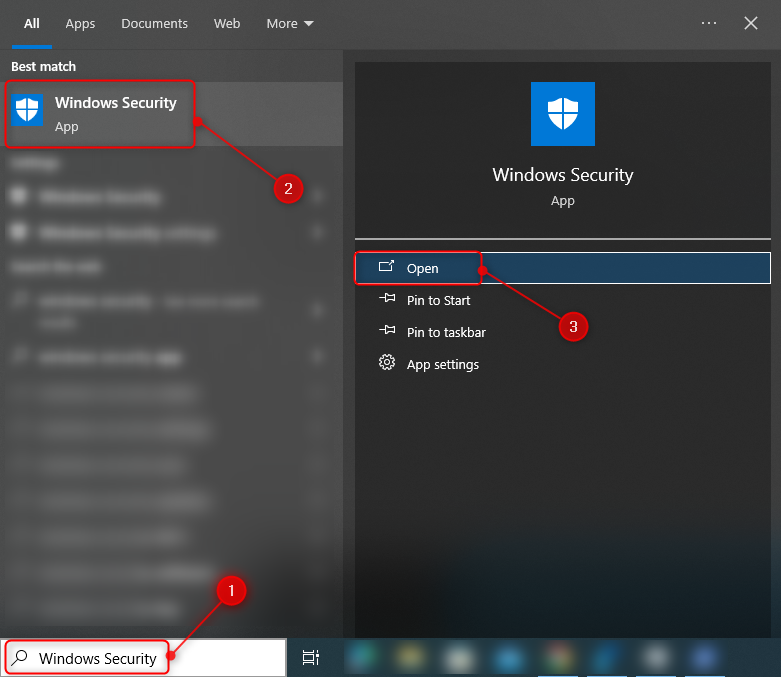
Step 1: Launch the Windows Security program from the Start menu:
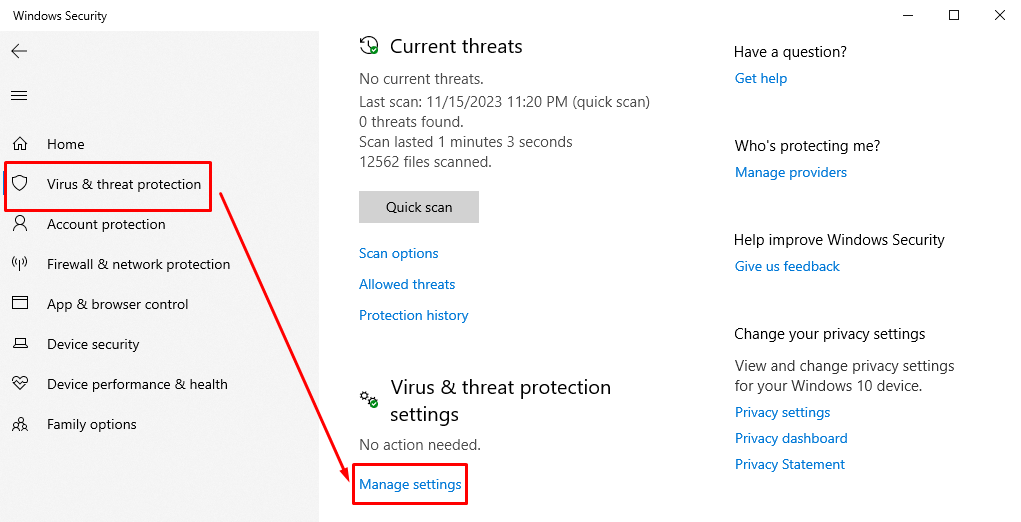
Step 2: Move to the section Virus & threat protection.
Step 3: Click on the Manage settings option:
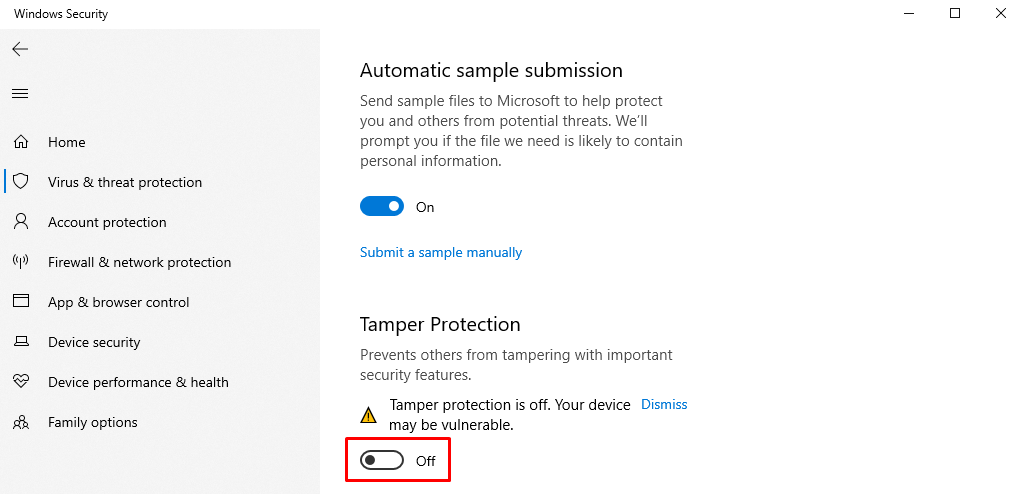
Step 4: Locate the Tamper Protection settings and disable it:
This article will overview the procedure to permanently turn off the Microsoft Defender.
How to Disable Microsoft Defender on Windows? (Easy-Way)
Windows Defender can simply be disabled by using built-in tools including Group Policy Editor, Registry Editor, and Command Prompt. However, third-party tools like Autoruns, Winaero, and Ultimate Windows Tweaker can also be used to disable Windows Defender.
Method 1: Use the Group Policy Editor to Disable Microsoft Defender
After disabling the Tamper Protection, it will be easier to disable the Microsoft Defender. As Tamper Protection won’t be able to interfere anymore. The Group Policy Editor is only available to Windows Professional and Enterprise Edition users. Check the steps mentioned to turn off the Windows Defender.
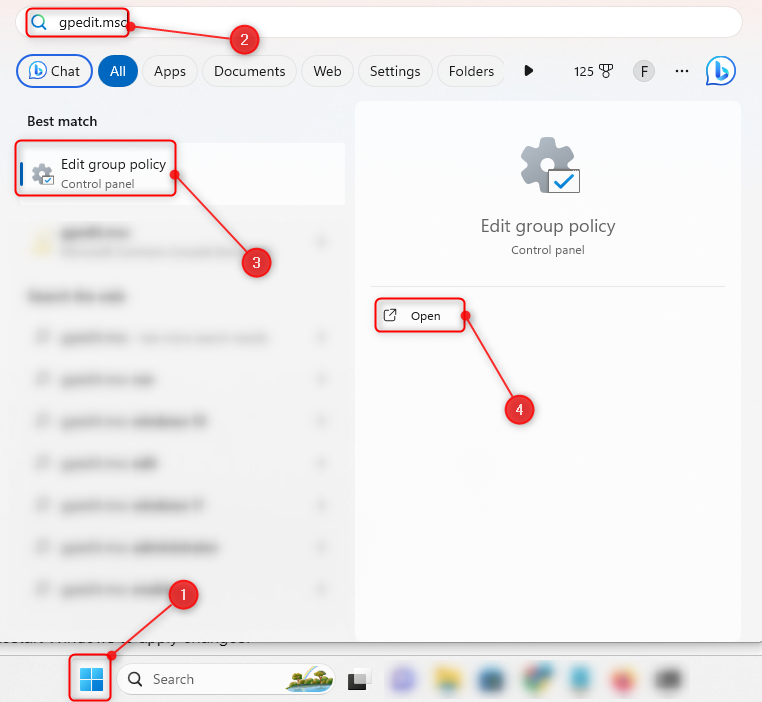
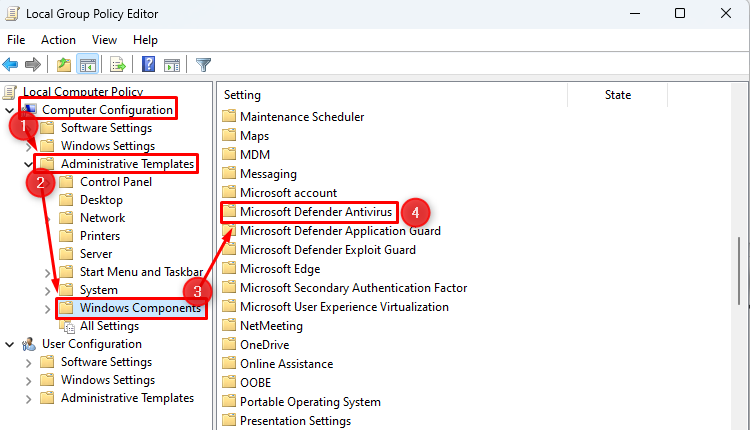
Step 1: Launch Edit Group Policy from the Start menu by searching gpedit.msc:
Step 2: Navigate to the Computer Configuration section available on the left pane:
Step 3: Move to the Administrative Templates > Windows Components settings.
Step 4: Double-click on Microsoft Defender Antivirus to open its window:
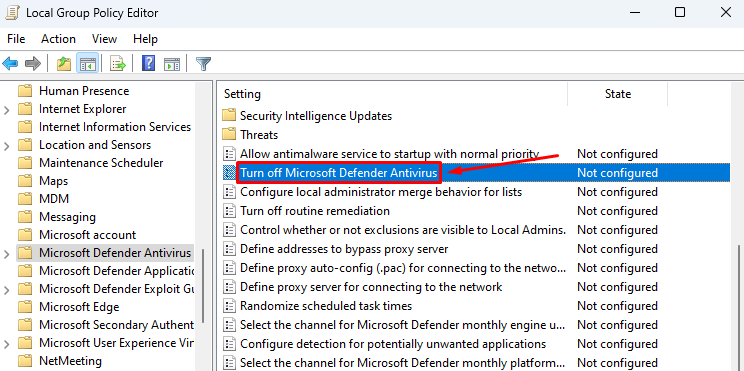
Step 5: Locate the Turn Off Microsoft Defender Antivirus option and double-click on it:
Step 6: Select the Enabled option and click the Apply button:
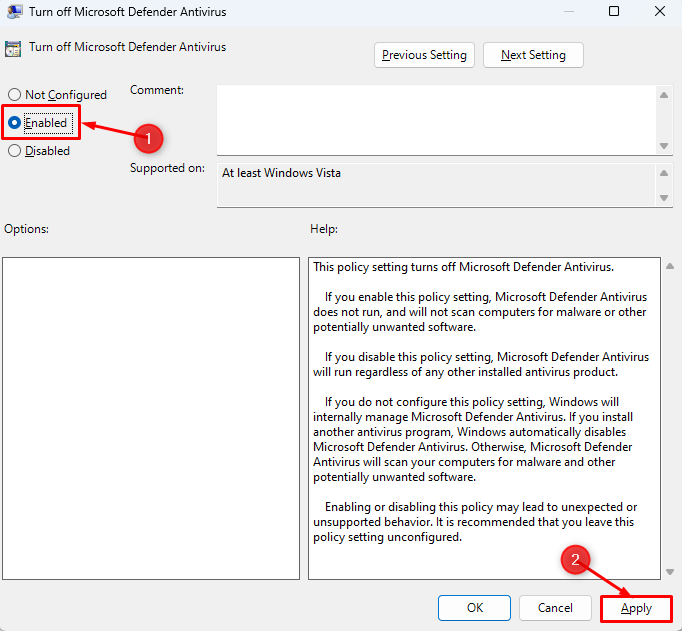
Step 7: Lastly, hit the OK button to disable Microsoft Defender and close the window.
Step 8: Restart Windows to apply changes.
Method 2: Use the Registry Editor to Disable Microsoft Defender
For those Windows users who do not have the Group Policy Editor such as Home Edition users, they can avail of Registry Editor to disable the Microsoft Defender. The Registry Editor is a Windows tool that allows authorized users to make and view changes to the Windows settings. Always create a registry backup before making any changes to Microsoft Defender.
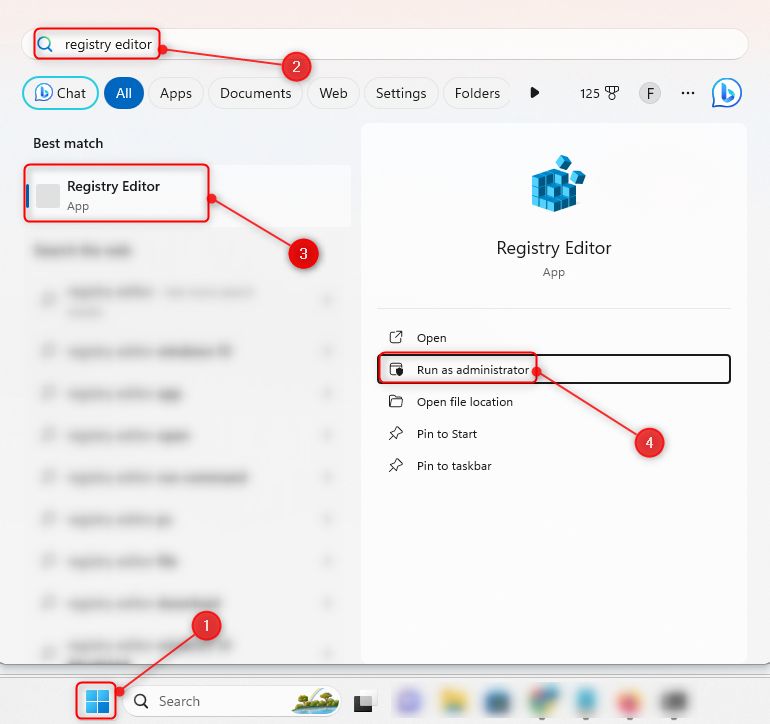
Step 1: Open the Registry Editor application as an administrator:
Step 2: Type the given value in the address bar and press Enter:
Step 3: Open context-menu and select New > DWORD (32-bit) Value:
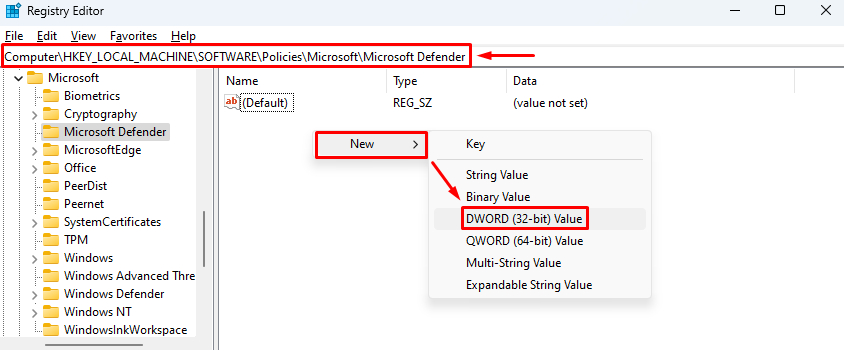
Step 4: Rename the newly created value to DisableAntiSpyware:
Step 5: Set its Value data to 1:
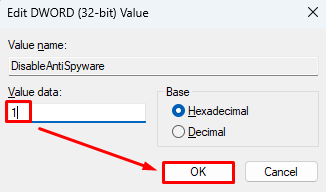
Step 6: Restart Windows to apply changes.
Method 3: Use the Command Prompt to Disable Microsoft Defender
Command Prompt can also disable the Microsoft Defender on Windows. Here is the stepwise guide to disable the Windows Defender.
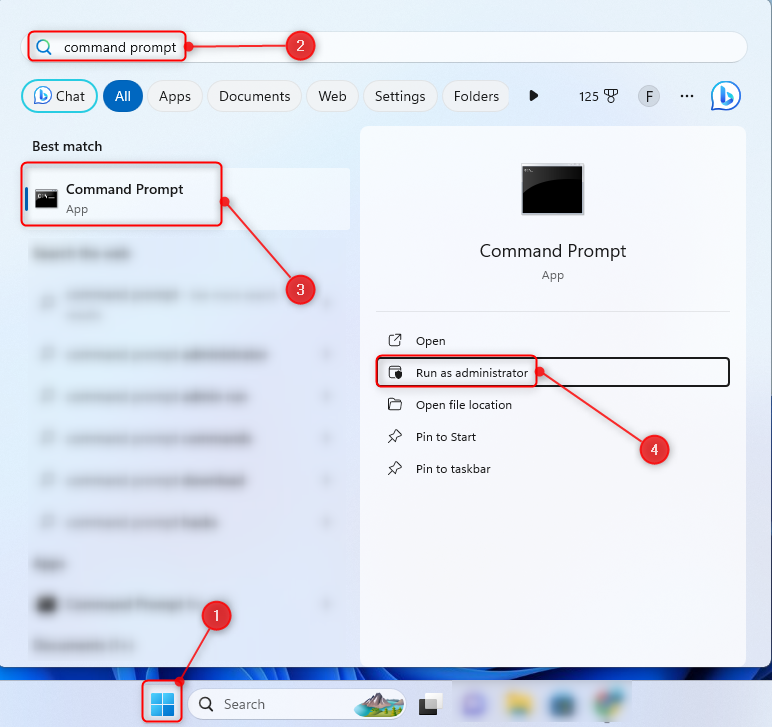
Step 1: Open CMD as an administrator:
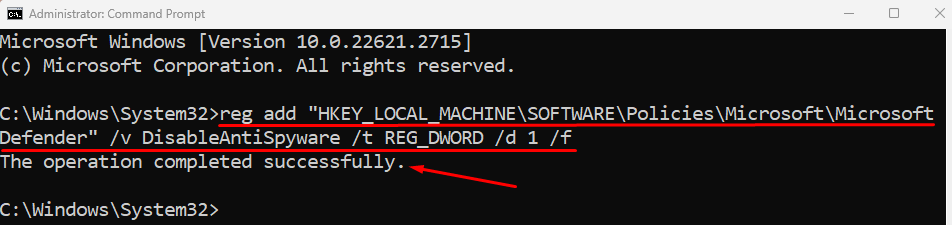
Step 2: Type the given code into the CMD console and press Enter:
Step 3: Close CMD.
Step 4: Restart Windows to apply changes.
Method 4: Use the Winaero Tweaker to Disable Microsoft Defender
If you are a user who finds it tough to deal with Registry settings then the Winaero Tweaker tool is for you. It especially lets you configure hidden Windows settings that Microsoft does not want you to edit. Users can easily disable the Microsoft Defender using the Winaero Tweaker application. To download the Winaero Tweaker application, navigate to this link.
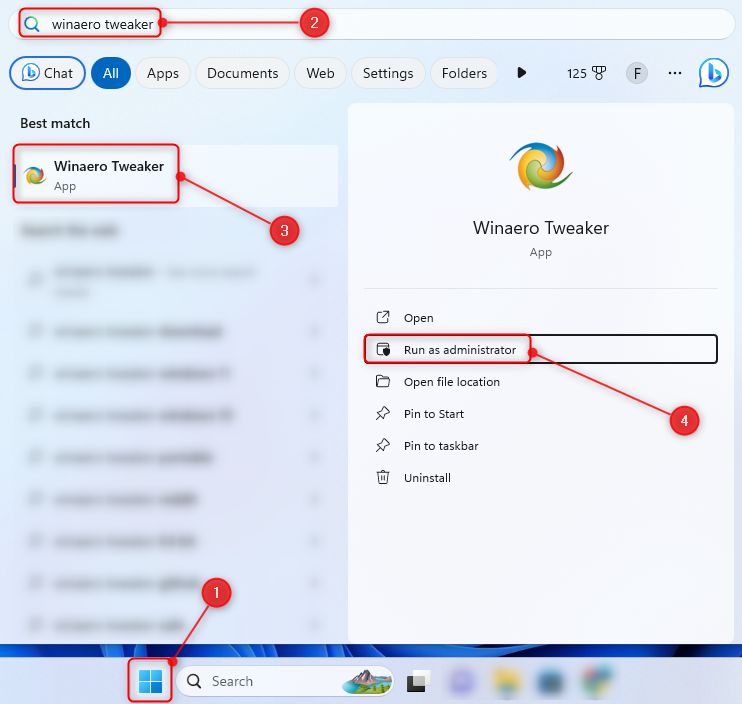
Step 1: Open Winaero Tweaker as an administrator:
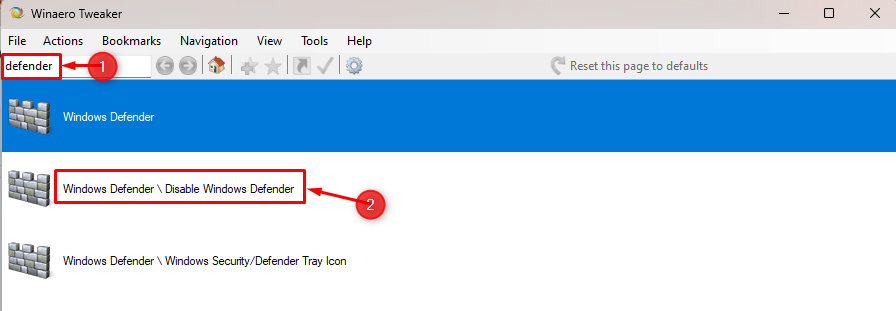
Step 2: Type Defender in the search area and press Enter.
Step 3: Double-click on Disable Windows Defender from the search results:
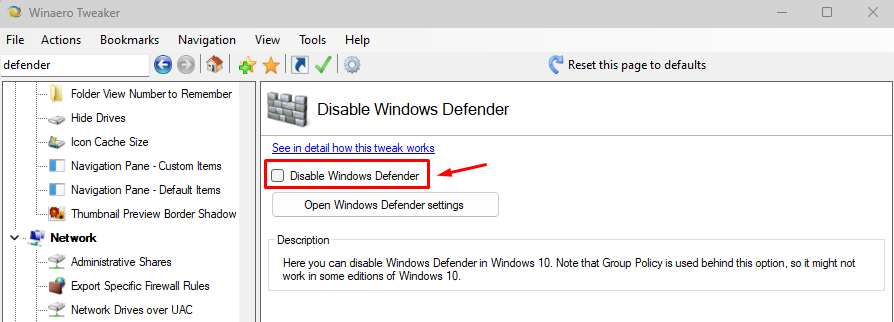
Step 4: Check-mark the Disable Windows Defender box:
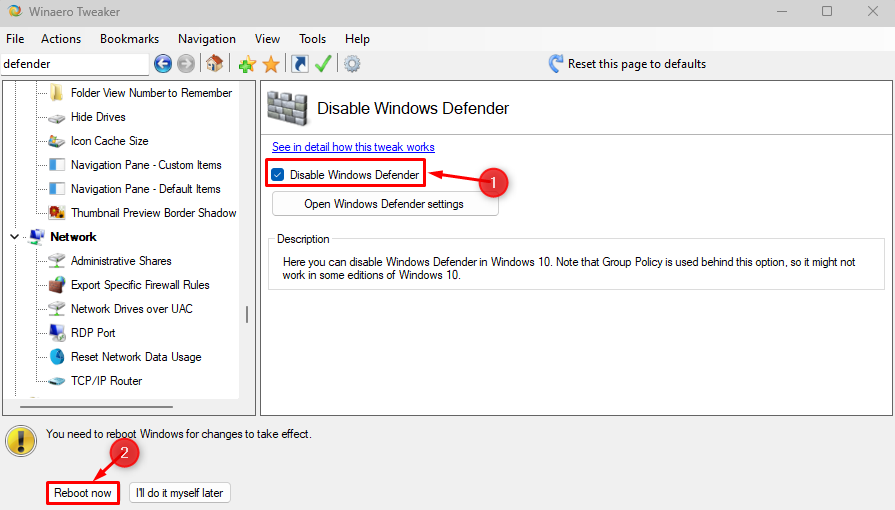
Step 5: Click the Reboot Now button to restart Windows to apply changes:
Method 5: Use Ultimate Windows Tweaker to Disable Microsoft Defender (Third party application)
Microsoft Defender can also be disabled using the Ultimate Windows Tweaker application. It is a third-party application that is used to tweak or configure important Windows settings. The Ultimate Windows Tweaker application can be downloaded by navigating to this link.
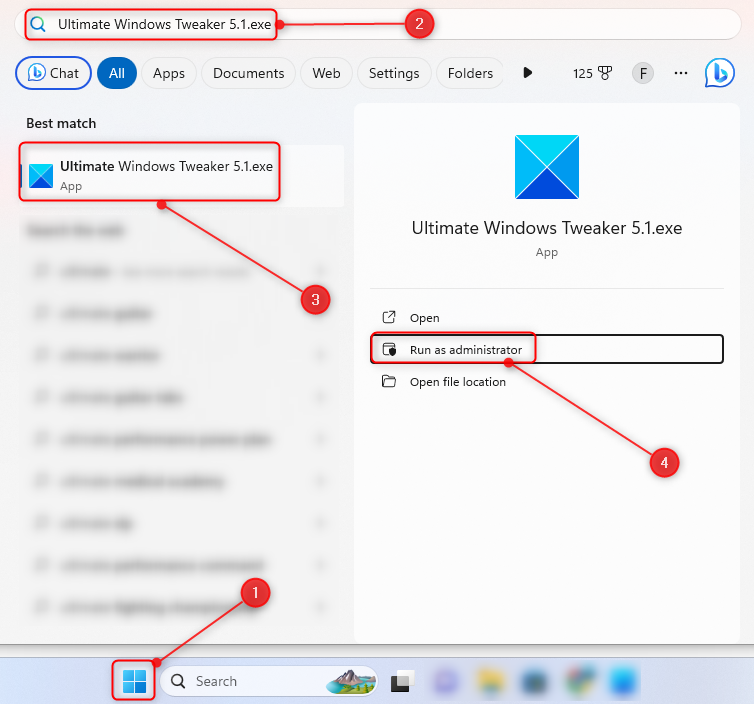
Step 1: Launch the Ultimate Windows Tweaker app as an administrator:
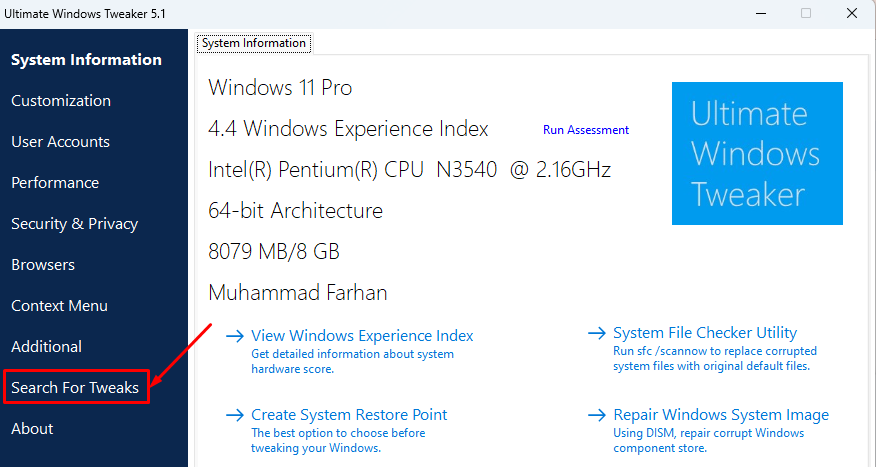
Step 2: Select the Search for Tweaks option:
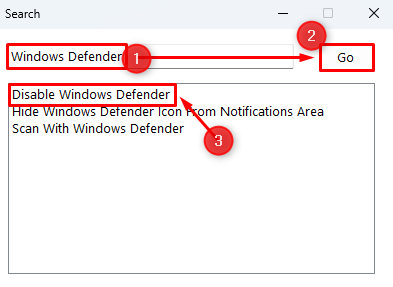
Step 3: Type Windows Defender and press Enter:
Step 4: Select Disable Windows Defender from the search results:
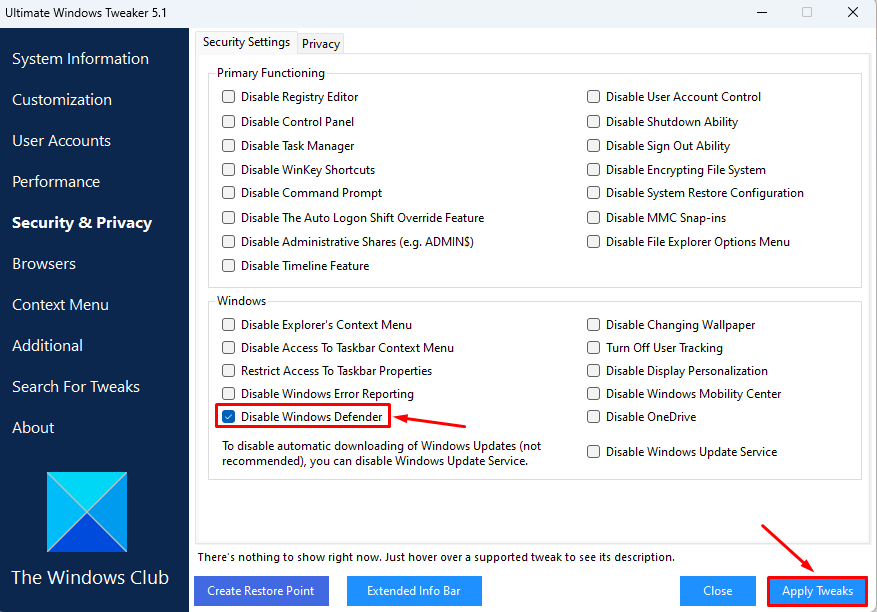
Step 5: Mark-check the Disable Windows Defender box under the Windows section:
Step 6: Lastly, click the Apply Tweaks button.
Step 7: Restart Windows to apply changes.
Method 6: Use Autoruns to Disable Microsoft Defender (Third-party application)
Another third-party application that can be used to disable Microsoft Defender is the Autoruns application. The Autoruns is a Microsoft Windows tool that checks whether the software was configured when the system boots up or not. Furthermore, it also identifies the user logins. To download the Autoruns application visit this link. Check the mentioned steps to disable the Microsoft Defender using the Autoruns application.
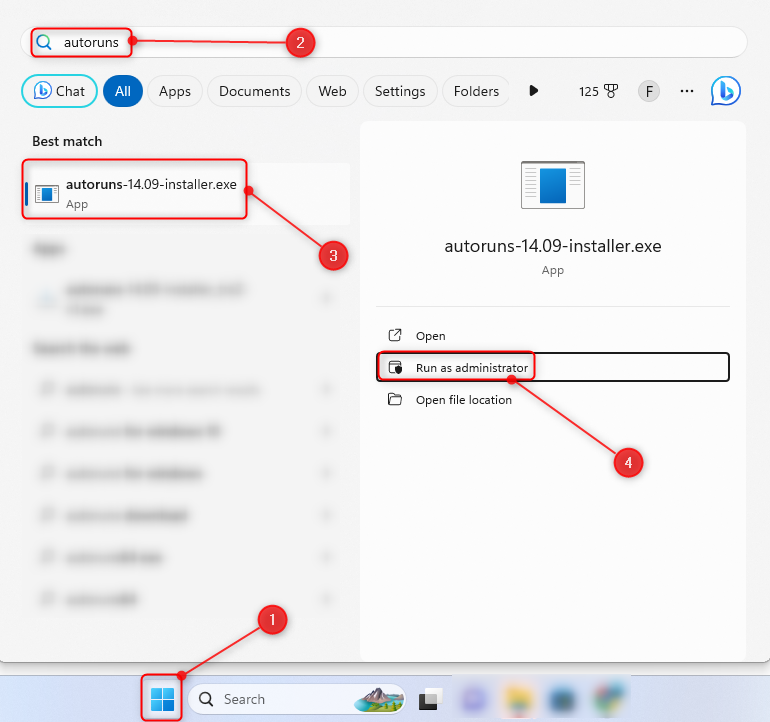
Step 1: Launch the Autoruns application as an administrator:
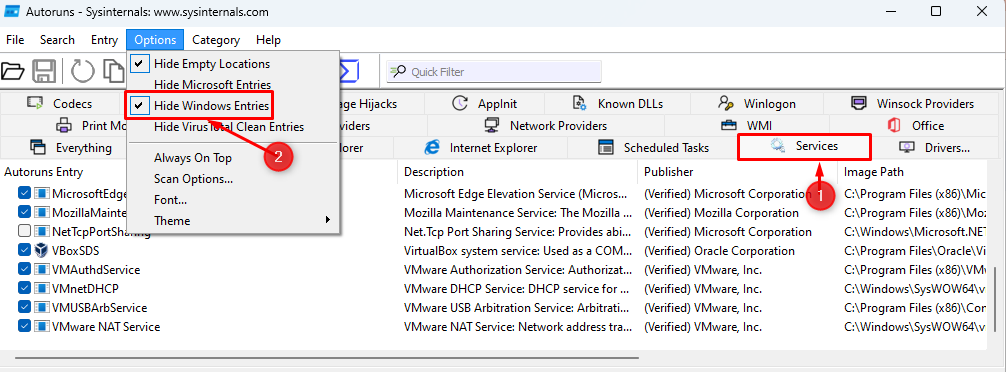
Step 2: Move to the Services tab.
Step 3: Select Options > Hide Windows Entries from the menu bar:
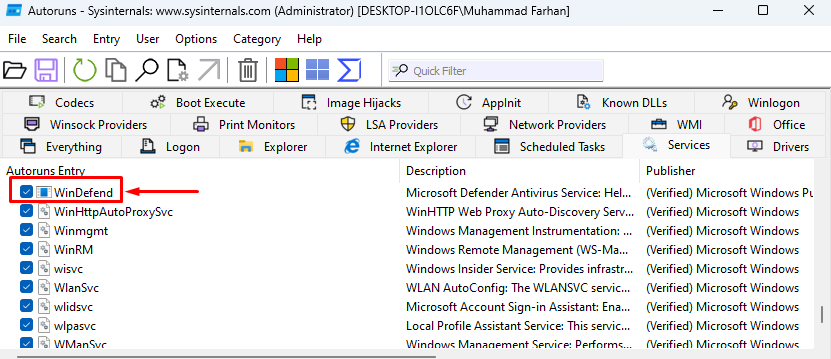
Step 4: Locate the WinDefend service and uncheck it:
Step 5: Restart Windows to apply changes.
Permanently Disable Microsoft Defender on Windows (Hard-Way)
Until 2016, users had the ability to disable the Microsoft Defender from Local Group Policy Editor and Registry Editor. However, after the release of the Windows 10 1903 version, it became impossible to disable the Microsoft Defender completely because the settings are protected by the Tamper Protection shield.
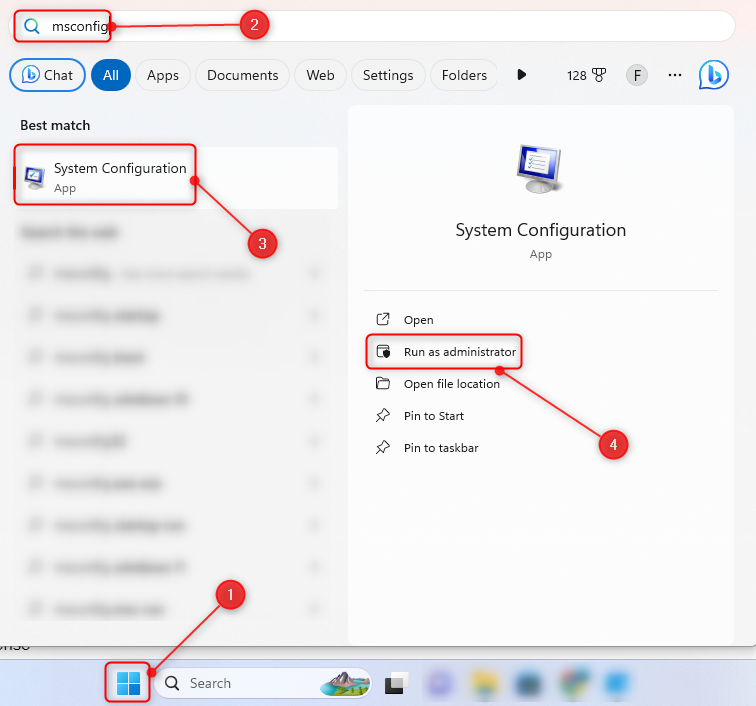
Step 1: Open the msconfig (System Configuration) app from the Start menu:
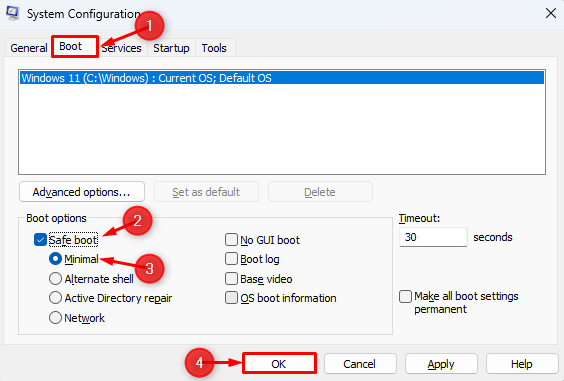
Step 2: Navigate to the Boot tab.
Step 3: Select Boot > Minimal under the Boot options section.
Step 4: Click the OK button to restart Windows in Safe mode:
Step 5: After restart, launch the regedit.exe (Registry Editor) app as an administrator.
Step 6: Navigate to the given path:
Step 7: Disable the startup of the following services one by one:
- Sense
- WdBoot
- WdFilter
- WdNisDrv
- WdNisSvc
- WinDefend
To disable them, open each service, locate the Start value, and set its Value data to 4. For instance, let’s first disable the Sense service. To do so, open the Sense service folder, locate Start, double-click on it, and set Value data to 4:

Step 8: Open the msconfig (System Configuration) app and disable the Safe Mode.
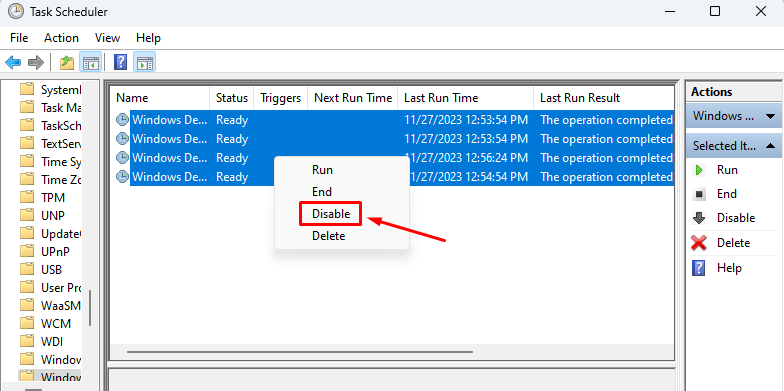
Step 9: Open taskschd.msc (Task Scheduler) app and navigate to Microsoft > Windows > Windows Defender.
Step 10: Select all the listed tasks, right-click, and select Disable:
How to Re-enable the Microsoft Defender in Windows 11?
In order to re-enable the Microsoft Defender check the provided steps below.
Step 1: Open Registry Editor (regedit.exe) from the Start menu.
Step 2: Navigate to the given path:
Step 3: Set the given registry values to the specified values.
- Sense to 3
- WdBoot to 0
- WdFilter to 0
- WdNisDrv to 3
- WdNisSvc to 3
- WinDefend to 2
For instance, let’s change the value of Sense to 3. To do so, first, open the Sense Service window. Double-click on the Start, set Value data to 3 and press Enter to save settings. Do the same for other services by entering their respective values.
Conclusion
It is never recommended to disable Microsoft Defender permanently on Windows. As you will be vulnerable to different potential threats that can steal your important information. Disabling Microsoft Defender is not a piece of cake, as, whenever a user disables it, it gets enabled after every restart. So, first, disable the Tamper Protection from the Windows Security settings, and then disable Microsoft Defender through Group Policy Editor, or Registry Editor. Additionally, it can also be disabled using third-party applications including Winaero Tweaker, Ultimate Windows Tweaker, or Autoruns application.