The OAuth2 is a protocol used in the Python language to provide the functionality of client-server communication. It is used to exchange some data between client and server through authorization. The user would first authorize itself from the server and get the token from it. The server will then provide the user data to it. So, in this guide, we will provide you with a brief explanation of Python OAuth2 in the Ubuntu 20.04 system.
The “pip” package is a prerequisite to the python package. Without it, python won’t be installed on your Linux system. Before installing python version 3 on your system, make sure you have the “pip” package configured already. If not, use the below command on your shell to do so.

Version 3 is the latest; that’s why it is recommended. Now, to install python’s latest version, try out the command shown in the image beneath. Tap on the “Enter” key after writing the command line. It may ask you to enter the root account password. Write your root password and hit “Enter”. It will start installing python3 and get it completed within a few seconds.

Now, we require some code editor as well. So, we have been using the “nano” editor. If you don’t have one, try to get it with the below-stated command. You can also use the “vim” editor.

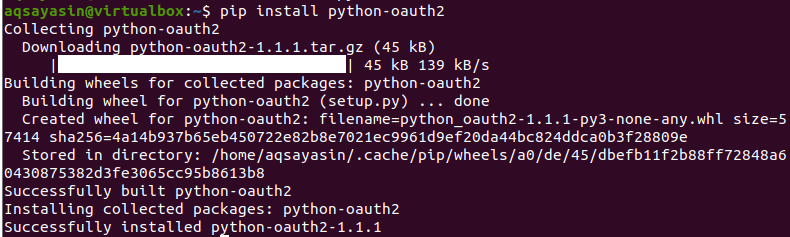
After we have done with the prerequisites, you must have installed the python “oauth2” package in your system as well. Without the package installation for authorization API, we cannot make our code work. So install the oauth2 python API with the help of a “pip” repository. The instruction for its installation is shown below. It will firstly download the oauth2 zip file and then extract it to install it. Within 1-2 minutes, it will be installed completely and ready to be used.
Example 0Auth2:
Create a new file named “OAuth2.py” having a python extension in it. You have to use the “touch” query in the shell as follows:
After the creation of a python file, let’s open it with some installed editor. We have been utilizing the GNU Nano editor here. You can also use other ones. The command is as follows:
$ python3 OAuth2.py
As the file is opened successfully, you have to write the code shown below in it as it is. Firstly, you need to import the requests package, which is basically from the OAuth2 API. Some variables have been defined as string types. These variables are the credentials of the client to be authorized.
The first one is “CLIENT_ID” which would be given to your client-server on the web application you have created. The “CLIENT_SECRET” is the secret key that has been provided at your application portal. Then a variable “REDIRECT_URL” comes. It is used to redirect you towards the webpage or URL when you have been authorized successfully. Here the Gmail URL is provided as a redirect URL. The “AUTHORIZE_URL” is the URL from which the client will get itself authorized. The variable “ACCESS_TOKEN_URL” contains the URL of exchanging the access token with the authorization code for the client. The next line uses the module “requests” to get or ask for the authorization code via the method “get”.
The method takes three arguments here. After the successful login, the user will consent to your verification demand. The authorized server will redirect you to the web URL that you have provided in the variable “REDIRECT_URL”. It will provide you with the authentication code within the URL of the redirect page URL.
CLIENT_ID = "894230029083500605"
CLIENT_SECRET = "ZBez83WZl_evoat81VKWex-Epdpioma"
REDIRECT_URL = "https://gmail.com"
AUTHORIZE_URL = "https://discord.com/api/oauth2/authorize" ACCESS_TOKEN_URL = "https://discord.com/api/oauth2/token" requests.get('{}?response_type=code&client_id={}&redirect_url={}'.format(AUTHORIZE_URL, CLIENT_ID, REDIRECT_URL))
requests.post(
ACCESS_TOKEN_URL,
data={
'grant_type': 'authorization_code',
'code': '1234567890',
'client_id': CLIENT_ID,
'client_secret': CLIENT_SECRET, 'redirect_url': REDIRECT_URL
})
requests.get('https://gmail.com',
headers={'Authorization': 'Bearer YOUR_ACCESS_TOKEN'})
requests.post(
ACCESS_TOKEN_URL,
data={
'grant_type': 'refresh_token',
'client_id': CLIENT_ID,
'client_secret': CLIENT_SECRET,
'refresh_token': 'YOUR_REFRESH_TOKEN'})
You can copy that code from the URL. We have been utilizing the function of “post” by the requests package. In this function, we have provided the variable “ACCESS_TOKEN_URL” in the first parameter, while the other parameter “data” contains the dictionary type key-value pairs. Within this dictionary, we have specified the grant type of client, i.e., authorization_code.
The key “code” has been used here to get the authorization code, which you have got from the URL. Paste the access_code as a value to the key “code”. Then we have given the key-value pairs of client ID, client secret, and its redirect URL. The function is closed here. So, you are all set now. We have been using another function to use the authorization details that we got. You have to provide the home screen of your client, i.e., discord. If you have given the correct access_code in the above function, it will return you the information regarding the user. The last function, “post” has been utilized here to refresh your token until the specified time.
So, if you got the authorization page late, you can simply refresh it or do the same process once again. You will be provided with a code. You have to mention the type of code grant you have been using, i.e., refresh_token. The variables, client ID, client secret, and refresh_token will be provided in its dictionary. When you run the code file, it will be successful.
$ python3 OAuth2.py
Let’s have a GUI look at OAuth2 on the Discord.com client-server. You have to first log in from it and make a new server on it with any name. After that, open its developer’s page and go to the “Applications” option. Create a new Application with any name, i.e., you can use your username as well. Tap on the “Bot” area and tap on the “Build-A-Bot” button. A dialogue would appear on your screen. You have to just name your bot and create it. You can see we have created a bot “aqsayasin” here. You can see the Bot “Token” as well.

Navigate towards the “OAuth2” option. You will see the below output. You have your client ID, Client Secret, here. You have to use these two in your code. You can see the section of Redirects. You can add any redirect URL here of your choice. Paste the same in your code.

Now tap on the blue highlighted text “Learn more about OAuth2” to explore from the above image. Or simply tap on the Documentation option from the sidebar. You will be navigated towards another page, i.e., Documentation. You will see the URLs listed there. Use them in your code where required.

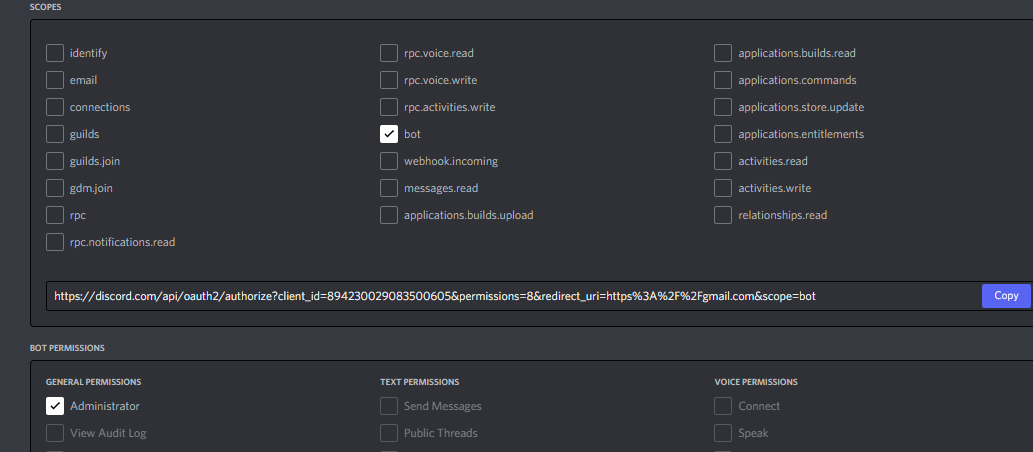
Go back to the Application section and scroll down a little. You will see the section of scopes and Bot permissions here. Select any scope you want to define by check-marking it and make sure to give Administrator rights to the bot. Copy the URL shown in the text box between scopes and bot permission and paste it to the browser.
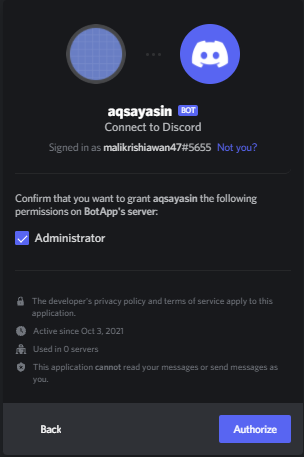
You have to tap on the Authorize button to get authorized successfully. It will show you the code upon redirect your redirect URL. Use that code in your script.
Conclusion:
This article contains a brief description and illustration of Python OAuth2 API for client-server communication. It explains the concept with the python code authorization process and the GUI interface illustration as well. We hope this article will be helpful for our users while making the cline-server communication and exchanging some data.