“No Internet, secured” error message indicates that the computer is connected to the Wi-Fi router, but there is no data transmission between them. It is because the Wi-Fi adapter is not connected with internet. This error occurs either because of the wrongly configured network settings or a problem with your network adapter. However, it can be fixed by resetting the internet configurations or restarting the Wi-Fi- router.
This tutorial will cover several methods to fix the mentioned problem.
How to Solve/Fix the “No Internet, Secured” Wi-Fi Issue?
The described problem can be fixed by applying these approaches:
- Restart Windows 10.
- Restart the router.
- Run the network troubleshooter.
- Disable IPv6.
- Perform a network reset.
- Reset Windos to resolve various Windows errors.
- Disable VPN.
- Reinstall network driver.
- Forget network.
- Change DNS server.
Fix 1: Restart Windows 10
Restarting Windows 10 helps to resolve various Windows errors. Doing so will start all the processes stuck in the first place. Similarly, it will help to resolve the “No Internet, secured” Wi-Fi issue.
In order to restart the PC, follow these instructions:
- Initially, press the “Alt+F4” shortcut keys to open the Shut Down window.
- After that, choose “Restart” and hit the “OK” button:
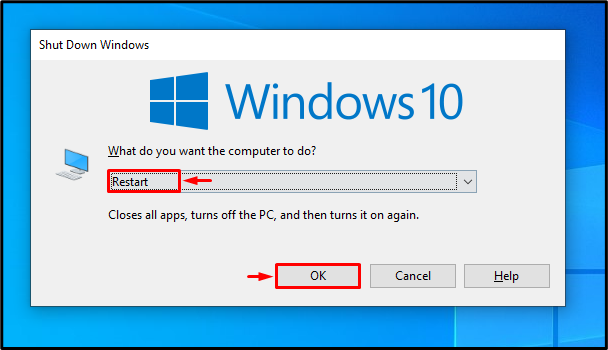
This will restart Windows 10 to resolve the “No Internet, secured” problem.
Fix 2: Restart the Router
When you restart your router, it will help refresh the internet connection. For that reason, navigate through the given steps:
- First, disconnect the router’s power cable.
- Reconnect the router’s power cable after a few seconds.
- After a few minutes of its start, it will resolve the problem.
Fix 3: Run the Network Troubleshooter
Performing the network troubleshooting will identify the problems that are causing the “No Internet, secured” error, and fix them automatically.
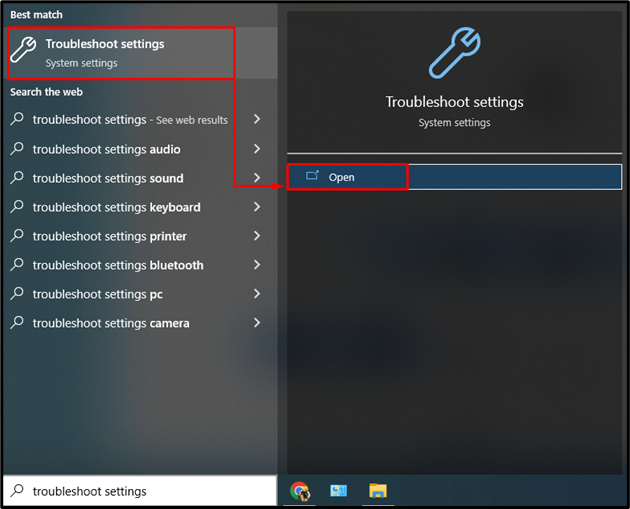
Step 1: Open the Troubleshoot Settings
First, launch the “Troubleshoot settings” from the Windows Start menu:
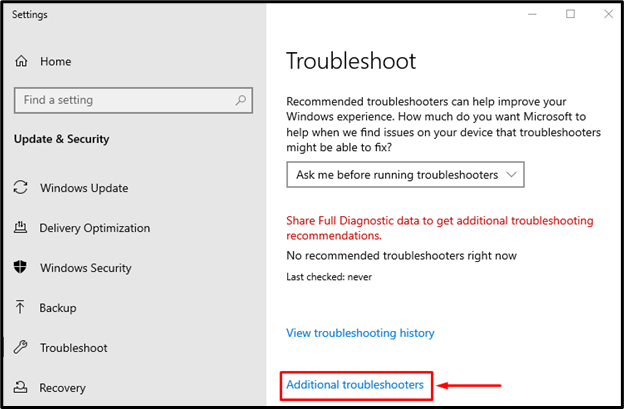
Step 2: Open the Additional Troubleshooters List
Trigger the highlighted option:
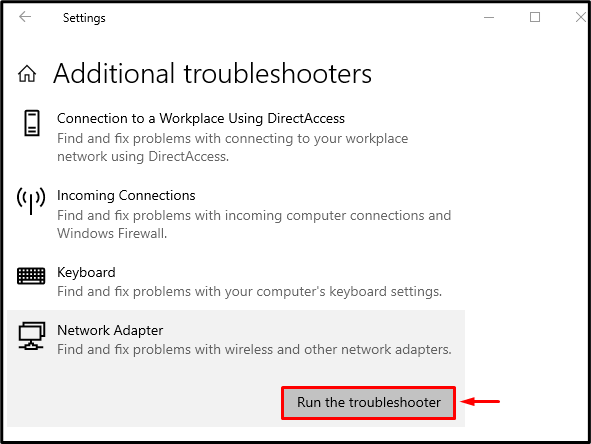
Step 3: Execute the Troubleshooter
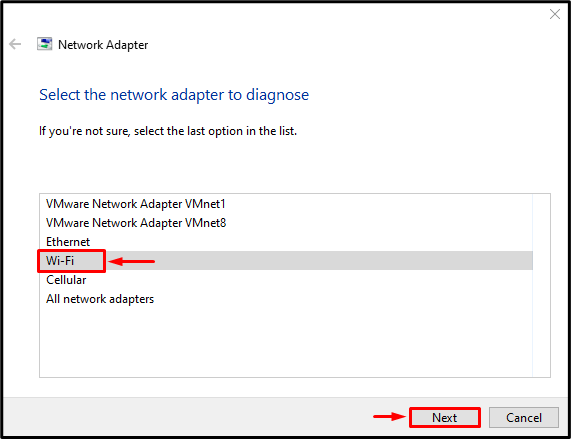
Locate the “Network Adapter” section and click on the “Run the troubleshooter”:
Select “Wi-Fi” from the list and click on the “Next” button to proceed:
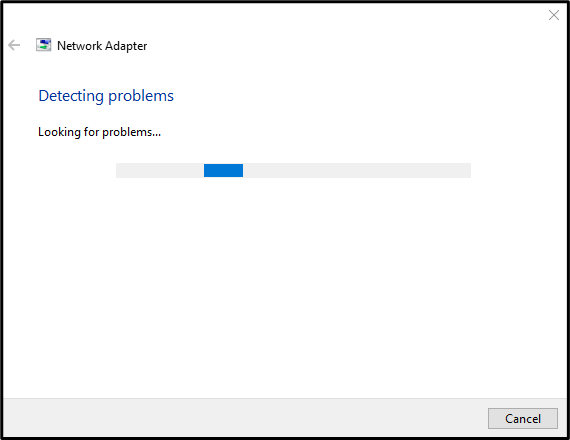
The network troubleshooting windows has just begun to troubleshoot the errors:
Whenever the troubleshooter finishes the network troubleshooting, reboot the system.
Fix 4: Disable IPv6
Try disabling the IPv6 as it may help to resolve the error “No Internet secured”.
Step 1: Open the Network Settings
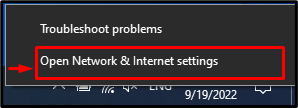
First, right-click on the “Network icon” and trigger the highlighted option:
Step 2: Launch the Network Connections Settings
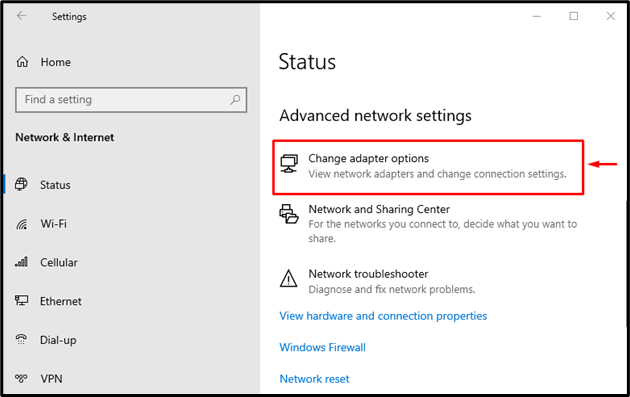
Trigger the “Change adapter options” in the below window:
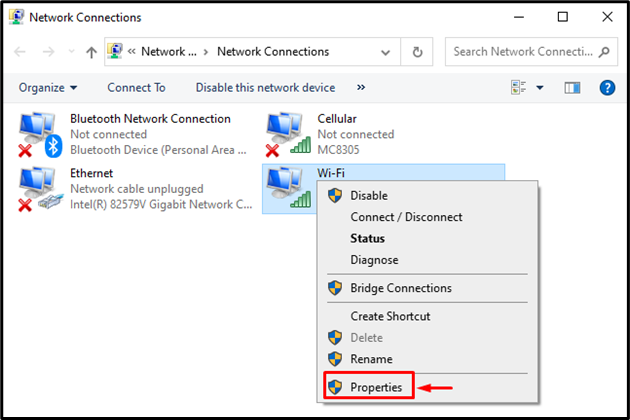
Step 3: Launch the Wi-Fi Properties
Right-click on the “Wi-Fi” and trigger the “Properties” option:
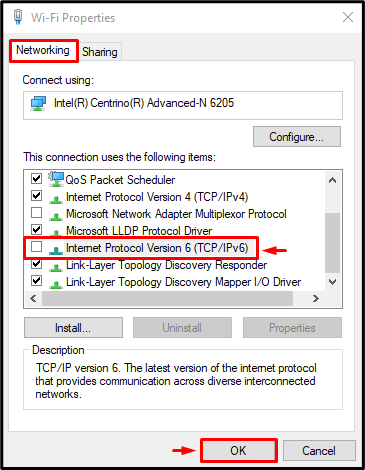
Step 4: Disable IPv6
- First, navigate to the “Networking” tab.
- Unmark the “Internet Protocol Version 6” checkbox option.
- Finally, click the “OK” button to disable IPv6:
The IPv6 has been disabled successfully.
Fix 5: Perform a Network Reset
Performing a network reset will set network settings to default and it will surely resolve the discussed Wi-Fi issue.
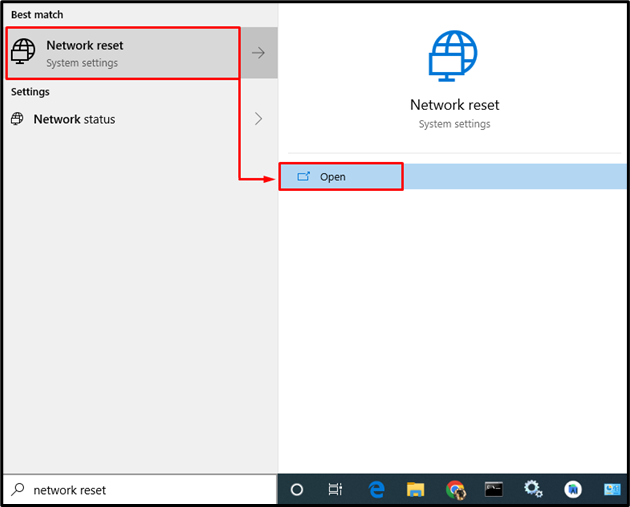
Step 1: Launch Network Settings
First, navigate to the Start menu and open “Network reset” from it:
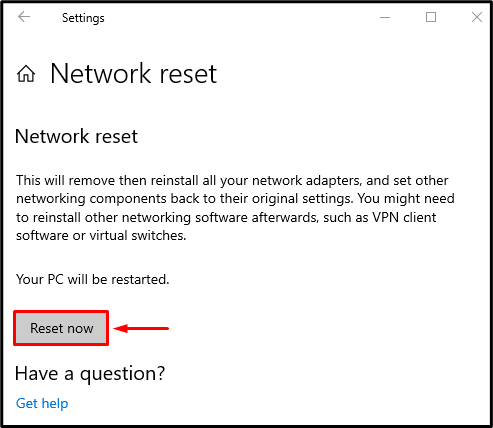
Step 2: Perform Network Reset
Hit the “Reset now” button:
Reboot the system, after resetting the network.
Fix 6: Flush DNS
Flushing the DNS will remove all the data stored in the cache memory. Moreover, resetting the IP address configuration will clear the old configurations saved and it will release the settings for the IP address.
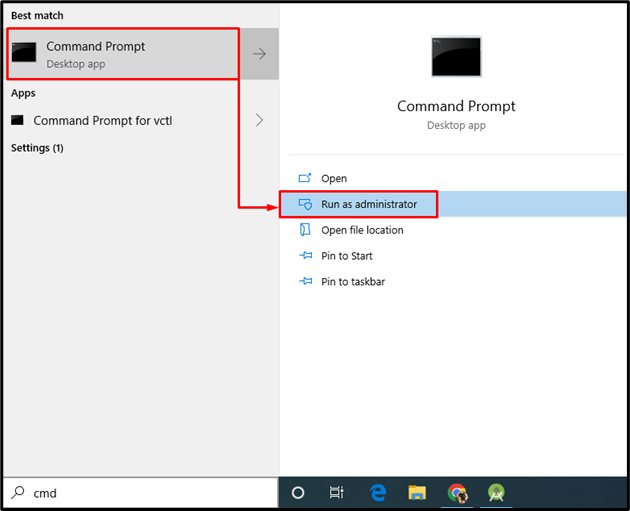
Step 1: Launch CMD
First, search and open “Command Prompt” from the Windows Start menu as an administrator:
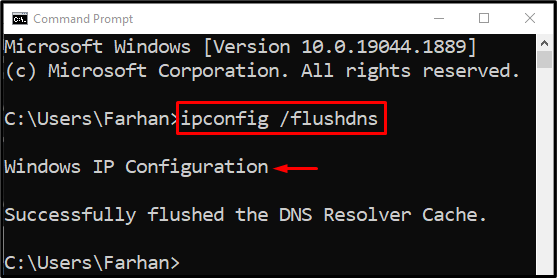
Step 2: Flush DNS
Write and execute the following “ipconfig” command in the console:
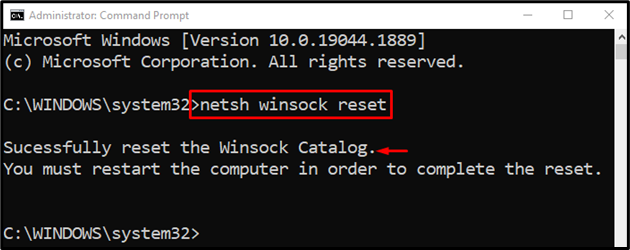
Step 3: Reset Winsock Catalog
Write out the provided command in CMD to reset Winsock catalog:
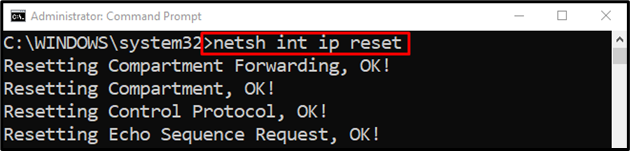
Step 4: Reset IP Address
Now, execute the below command in the console to reset the IP address:

The IP address is cleared.
Step 5: Release IP Configuration
Now, run the command in the CMD console to release the new IP configuration:


After performing all the steps, reboot the system to check whether the problem has been resolved or not.
Fix 7: Disable VPN
If there is a VPN installed on Windows and it is connected, then there are chances that the VPN is causing the problem of “No Internet, secured”. Because in most VPN programs, there is a built-in function of whenever the VPN server goes down, disconnects the user from the internet. As a result, it will display the “No Internet, secured” message. Disabling the VPN will resolve the problem.
Fix 8: Reinstall Network Driver
Sometimes the installed driver is not compatible with the network adapter. So, it can cause the stated problem. Reinstalling the network adapter driver may resolve the issue.
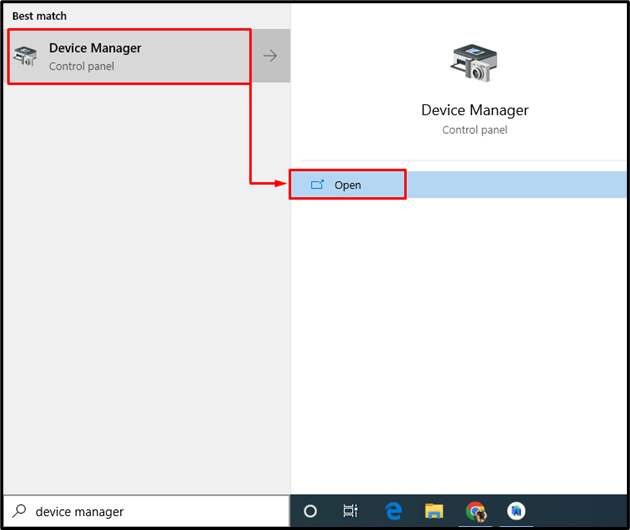
Step 1: Launch the Device Manager
First, search and launch the “Device Manager” from the Windows Start menu:
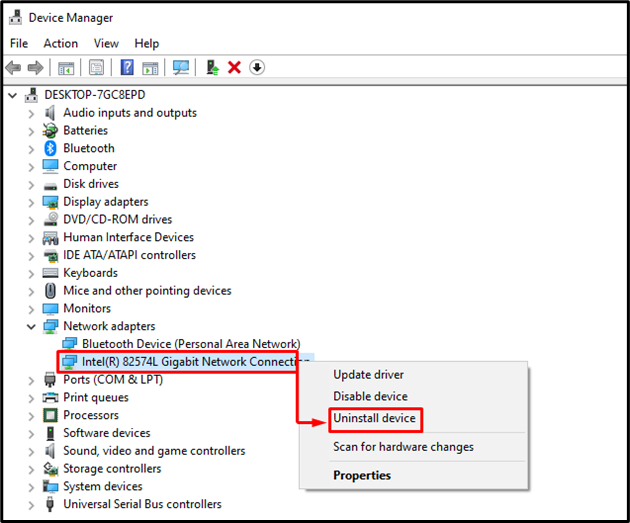
Step 2: Uninstall the Network Driver
First, extend the “Network adapters” section, locate the driver and hit “Uninstall device”:
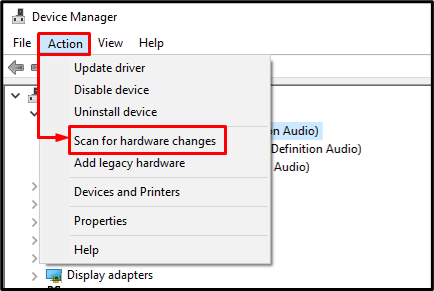
Step 3: Reinstall the Network Driver
Trigger the “Action” option and from the context-menu select the “Scan for hardware changes” option:
Fix 9: Forget Network
Using the “Forget” the network and reconnecting again method has helped in most cases to resolve the “No Internet, secured” Wi-Fi issue.
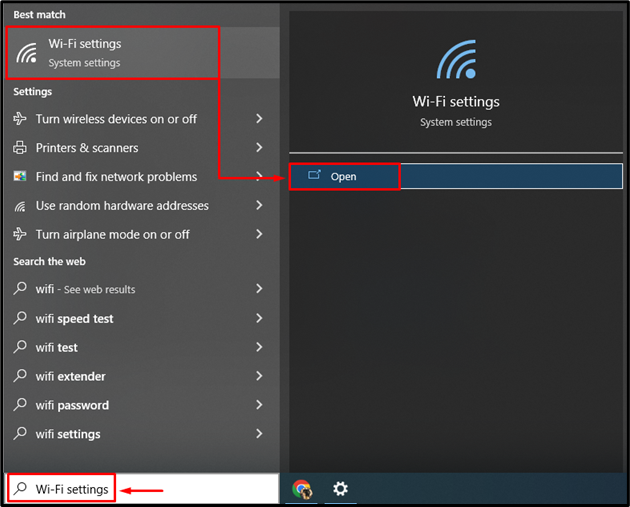
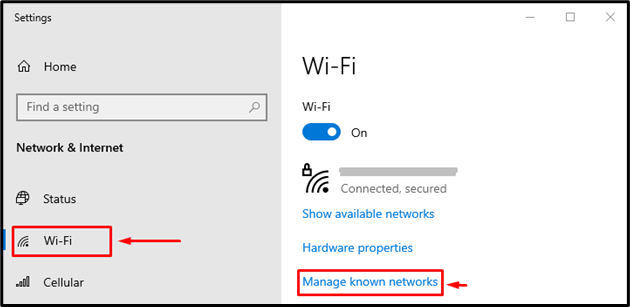
Step 1: Launch Wi-Fi Settings
First, launch the “Wi-Fi settings” from the Windows 10 Start menu:
Step 2: Open the List of Connected Networks
Click on the “Manage known networks” option:
Step 3: Forget the Network
- First, locate the connected network, and click on “Forget” under the connected Wi-Fi network.
- Reconnect to that network again:
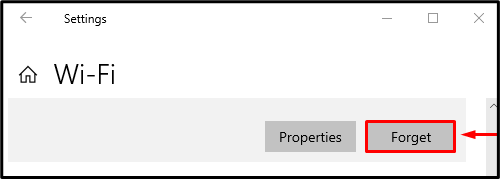
This will resolve your problem of the “No Internet, secured” Wi-Fi problem.
Fix 10: Change DNS Server
DNS is the short form of “Domain Name Server” and is the tool that helps you to connect and explore the website available on the internet using its domain name. Generally, the DNS server is set by your ISP (Internet Service Provider). But in case, your internet is not working and causing the “No Internet, secured” error to occur, then changing the DNS server will help.
For that reason, go through these steps:
- Initially, right-click on the “Network icon” and trigger the “Open Network & Internet settings”.
- After that, trigger the “Change adapter options”.
- Right-click on the Wi-Fi and trigger the “Properties”.
- Move to the “Networking” section and open the properties of “Internet Protocol Version 4(TCP/IPv4)”.
- Navigate to the “General” tab and mark the “Use the following DNS server addresses” radio button.
- It is up to you what DNS address you would like to use, but we are using 8.8.8.8 and 8.8.4.4.
- Type 8.8.8 in the “Preferred DNS server” section and type 8.8.4.4 in the “Alternate DNS server” section.
- Press “OK” to save changes:
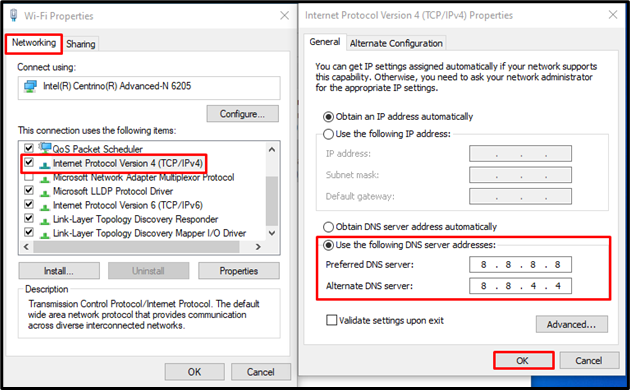
This will change the DNS server according to your choice. After saving settings, restart the system.
Conclusion
The “No Internet, secured” error can be repaired by using various methods, including restarting Windows, restarting the router, running the network troubleshooter, disabling the IPv6, performing the network reset, disabling the VPN, forgetting the network, reinstalling the network adapter driver or resetting the network configuration. This write-up has provided all the possible solutions to resolve the “No Internet, secured” Wi-Fi error.