Create a Python Project
Let’s say we want to create a Python project that performs the unit test for different options available. For this, we utilize the Python classes in our project.
Vehicle Class
For instance, the Python class called “Vehicle” represents a vehicle such as a car, truck, or motorcycle. The class has four attributes declared using five variables as follows:
- vehicle_make: It represents the brand of vehicle, i.e. Toyota or Ford.
- vehicle_model: It represents the model of the vehicle, i.e. Camry or F-150.
- vehicle_year: It represents the year when the vehicle was made.
- vehicle_color: It represents the color of the vehicle.
- speed: It represents the current speed of the vehicle in miles per hour.
To use the “Vehicle” class in your project, you first need to generate an object of the class. Once you formed an object of the class, you can call the functions of this class using that object. But, we create its instance in another class that will be utilized later. The “Vehicle” class contains a total of four methods as follows:
1: Start() Method
If a user wants to start the vehicle, they call the start() method. This method contains the print statement that displays the “engine started” message preceded by the year of the vehicle on which it has been made, its brand, and its model.
2: Stop() Method
Users who want to stop the vehicle call the stop() method. This function utilizes the if-else statement to check whether a vehicle is moving or has stopped. If the speed of a car is greater than 0, the variable speed is declared as 0 and the message that the car stopped is displayed. If the vehicle is already stopped, this method does nothing and displays that it has already stopped.
3: Accelerate() Method
To accelerate the vehicle, a user calls the accelerate() method with the desired speed increase in miles per hour by passing the speed value as an argument to this method. The new speed and vehicle information are displayed via the “print” method.
4: Brake() Method
The brake() method of the “Vehicle” class uses the “if-else” statement to check for the speed of a vehicle. The “speed_decrease” value is passed as an argument to compare it with the speed of a vehicle. If the value that is passed is less than a vehicle’s current speed, the current speed will be down by a value that is passed to it using the decrement operator. If the current speed is already “0”, it shows the message consequently.
def __init__(self, vehicle_make, vehicle_model, vehicle_year, vehicle_color):
self.vehicle_make = vehicle_make
self.vehicle_model = vehicle_model
self.vehicle_year = vehicle_year
self.vehicle_color = vehicle_color
self.speed = 0
def start(self):
print(f"{self.vehicle_year} {self.vehicle_make} {self.vehicle_model} engine started")
def stop(self):
if self.speed > 0:
self.speed = 0
print(f"{self.vehicle_year} {self.vehicle_make} {self.vehicle_model} stopped")
else:
print(f"{self.vehicle_year} {self.vehicle_make} {self.vehicle_model} is already stopped")
def accelerate(self, speed_increase):
self.speed += speed_increase
print(f"{self.vehicle_year} {self.vehicle_make} {self.vehicle_model} accelerated to {self.speed} mph")
def brake(self, speed_decrease):
if self.speed >= speed_decrease:
self.speed -= speed_decrease
else:
self.speed = 0
print(f"{self.vehicle_year} {self.vehicle_make} {self.vehicle_model} slowed down to {self.speed} mph")
TestVehicle Class
After creating a “Vehicle” class, we need to create another class named “TestVehicle” to create the test cases for the “Vehicle” class in the “test_vehicle.py” file.
The setUp() function is invoked before each test function is run. To utilize the class in this case, the setUp() method creates an entirely new instance of the “Vehicle” class. Each “test” method evaluates a particular feature of the “Vehicle” class’ performance.
For instance, the test_start() method checks to see if the vehicle’s speed is unaffected by the start() function. The test_accelerate() method determines if the accelerate() function raises the vehicle’s speed by the given amount. The brake() method’s ability to reduce the speed by the provided amount is tested using the test_brake() method. The stop() method’s ability to set the speed to zero is tested by the test_stop() method. The “unit test” class is executed if it happens to be processed directly and not loaded by a different module which is ensured by the if __name__ == ‘__main__’: block.
from vehicle import Vehicle
class TestVehicle(unittest.TestCase):
def setUp(self):
self.vehicle = Vehicle("Toyota", "Camry", 2022, "Blue")
def test_start(self):
self.vehicle.start()
self.assertEqual(self.vehicle.speed, 0)
def test_accelerate(self):
self.vehicle.start()
self.vehicle.accelerate(30)
self.assertEqual(self.vehicle.speed, 30)
def test_brake(self):
self.vehicle.start()
self.vehicle.accelerate(40)
self.vehicle.brake(20)
self.assertEqual(self.vehicle.speed, 20)
def test_stop(self):
self.vehicle.start()
self.vehicle.accelerate(50)
self.vehicle.stop()
self.assertEqual(self.vehicle.speed, 0)
if __name__ == '__main__':
unittest.main
Create a Makefile
To organize the routine development chores, build a Makefile in the same folder as your Python code. We have now produced a straightforward Makefile for this project. The first line of code informs the Makefile that the test and clean targets are phony and don’t generate any output files.
The next line defines the route to the Python interpreter by defining the PYTHON variable. The route to the “source” folder is set for the SRC_DIR variable, and the path to the “test” folder is specified for the TEST_DIR variable. The “ifeq” section of the snippet is a conditional statement that checks the operating system. If the operating system is Windows, the RM variable is defined to be the “del” command. Otherwise, the RM variable is “rm”. These commands delete the __pycache__ directory and all of the “.pyc” files in the current directory.
The “test” target runs the unittest discovery tool to discover and run all unit tests in the “test” directory. The unittest discovery tool finds all of the files in the “tests” directory that end in “.py” and run them as unit tests which, in our case, is the “test_vehicle.py” file. The next target in the Makefile is the “clean” target that is responsible for removing the __pycache__ directory and all of the “.pyc” files in the current directory. The “.pyc” files are assembled Python bytecode files and are not needed to run the Python code.
PYTHON = python3
SRC_DIR = D:Work\MakePython
TEST_DIR = D:Work\MakePython\tests
# Check the operating system
ifeq ($(OS),Windows_NT)
RM = del /s /q __pycache__ *.pyc
else
RM = rm -rf __pycache__ *.pyc
endif
test:
$(PYTHON) -m unittest discover -s $(TEST_DIR)
clean:
$(RM)
Execute the Makefile
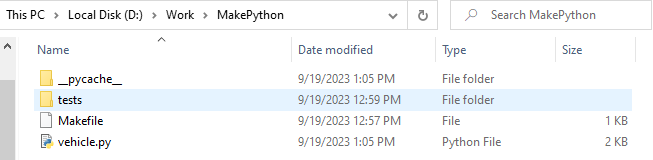
The “tests” folder should be in the same working space where the “vehicle.py” and Makefile are located. Navigate to your project directory and run the “make” command to build the “test” target that is responsible for performing the unit tests.
make test
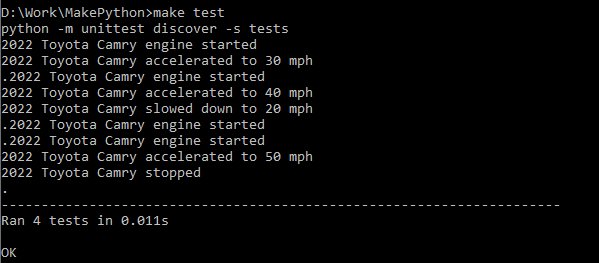
After unit testing, the working directory has the __pycache__ folder.
To remove the temporary files and caches, use the following instructions:
Make clean

Conclusion
This guide demonstrates the use of Makefiles to build a large Python project. We created a Python project that performs the unit testing on Python code to do so. Makefile is utilized to make the project at the end.