
Wireshark is a packet analyzer that allows configuring the network device in promiscuous mode to see all traffic in the network or between a specific source and destination. Wireshark can be used for troubleshooting, detecting anomalies in traffic packets, hacking purposes and protocol development. It is available for Linux, Unix, Mac and Windows.
Additionally to the installation process, this document also explains how to get started with Wireshark to capture relevant traffic like passwords.
All steps shown in this tutorial include screenshots, making it easy for all Debian/Ubuntu users to follow them.”
Installing Wireshark on Debian 11
Installing Wireshark in Debian and its Linux distributions is pretty easy with the apt packages manager.
Before installing it, update the packages repository by running the following command.

After updating repositories, install Wireshark by executing the command below.

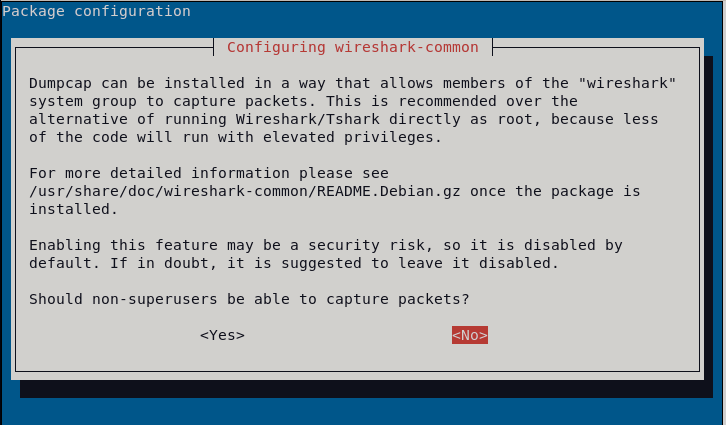
During the installation process, you will be asked if Wireshark can be executed as an unprivileged user or only as a root. If you are the only one using your computer, you can press Yes; otherwise, it is recommended to press No.
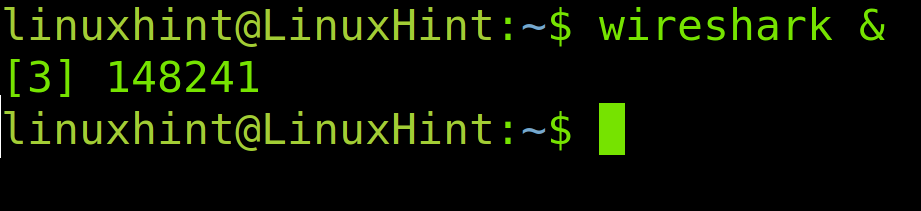
If you selected the option No, then you need to execute Wireshark with privileges as shown below. If you selected Yes, then you can open Wireshark from the graphical environment as shown in the next screenshot.

If unprivileged user access was allowed, then you also can open Wireshark from the graphical environment under the Internet.

Unprivileged users with access also can run Wireshark from the command line.
The Wireshark User Interface
In the Wireshark initial screen, you need to select the network interface whose traffic you want to analyze. You also can select Any to listen through all network devices. In my case, I will choose my wireless network interface, wlp3s0.
Once you select your network device, double click it or press the fin icon located in the left upper corner below File.
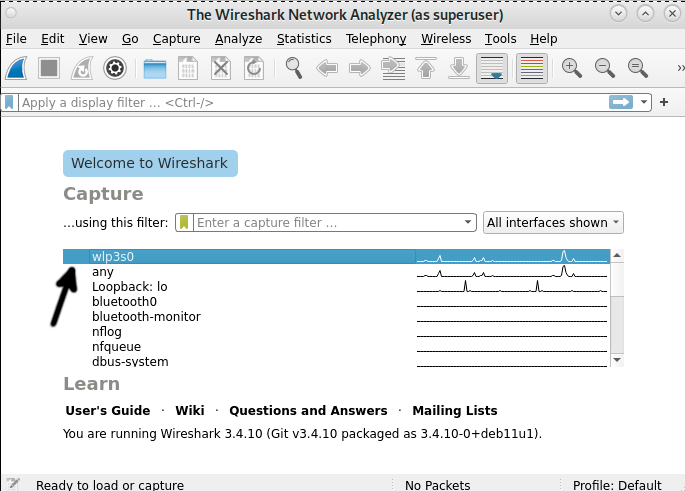
After pressing the network device or the fin icon, Wireshark will start listening to the traffic.
The Wireshark user interface can be divided into 6 sections: Menu, Toolbar, Filter Toolbar, Packet List, Packet Details and Packet Bytes.
The arrows in the screenshot below show the packet list (Upper section), the packet details (Middle section) and the packet bytes section (Lower section).
If you select a packet from the upper section (Packet list), the middle section (Packet details) will display a description of the selected packet, and the lower section (Packet bytes) shows a canonical hex dump of the selected packet. You can see an example in the following screenshot.

The arrows below point to 4 arrows in the Packet Details section; by pressing them, you can see the packet description.

The main menu you can see in the image below contains the following options:
![]()
Menu: The menu section includes items to manage capture files, save, export and print partial or all captures. On the Edit tab, this section contains options to find packets, manage configuration profiles and some preferences. The View tab allows managing display options such as specific packet colorization, fonts, additional windows, and more. The Go tab allows you to inspect specific packets. The Capture tab allows to start and stop capturing files, as well as editing filters. From the Analyze tab, you can enable or disable protocol dissection and manipulate display filters, among additional options. The statistics tab allows showing statistics and summaries of captures. The telephony tabs allow you to display telephony statistics. The Wireless tab shows Bluetooth and IEEE 802.11 statistics. The tools tab contains available tools for Wireshark. Finally, the Help menu contains manual and help pages.
The toolbar you can see in the image below contains the following options:
![]()
Toolbar: The main toolbar contains buttons to start, restart and stop capturing packets. From this toolbar, you can save, reload and close capture files. From this menu, you also can access additional capture options or find specific packets. You can pass to the next packet or go back to the previous one. This toolbar includes display options to colorize packets, zoom in or zoom out, etc.
To Finish with the user interface, the filter toolbar you can see in the image below contains the following options:
![]()
Filter Toolbar: This toolbar is useful for specifying the type of packets you want to capture or to specify the type of packets you want to drop. For example, to capture all packets whose source is the port 80, you can type “tcp src port 80”. To drop all arp packets, you can type “not arp.”
Capturing Passwords With Wireshark
This section of the present tutorial explains how to use Wireshark to hack vulnerable protocol passwords.
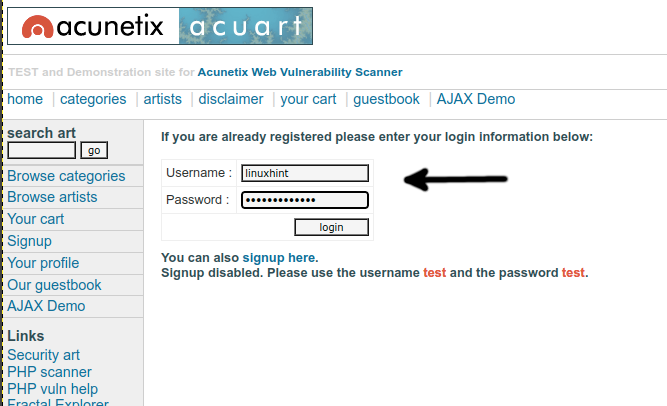
For this purpose, I will use the http://testphp.vulnweb.com/login.php website as the target because the password is sent in plain text (HTTP instead of HTTPS). You also can get encrypted protocol passwords to decipher later, but this tutorial covers plain text password hacking.
The first step is to get the website IP address. We can do it by using the host command followed by the URL whose IP address we want. The syntax is the following.
Therefore, in this case, I execute the following.

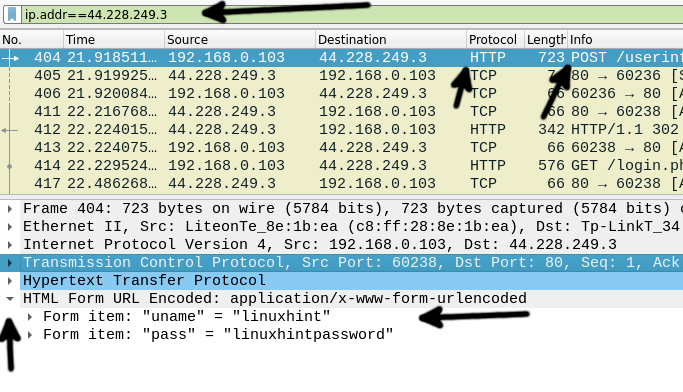
We want to see traffic to the destination with IP address 44.228.249.3 only. To do it, use the Filter Toolbar shown in the following screenshot.
The syntax to filter by IP address is the following.
Therefore to see only packets belonging to the target website IP (In this example, 44.228.249.3), I type the following in the Toolbar Filter, and I press the ENTER key.
![]()
Login into the vulnerable website to capture the password and learn the process.
In the Packet List section, find the POST request, as pointed by the arrow to the Info column.
In the Packet Description section, press HTML Form URL Encoded: application/x-www-form-urlencoded, and the POST content will show up, in this case revealing the username and password sent to the vulnerable site.
That’s all to get started with Wireshark. In the next tutorial, we will explain how to reveal ciphered passwords using Wireshark and a deciphering tool.
Conclusion
As you can see, installing Wireshark in Debian is pretty easy; it only requires running the apt packages manager. Using Wireshark is easy once you know what the user interface items are for. Despite Wireshark being one of the most popular tools to execute Man In The Middle attacks, this is not only a hacking tool, as shown in the example above; it is a great resource to diagnose network problems and learn how protocols operate. For terminal users, you can use Tshark instead, the Wireshark command line alternative. Another popular alternative to Wireshark you may want to try is Tcpdump.
Thank you for reading this tutorial explaining how to install Wireshark in Debian and how to get started with it. Keep following us for more professional Linux tutorials.