WebSocket is an application layer protocol that allows two-way communication between a client and a server. WebSocket protocol works first by creating a handshake and then a message framing implemented over TCP rather than basic HTTP.
WebSockets and other similar technologies such as SSE (Server-Sent Events) and WebRTC are helpful in applications where the server needs to keep an open connection to the connected clients. An excellent example of WebSockets used in applications is a chat application, online multiplayer games, and real-time tools such as analytics and collaboration tools.
WebSockets provides us with a full-duplex, bidirectional connection between the server and the connected clients over the Web. That means both the server and the client can push data once there is an established connection.
In this tutorial, I will not dive deep into how WebSockets work. Instead, I will show you how you can use Python to implement a simple application using WebSocket.
If you wish to learn more about HTTP, WebSocket, and SSEs, check out the other tutorials on this site explaining their differences.
NOTE: Before we begin, we assume you are familiar with basic networking concepts such as HTTP and HTTP requests. To implement the concepts in this tutorial with a degree of ease, you need to have basic Python and JavaScript Programming knowledge.
Step 1: Environment Setup
Let us begin to implement a simple WebSocket server to use the browser as the client to connect to the server.
It is good to note that the purpose of this implementation is not to build a massive application but to give you a basic understanding of how you can use python and JavaScript to create WebSocket Applications.
For this, we will need to have Python installed, preferably Python 3.6+.
We will also use the WebSocket package.
https://websockets.readthedocs.io/en/stable/index.html
Once you have Python installed, use pip to install the WebSocket package using the command below:
Once you have the WebSockets package installed, we can begin creating the server and a client to connect.
Step 2: Creating the Server
Start by creating a directory where we are going to serve the application—call it WebSocket.
Inside the directory, create a file, and call it server.py
Inside the server.py file, add the following lines of code that implement a simple server on the / URL.
import websockets
# create handler for each connection
async def handler(websocket, path):
data = await websocket.recv()
reply = f"Data recieved as: {data}!"
await websocket.send(reply)
start_server = websockets.serve(handler, "localhost", 8000)
asyncio.get_event_loop().run_until_complete(start_server)
asyncio.get_event_loop().run_forever()
Inside the server file, we import the required packages—in this case, asyncIO, and WebSockets.
Next, we create a handler that takes the arguments WebSocket and path. The WebSocket represents the URL of the server (localhost:8000). The path is the URI for the handler—in our case, the URI is /.
We then proceed to wait for the incoming connection and the message. With the data received, we implement an action. In our case, a simple response with the contents of the received data.
Step 3: Creating a Client
Let us now try to implement a simple client to connect to the server. We will use the Browser console as the client to preserve the simplicity of the tutorial.
Create a file and call it client.html. Inside the file, add the following code:
<html lang="en">
<head>
<meta charset="UTF-8">
<meta http-equiv="X-UA-Compatible" content="IE=edge">
<meta name="viewport" content="width=device-width, initial-scale=1.0">
<title>WebSocker Client</title>
</head>
<body>
<button onclick="contactServer">Click Here</button>
</body>
<script>
const socket = new WebSocket('ws://localhost:8000');
socket.addEventListener('open', function (event) {
socket.send('Connection Established');
});
socket.addEventListener('message', function (event) {
console.log(event.data);
});
const contactServer = () => {
socket.send("Initialize");
}
</script>
</html>
Save the file and open it in the browser.
To test if the connection is working, click the button and check the console for the server response.
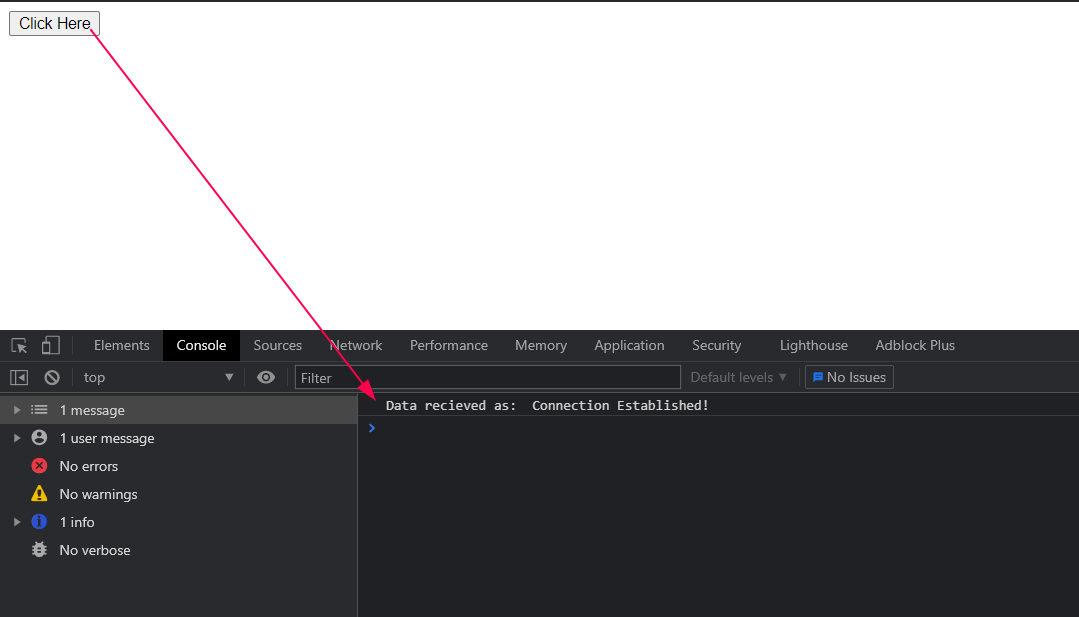
Once you click the button, a message is sent to the server. The server then responds with the contents of the message, thus indicating that the connection is established.
Conclusion
For this tutorial, we saw how to use the Python WebSockets package to implement a simple WebSocket connection.