This blog will state the solutions to resolve the CPU usage issues due to a system process.
How to Fix “High CPU usage due to SearchProtocolHost.exe” in Windows 10?
To resolve the “High CPU usage due to SearchProtocolHost.exe” issue in Windows 10, apply the following fixes:
- Disable the “Windows Search” Service.
- Initiate the “Search and Indexing” Troubleshooter.
- Run “SFC” Scan.
- Configure the Indexing Options.
- Check for the Latest Windows Update.
Fix 1: Disable the “Windows Search” Service
Disabling the “Windows Search” service and utilizing substitute options to find locations can resolve the issue of the discussed process consuming a lot of resources. For doing so, apply the following steps.
Step 1: Open “Services”
Type “services.msc” in the below-stated Run box to navigate to “Services”:
Step 2: Locate “Windows Search” Service
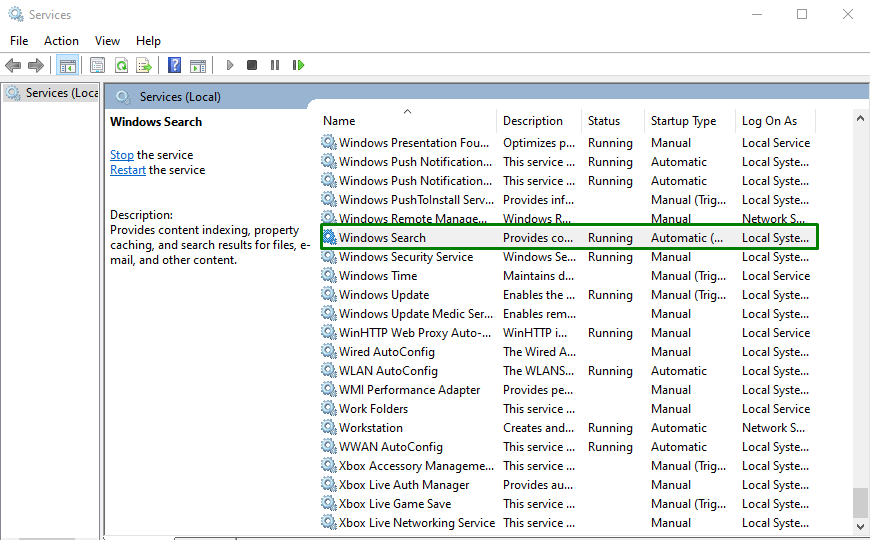
In the elevated “Services”, locate the “Windows Search” service and double-click on it:
Step 3: Disable the Service
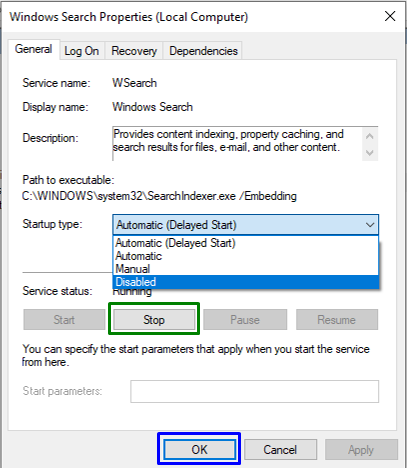
In the following pop-up, configure the startup type of the service as “disabled” and trigger “Stop” to stop the service. Finally, hit “OK” to save the changes:
After disabling the service, check if the encountered limitation is streamlined now. Otherwise, consider the next approach.
Fix 2: Initiate the “Search and Indexing” Troubleshooter
This particular troubleshooter resolves the issues faced with Windows search. Therefore, executing this troubleshooter can also overcome the CPU usage issue due to the “SearchprotocolHost.exe” process.
To run this troubleshooter, apply the below-listed steps.
Step 1: Open “Update & Security”
First of all, open “Settings-> Update & Security”:
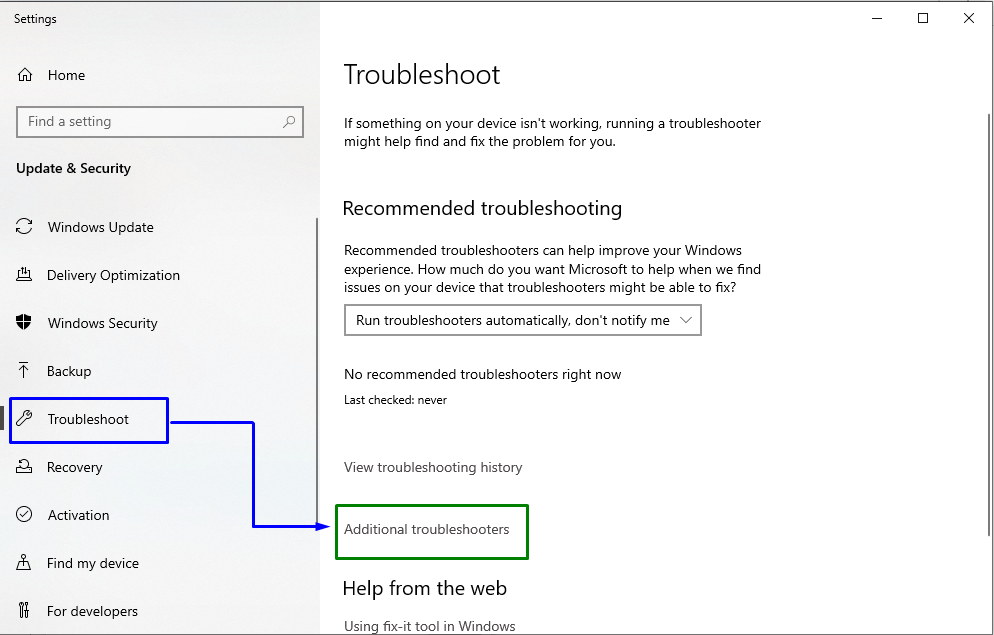
In the opened pop-up, navigate to the “Additional troubleshooters” settings in the “Troubleshoot” option:
Step 2: Run the Troubleshooter
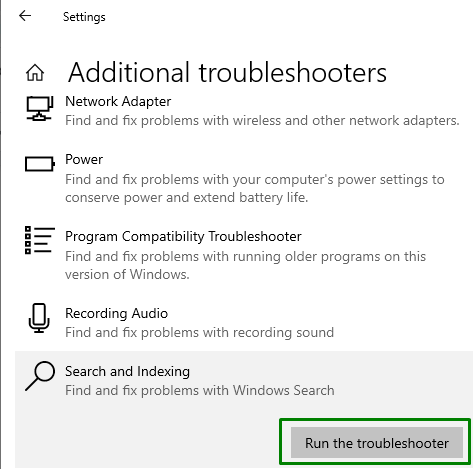
Finally, trigger the highlighted button to execute the “Search and Indexing” troubleshooter:
After the troubleshooting is completed, see if this approach is helpful. Else, consider the next solution.
Fix 3: Run “SFC” Scan
Running the “SFC(System File Checker)” scan is effective to detect and fix the infected files. To execute this scan, apply the below-provided steps.
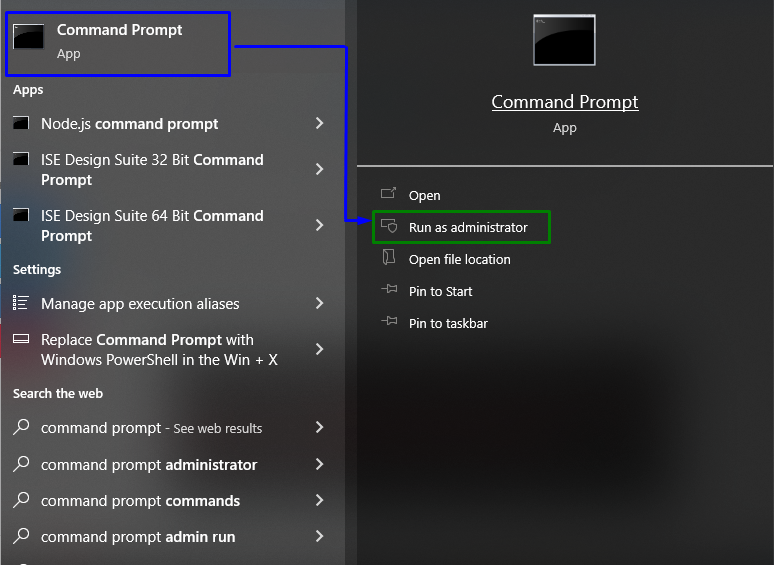
Step 1: Run Command Prompt
Open up the Command Prompt being an “administrator”:
Step 2: Run “SFC” Scan
Now, enter the below-stated command to run a scan for the contained infected files in the PC/Laptop:
Fix 4: Configure the Indexing Options
Indexing the contents in the system assists in getting the outcome faster while searching for files. Hence, this approach can be effective in normalizing the utilization of the CPU.
Implement the below-provided steps to carry out this approach.
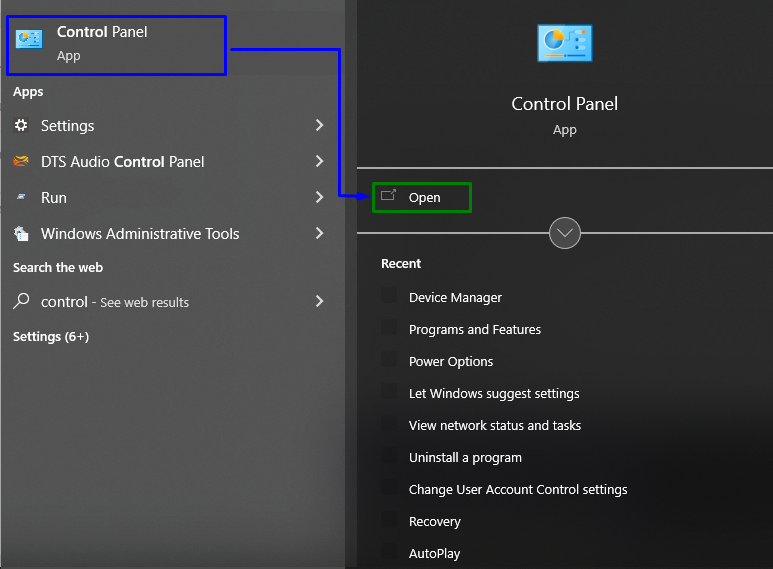
Step 1: Navigate to “Control Panel”
Firstly, open “Control Panel” from the Startup menu:
Step 2: Switch to “Indexing Options”
Now, type “indexing” in the search bar and open “Indexing Options”:
In the below-appeared pop-up, hit “Modify” button:
Here, opt for “Show all locations” which will require administrative privileges:
Step 3: Configure the “Indexed Locations”
Lastly, unmark the significant locations, i.e., “C: drive”, in the following window:
After applying all the above steps, observe if the CPU utilization is normal now. Else, proceed to the next solution.
Fix 5: Check for Latest Windows Updates
The updated Windows overcomes most of the issues faced by applying the latest fixes. Hence, doing so can also help resolve the massive resource usage due to a particular process issue.
Implement the following steps to apply this approach.
Step 1: Navigate to “Update & Security”
Firstly, navigate to “Settings-> Update & Security”:
Step 2: Install the Latest Windows Updates
Now, hit the highlighted button to start a search for the available updates and install them:
The below-given window indicates that the updates will be looked for and installed:
After updating Windows, the stated issue will get resolved.
Conclusion
To resolve the “High CPU usage due to SearchProtocolHost.exe” issue in Windows 10, disable the Windows Search service, initiate the “Search and Indexing” troubleshooter, run the “SFC” scan, configure the Indexing Options, or check for the latest Windows Update. This write-up stated the approaches to cope with the CPU utilization issue by the “SearchProtocolHost.exe” process.

