This write-up will state the approaches to resolve the malfunctioning of the Ctrl, Alt, and Del keys in Windows 10.
How to Fix the “Ctrl Alt Del not Working” Issue on Windows 10?
To resolve the “Ctrl Alt Del not Working” issue on Windows 10, consider the following fixes:
- Restart the PC.
- Execute the Keyboard Troubleshooter.
- Run the System in Clean Boot Mode.
- Verify Your Keyboard Language.
- Clean the Keyboard.
- Run SFC Scan.
- Execute DISM Scan.
- Update Keyboard Driver.
- Edit the Registry.
Fix 1: Restart the PC
Restarting the PC/laptop can help fix many problems automatically. So, it should be considered the foremost approach to cope with the stated issue. If the issue remains, overview the further fixes.
Fix 2: Execute the Keyboard Troubleshooter
There are built-in troubleshooters for the devices to resolve and fix the problems. Therefore, executing the keyboard troubleshooter can assist in resolving the malfunctioning in the stated keys. To make this approach come into effect, apply the following steps.
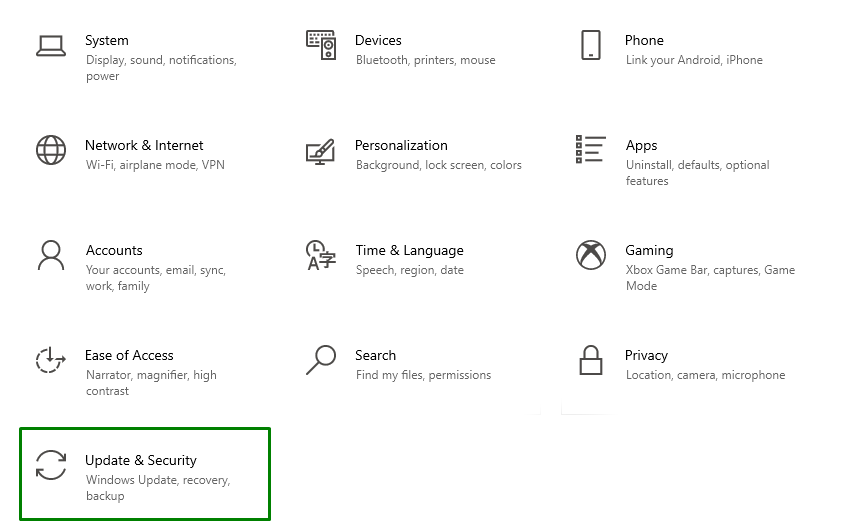
Step 1: Open “Update & Security” Settings
First of all, navigate to “Settings-> Update & Security”:
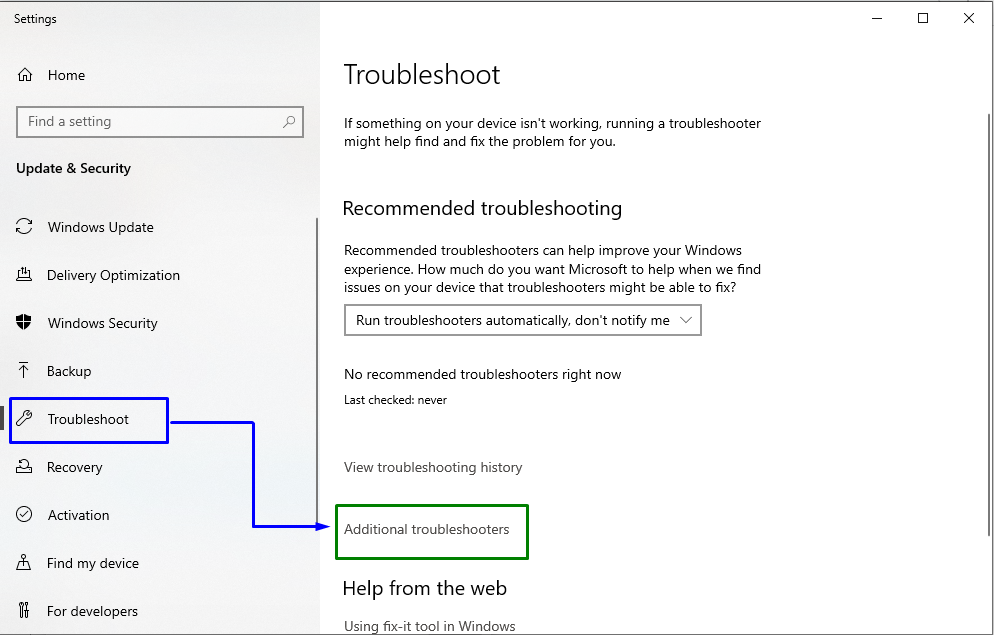
In the next step, switch to the highlighted option in the “Troubleshoot” settings:
Step 2: Execute the Troubleshooter
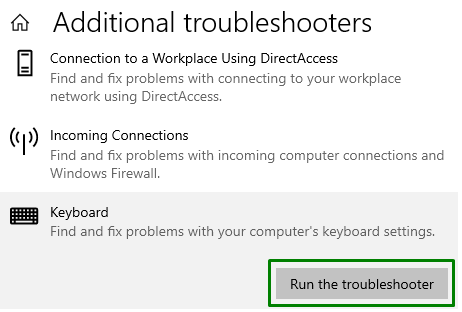
Finally, hit the highlighted button to run the keyboard troubleshooter:
After the troubleshooting is completed, observe if the keys are functional now. Else, move on to the next approach.
Fix 3: Run the System in Clean Boot Mode
The “Clean boot” mode initiates the Windows with limited resources. Hence, considering this approach can also be effective in getting rid of the discussed keys error. To carry out this approach, implement the following steps.
Step 1: Open “System Configuration”
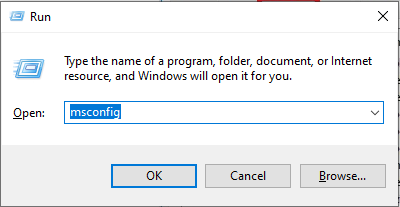
Enter “msconfig” in the Run box to switch to the “System Configuration” window:
Step 2: Switch to “Services”
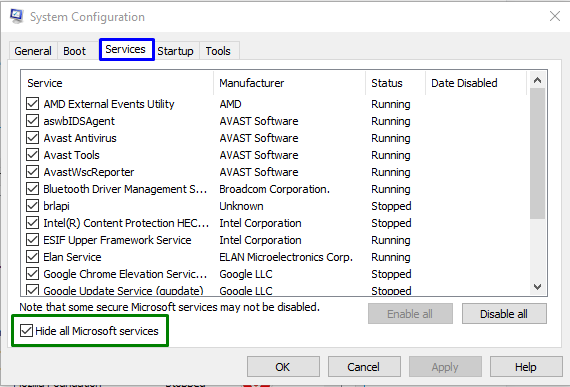
Open the “Services” tab. Here, mark the “Hide all Microsoft services” checkbox and click on the “Disable all” button:
Step 3: Switch to “Startup”
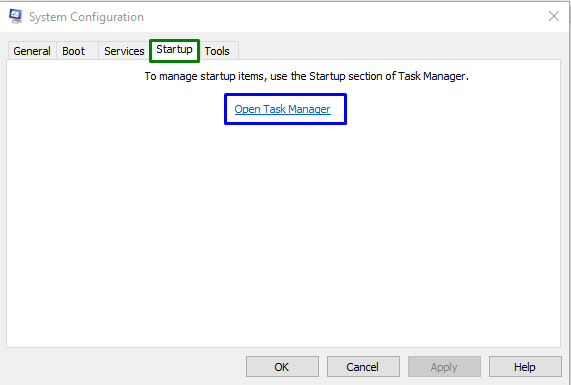
Now, open the “Startup” tab and hit the “Open Task Manager” link:
Step 4: Disable the Applications
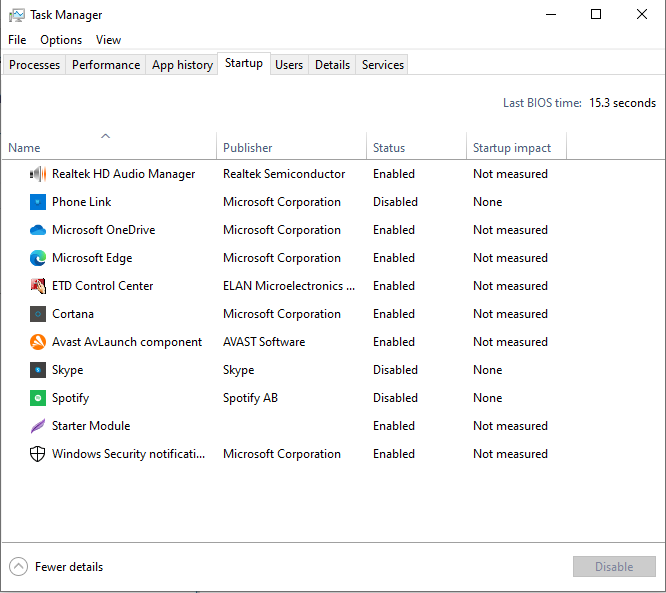
In the below popped-up window, disable the stated applications one by one:
Restart the PC and see if the stated issue is resolved.
Fix 4: Verify Your Keyboard Language
The unconfigured keyboard language can also result in malfunctioning the keys. To sort out this issue, apply the below-listed steps.
Step 1: Navigate to “Time & Language”
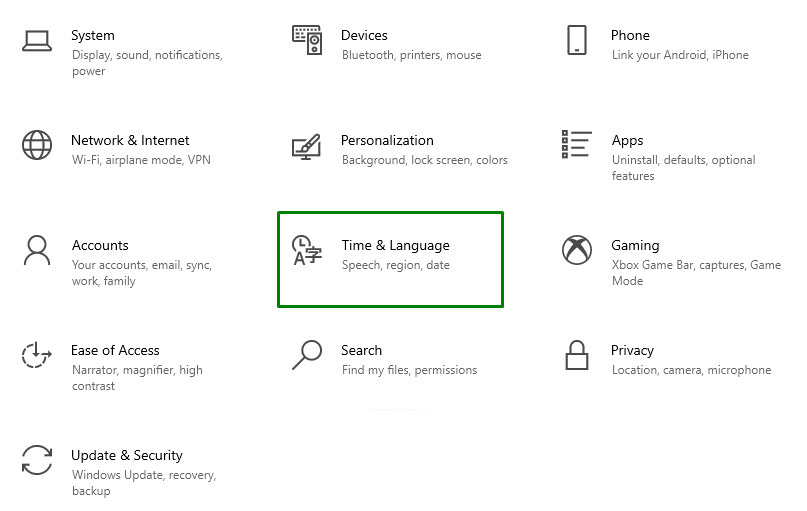
Firstly, navigate to “Settings-> Time & Language”:
Step 2: Add Language
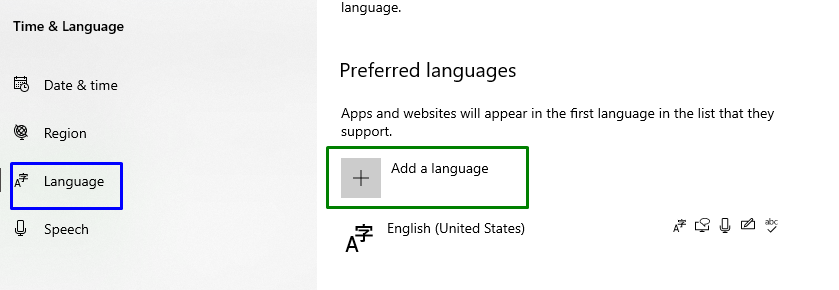
In the “Language” section from the left pane, verify if the correct language has opted. Otherwise, make the proper selection. For doing so, hit the “Add a language” option in the “Preferred languages” section:
After that, opt for the highlighted arrow to move the language to the top:
Now, check out if the discussed issue is streamlined. If it is not the case, consider the next fix.
Fix 5: Clean the Keyboard
The stated issue with the keys can also be faced due to the accumulated dust on the keyboard. Hence, clean the keys to get rid of the dirt.
Fix 6: Run “SFC” Scan
“SFC”, abbreviated as “System File Checker”, applies a scan upon the protected system files, locates the corrupted files, and repairs them. To initiate this scan, consider the below-enlisted steps.
Step 1: Run Command Prompt
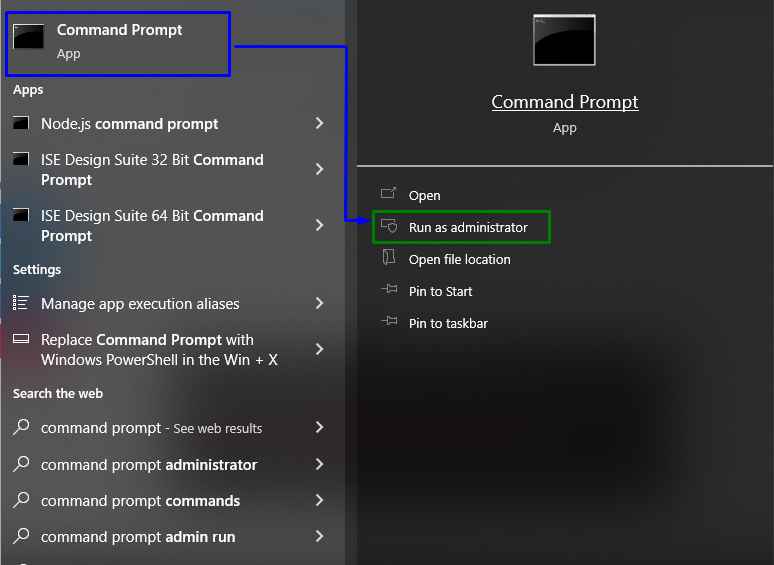
Execute the Command Prompt being an “administrator”:
Step 2: Initiate “SFC” Scan
In the opened terminal, enter the following command to initiate the system scan to locate the infected files:
Fix 7: Execute “DISM” Scan
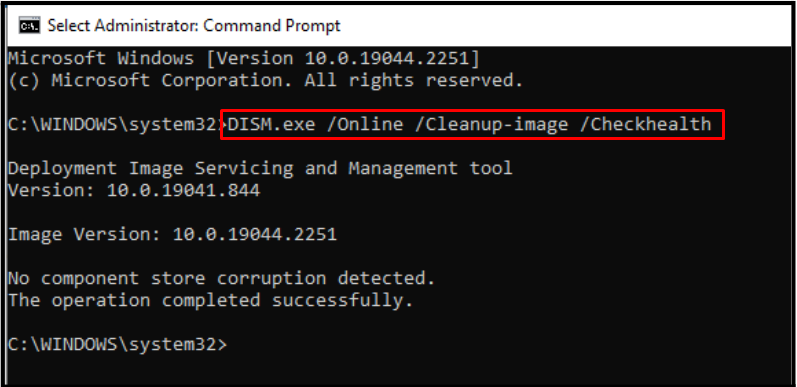
It is a good practice to run the “DISM” scan after applying the “SFC” scan as it displays the status of the system’s health and fixes it. To apply this particular scan, first of all, check the system image’s health:
After that, enter the following command to scan the system image’s health:
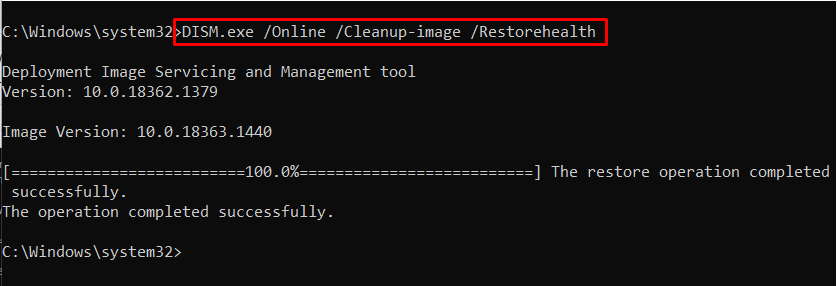
Lastly, restore the system image’s health via the below-given command:
After the scanning process is completed after some time, restart the PC/laptop, and observe if these scans were helpful. Otherwise, proceed to the next fix.
Fix 8: Update Keyboard Driver
The updated drivers resolve compatibility and security issues. Hence, updating the keyboard driver can also be a great approach to coping with this issue.
Step 1: Open “Device Manager”
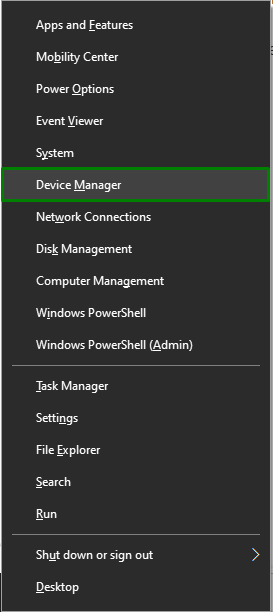
First of all, press the “Windows + X” shortcut keys and select “Device Manager” to navigate to the Device Manager:
Step 2: Update Keyboard Driver
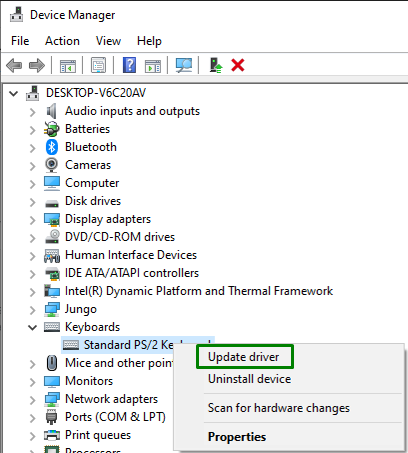
Now, expand the “Keyboard” option, right-click on the highlighted driver and opt for “Update driver”:
After the driver is updated, check out if this approach made a difference.
Fix 9: Edit the Registry
At times, the installed third-party apps in the PC modify the registry and change the default values. To configure these values, implement the below-listed steps.
Step 1: Navigate to “Registry Editor”
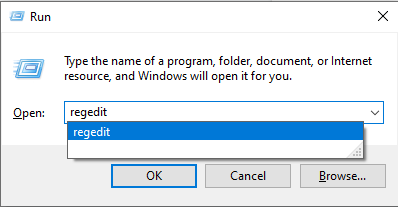
Firstly, type “regedit” in the Run box to navigate to the “Registry Editor”:
Step 2: Navigate to Path
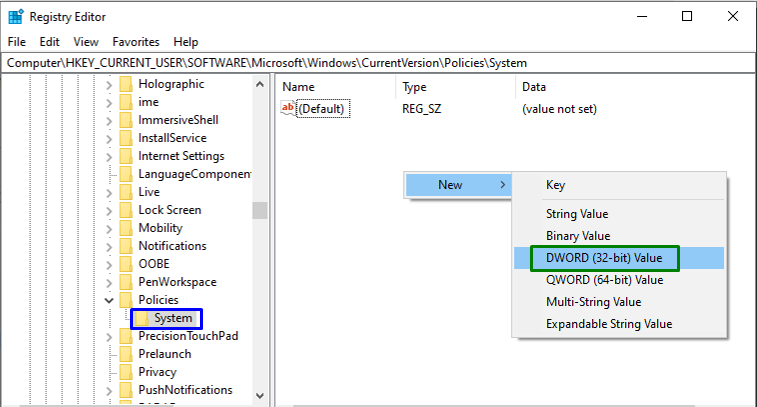
In the Registry Editor, navigate to the following path:
Step 3: Create “System” Key
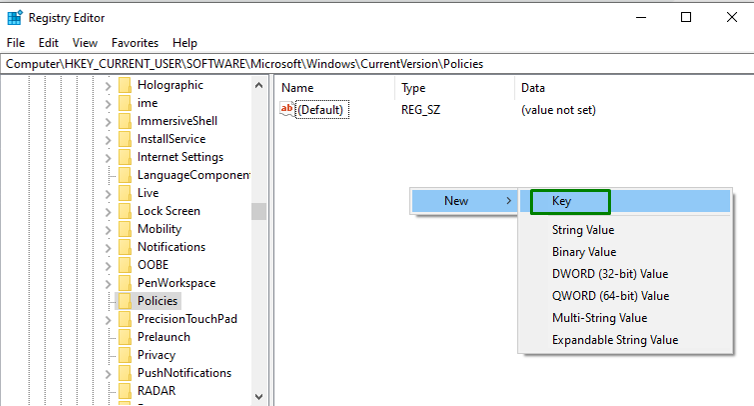
If you can’t locate the “System” key at the destined path. Right-click at the blank space and opt for “New-> Key” to create a key manually:
Step 4: Create a “DWORD Value”
Lastly, right-click at the right pane again within the create key, i.e., “System” and create a new “DWORD(32-bit) Value”:
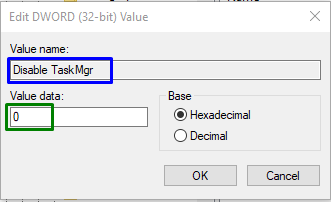
Name the created value as “Disable TaskMgr” having the assigned value as “0”:
Restart the PC and check if the discussed issue vanishes.
Conclusion
To resolve the “Ctrl Alt Del not Working” issue on Windows 10, restart the PC, execute the keyboard troubleshooter, run the system in Clean Boot mode, verify your keyboard language, clean the keyboard, run the SFC scan, execute the DISM scan, update keyboard driver, or edit the Registry. This blog stated the fixes to cope with the malfunctioning of the discussed keys in Windows 10.

