
Without any further ado, let’s get started!
Following are the steps that are used to create a Reverse Proxy in Nginx:
Step 1: Update the System and Install Nginx
We begin by updating the machine before installing Nginx on our system:
![]()
Let’s now install Nginx on our system by executing the following command:
![]()
The installation begins as soon as the command is issued. Next, we start the Nginx service using this command:
![]()
We can now enable the Nginx service with this command:
![]()
You will get the following output which tells you that Nginx is enabled.
![]()
Now, let’s check the status of Nginx. We need to make sure that it is running.
![]()
The output tells us that Nginx is running fine. Now, we can move to the next step which is configuring the Nginx as a reverse proxy.

Step 2: Configure Nginx as Reverse Proxy
In this step, let’s configure Nginx as a reverse proxy. This can be achieved by creating a reverse proxy configuration file as shown in the following:
![]()
Once the file is created, add the following configuration lines to the file:
listen 80;
listen [::]:80;
server_name myexample.com;
location / {
proxy_pass http://localhost:3000/;
}
}
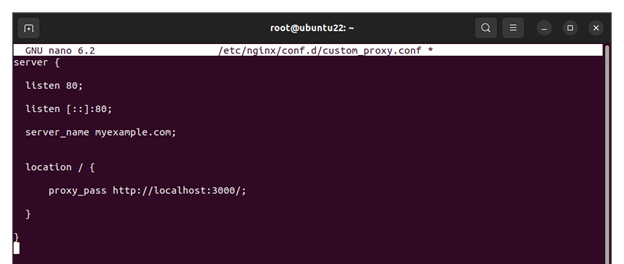
Now, save the proxy configuration file and exit.
We need to link the new proxy configuration file. This is done with the help of the following command:
![]()
Step 3: Test the Configuration
Let’s now check the Nginx configuration using the following given command:
![]()
If you get the following output, this means that the Nginx configuration is fine and there’s no error in it:
![]()
Let’s restart the Nginx with this command:
![]()
Advanced Proxy Configuration
The configurations that we added in the proxy configuration file are enough to create a basic reverse proxy. However, for complex applications, you’ll need to add more configurations to the file.
Configure the Buffers
To configure the buffers, add the following lines in the file:
proxy_pass http://localhost:3000/;
proxy_buffering off;
}
Configure the Request Headers
To configure the request headers, add the following lines:
proxy_pass http://localhost:3000/;
proxy_set_header X-Real-IP $remote_addr;
}
Conclusion
In today’s guide, we saw in detail how to create the Nginx Reverse Proxy. To do that, we first installed Nginx on our Linux system. Then, we created an Nginx Reverse Proxy configuration file. Lastly, we applied the new configurations for Nginx to start working as a Reverse Proxy. We also discussed the advanced configuration options that can be added to the Nginx reverse proxy config file if needed.
We hope you liked the tutorial.