Frequent usage of passwords increases the possibility of a data breach or password theft. But like most authentication protocols, your success with Kerberos relies on proper installation and setup.
Many people sometimes find configuring Linux to use Kerberos a tedious task. This can be true for first-time users. However, configuring Linux to authenticate with Kerberos is not as complicated as you think.
This article provides you with a step-by-step guide on configuring Linux to authenticate using Kerberos. Among the things that you will learn from this write-up include:
- Setting your servers
- The prerequisites necessary for Linux Kerberos configuration
- Setting up your KDC and databases
- Kerberos service management and administration
Step By Step Guide on How to Configure Linux to Authenticate Using Kerberos
The following steps should help you configure Linux to authenticate with Kerberos
Step 1: Ensure That Both Machines Meet Prerequisites for Configuring Kerberos Linux
First off, you need to ensure that you do the following before you begin the configuration process:
- You must have a functional Kerberos Linux environment. Notably, you must ensure that you have a Kerberos server (KDC) and Kerberos client set up in separate machines. Let’s assume the server is denoted with the following internet protocol addresses: 192.168.1.14, and the client runs on the following address 192.168.1.15. The client asks for tickets from the KDC.
- Time synchronization is mandatory. You will use network time synchronization (NTP) to ensure that both machines run in the same time frame. Any time difference of more than 5 minutes will result in a failed authentication process.
- You will need a DNS for the authentication. The domain network service will help resolve conflicts in the system environment.
Step 2: Set Up a Key Distribution Center
You should already have a functional KDC that you had set up during installation. You can run the below command on your KDC:
Step 3: Check the Installed Packages
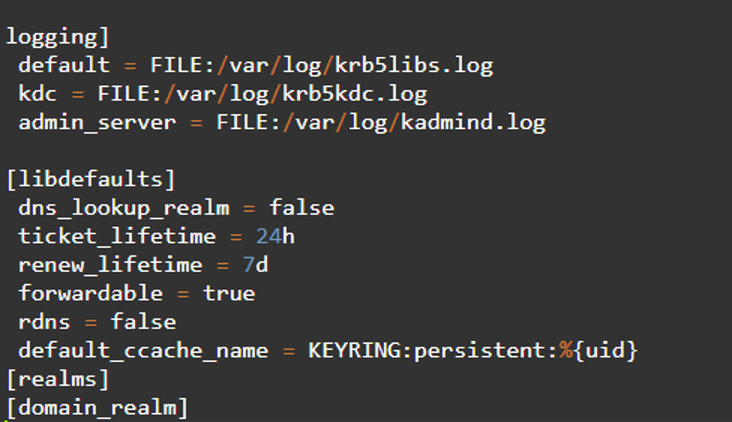
Check the/ etc/krb5.conf file to find out which packages exist. Below is a copy of the default configuration:
Step 4: Edit the Default /var/kerberos/krb5kdc/kdc.conf File
After successful configuration, you can edit the /var/Kerberos/krb5kdc/kdc.conf file by removing any comments in the realm section, default_reams, and changing them to fit your Kerberos environment.
Step 5: Create The Kerberos Database
After successful confirmation of the details above, we proceed to create the Kerberos database using the kdb_5. The password that you created is essential here. It will act as our master key as we will use it for encrypting the database for secure storage.
The command above will execute for one minute or so to load random data. Moving your mouse around the press keeps or in the GUI will potentially fasten the process.
Step 6: Service Management
The next step is service management. You can automatically start your system to enable kadmin and krb5kdc servers. Your KDC services will automatically configure after you reboot your system.
Step 7: Configure the Firewalls
If the execution of the above steps are successful, you should then move to configure the firewall. Firewall configuration involves setting the correct firewall rules that enables the system to communicate with kdc services.
The below command should come in handy:
Step 8: Test if the krb5kdc Communicates With the Ports
The initialized Kerberos service should allow traffic from TCP and UDP port 80. You can perform the confirmation test to ascertain this.
In this case, we have allowed the Kerberos to support traffic that demands kadmin TCP 740. The remote access protocol will consider the configuration and enhance security for local access.
Step 9: Kerberos Administration
Administer the key distribution center using the kadnim.local command. This step allows you to access and view the content in the kadmin.local. You can use the “?” command to see how addprinc is applied in the user account for adding a principal.
Step 10: Set Up the Client
The key distribution center will accept connections and offer tickets to users to this point. A few methods come in handy for setting up the client component. However, we will use the graphic user protocol for this demonstration as it is easy and quick to implement.
First, we have to install the authconfig-gtk application using the commands below:
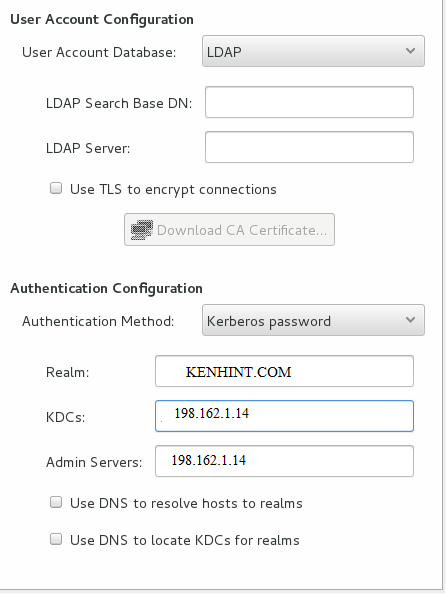
The authentication configuration window will appear after completing the configuration and running the command above in the terminal window. The next move is to select the LDAP element from the identity and authentication drop-down menu and type Kerberos as the password corresponding to the realm and key distribution center information. In this case, 192.168.1.14 is the internet protocol.
Apply these modifications once done.
Conclusion
You will have a fully configured Kerberos and the client server after installation when you complete the steps above. The guide above takes one through the process of Configuring Linux to authenticate with Kerberos. Of course, you can then create a user.


