It is a popular tool for data science and machine learning developers. This is because it offers a collection of over 800 packages installed and curated to work correctly out of the box.
The Anaconda distribution is also free and very user-friendly. It comes with a command-line interface for terminal nerds and the Anaconda navigator, allowing you to manage environments and packages with a GUI interface.
As a result, it is a favored Python platform for anyone who wishes to quickly set up a full-fledged Python environment without installing the packages manually.
What is Conda?
The Anaconda distribution comes with the conda package manager. Conda is a powerful command-line utility that allows you to download, install, update, and uninstall packages. It also enables you to create and manage virtual environments with simple commands.
What is requirements.txt?
The requirements.txt is a simple text file that allows you to keep track of the Python modules installed and enabled in a given environment.
This file keeps a list of modules and packages required in a given project. Hence, if you want to replicate the project in a new environment, you can reference this file to install the dependencies instead of manually tracking them down.
There is a clear drawback of using the requirements.txt file. It is built to work with the pip package manager.
However, that does not mean you can not use it with conda. In this article, we will explore various ways you can use to install packages from a requirements.txt file using conda.
Python Create Requirements.txt
Although there are various ways of creating the requirements.txt file, the best one is to use pip.
Start by navigating to the environment where your project is located. Next, use the pip freeze command to export your packages to the requirements.txt file.
The command will output the list off all the packages installed in that environment into the specified file.
The good thing about using pip freeze is getting the package name and its corresponding version in an easy-to-read file.
An example of the requirements.txt file from the pip freeze command is shown:
aiosignal @ file:///tmp/build/80754af9/aiosignal_1637843061372/work
alabaster @file:///home/ktietz/src/ci/alabaster_1611921544520/work
anaconda-client @ file:///tmp/build/80754af9/anaconda-client_1635342557008/work
anaconda-navigator==2.1.4
anaconda-project @ file:///tmp/build/80754af9/anaconda-project_1637161053845/work
anyio @file:///tmp/build/80754af9/anyio_1644463572971/work/dist
appdirs==1.4.4
argon2-cffi @file:///opt/conda/conda-bld/argon2-cffi_1645000214183/work
argon2-cffi-bindings @ file:///tmp/build/80754af9/argon2-cffi-bindings_1644569679365/work
arrow @file:///opt/conda/conda-bld/arrow_1649166651673/work
astroid @ file:///tmp/build/80754af9/astroid_1628063140030/work
astropy @file:///opt/conda/conda-bld/astropy_1650891077797/work
asttokens @ file:///opt/conda/conda-bld/asttokens_1646925590279/work
async-timeout @ file:///tmp/build/80754af9/async-timeout_1637851218186/work
atomicwrites==1.4.0
attrs@file:///opt/conda/conda-bld/attrs_1642510447205/work
If you are using conda as your environment manager, run the command below to create a requirements.txt
Conda install requirements.txt
If you create a new conda environment, you will get a minimal Python environment without pip installed. This can be problematic if you need to use pip and the requirements.txt file to set up your project.
There are several methods you can use to resolve this:
Installing pip in the environment.
If pip is missing in that environment, you can simply use conda to install it as:
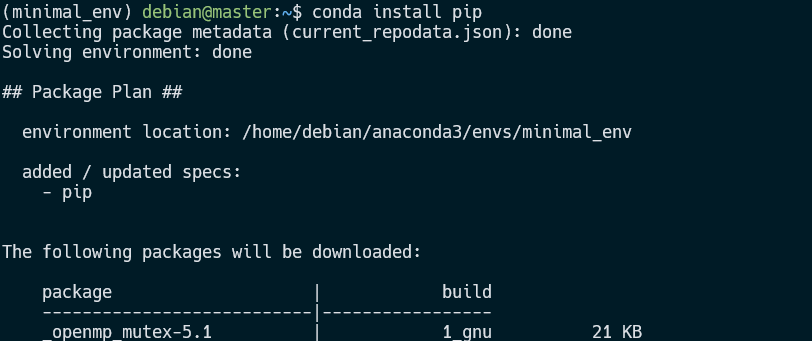
Once pip is installed, you can use it to install the packages in your requirements.txt file.
The second solution is to use the requirements.txt file to create an environment out of the box.
For that, you can use the –file flag when creating an environment with conda as:
Conda will take the file and create an environment with the packages specified.
Using conda install with the –flag
If you have created your environment, you can use the –file flag with the conda install command as:
The command will resolve the packages specified in the file and install them in the environment.
Conclusion
This tutorial taught you various ways of installing packages in the requirements.txt file using conda.