Data compression is a technique used to compress the data size so that it consumes less space on the disk. For small devices such as Raspberry Pi, this technique is helpful since it allows you to speed up the system performance. Also, it is easy to deal with compressed data while sharing or transferring.
Follow this article to find out the ways to compress files on Raspberry Pi.
How to Compress Files on Raspberry Pi
There are multiple formats for compressed files but the most used formats for compressed files are:
Let’s disuses how you can use both format and compress the file on Raspberry Pi.
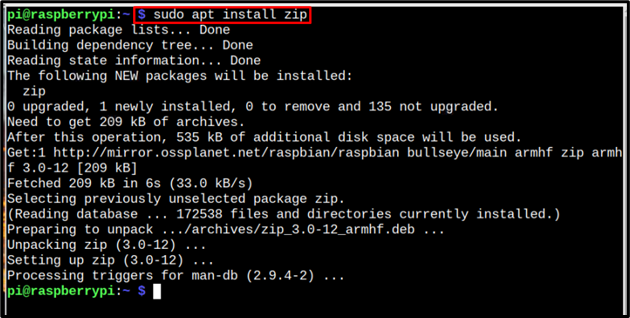
1: Compress Files Through zip
The widely used format for compressed files is the zip format and nowadays everyone knows what a zip file is. The zip file zip/compress files into a single file. To compress files using “zip” on Raspberry Pi, you must install the zip using the below-written command:
Once the zip is installed now it can be used to zip/compress files by following the below-written syntax:
Syntax
Example
Just to quote an example, I have created 3 example files with names egfile1, egfile2 and egfile3. The below-written ls command is just to list these files:

Now let’s compress them by zipping them into an opfile.zip by using the below-mentioned command:

Now verify if the zip file is created successfully or not by using the same ls command:

Optional: The zip can also be used to compress a directory into zip format. To compress the directory, use the directory name and a -r flag in the zip command to ensure that all files in the directory are compressed properly:
Syntax
Example
2: Compress Files through tar
The tar is the default format for compressing files on Raspberry Pi system and it’s already installed. It compresses the files or directories into an output tar file.
To compress files into a tar file, follow the below-mentioned command syntax:
Syntax
Example

To verify, I have displayed the content using the ls command:

Optional: Similarly, to compress the directory, follow the below-mentioned command syntax:
Syntax
The c flag is to “create archive”, v is for “verbose mode”, j to “use bzip2” and f to “allow to specify the filename of tarfile”.
Example

Then just for verification, run ls command:

Conclusion
To compress files in Raspberry Pi, two formats are most used which are: zip and tar. To use the zip format, first you must install it on the system, then you can use the zip command to compress the files on Raspberry Pi. To tar format is the default format for compressed files on Raspberry Pi and you only have to use the tar command to compress the files in the tar.gz format.