You can also modify how the information is displayed by changing the text color. Changing text color allows you to add information such as warnings, hyperlinks, and more.
This tutorial will discuss how to use LaTeX xcolor package to change text colors in LaTeX documents.
Basic LaTeX xcolor Package Usage
Before we can change text color in LaTex, we need to import the xcolor package. Do this by adding the following entry in your LaTeX document preamble.
It is good to note that you can also use the color package. However, this is superseded by the xcolor package as it offers more flexibility and color formats.
How to Change Text Color in LaTeX
To change the text color, use the \color{} command followed by the name of the color you want to use.
For example:
\usepackage[utf8]{inputenc}
\usepackage{xcolor}
\begin{document}
\title{\color{red}How to Work with \LaTeX colors}
\author{Linuxhint}
\maketitle
\section{Introdution}
\color{blue}Lorem ipsum dolor sit amet, consectetur adipiscing elit, sed do eiusmod tempor incididunt ut \footnote{This an example footnote}labore et dolore magna aliqua.
\end{document}
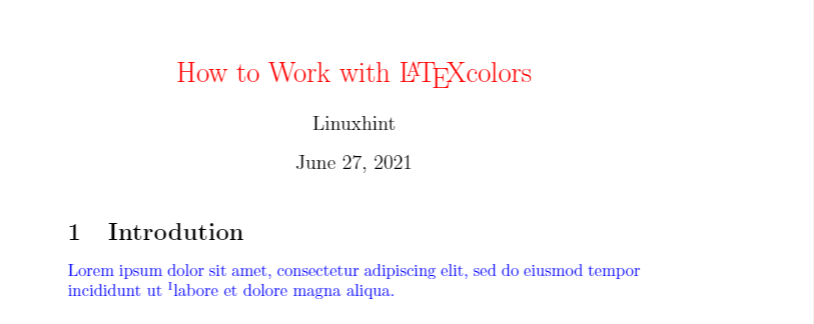
The above LaTeX code will set the title color to red and the main text to blue. The following is an illustration of the code above.
How to Set Text Color by Environment in LaTeX
You can also set text colors for a specific environment. For example, we can display a math block in a particular color:
\usepackage[utf8]{inputenc}
\usepackage{xcolor}
\usepackage{amsmath}
\begin{document}
\title{\color{red}How to Work with \LaTeX colors}
\author{Linuxhint}
\maketitle
\section{How to create a matrix}
\begin{equation}
\color{cyan}
y = \begin{pmatrix}
a & b & c \\
0 & 1 & 0 \\
x & y & i
\end{pmatrix}
\end{equation}
\end{document}
In the example code above, we set the entire equation block to the cyan color. Therefore, all the text inside the environment takes the color defined.
The following is the result of the code above.
How to Change a Single word color in LaTeX
If you only want to change a single text to a specific color inside a paragraph, you can do this using the \textcolor command.
For example:
\usepackage[utf8]{inputenc}
\usepackage{xcolor}
\begin{document}
\title{\color{red}How to Work with \LaTeX colors}
\author{Linuxhint}
\maketitle
\section{set color for single text}
Lorem ipsum dolor sit amet, \textcolor{orange}{consectetur} adipiscing elit, sed do eiusmod \textcolor{magenta}{tempor incididunt} ut labore et dolore magna aliqua. Molestie nunc non blandit massa enim nec dui nunc mattis
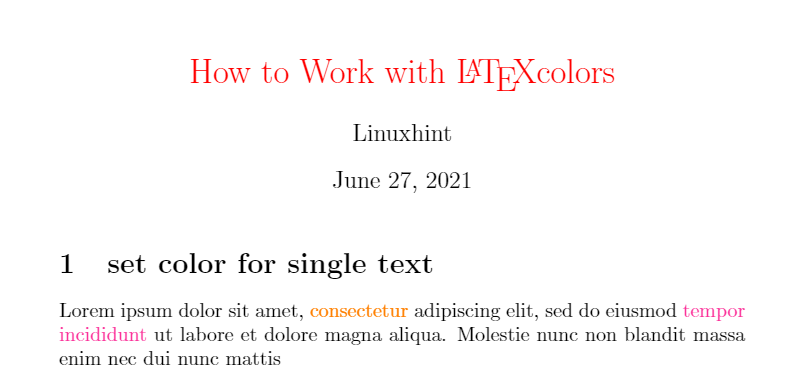
In the example above, we set specific colors for a single word by enclosing it with curly braces.
The example code above gives us the following result:
How to set a Background color in LaTeX
To set a background color for a block of text, we use the command \colorbox{}. For example:
\usepackage[utf8]{inputenc}
\usepackage[dvipsnames]{xcolor}
\begin{document}
\title{\color{red}How to Work with \LaTeX colors}
\author{Linuxhint}
\maketitle
\section{set color for single text}
\colorbox{Mahogany}{Lorem ipsum dolor sit amet, orangeconsectetur adipiscing elit}
\end{document}
In the example above, we set the text block with a background color, Mahogany.
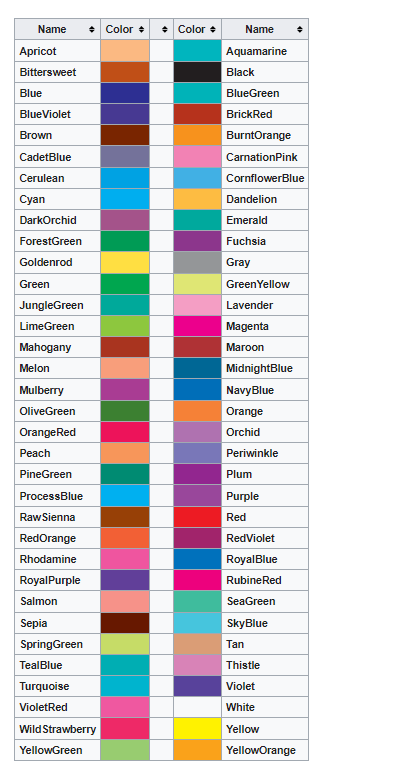
NOTE: We use the package name as (\usepackage [dvipsames]{xcolor}). This allows us to use 68 standard colors defined in the package.
Dvips colors are as shown:
Image source – https://en.wikibooks.org/wiki/LaTeX/Colors
How to Define Custom Colors in LaTeX
LaTeX xcolor package also allows you to define custom colors. The general syntax for color definition is:
The above command takes three arguments, the name, model, and color specification.
The name can be any custom name as long it does include a LaTeX command.
The following are the supported color models you can use:
- rgb – Red, Green, Blue and has a comma-separated value between 0 and 1.
- RGB – This is similar to rgb, but values range from 0 to 255.
- cmyk – Cyan, Magenta, Yellow, and Black. This model is a comma-separated list with four values between 0 and 1. Commonly used in printer models.
- gray – Grayscale. A single integer value between 0 and 1.
Consider the following code that shows how to define custom colors using the above models.
\usepackage[utf8]{inputenc}
\usepackage[dvipsnames]{xcolor}
\definecolor{azure}{rgb}{0.00, 0.50, 1.00}
\definecolor{Azure}{RGB}{0, 127, 255}
\definecolor{AZURE}{cmyk}{1, 0.502, 0, 0}
\definecolor{grey}{gray}{0.3}
\begin{document}
\renewcommand{\labelenumii}{\roman{enumii}}
\begin{enumerate}
\item \textcolor{azure}{This is Azure with rgb}
\item \textcolor{Azure}{This is Azure with RGB}
\item \textcolor{AZURE}{This is azure with CMYK}
\item \textcolor{gray}{This is is Gray}
\end{enumerate}
\colorbox{red}{\color{white}NOTE: } You can have similar names as long as they are defined under different models.
\end{document}
\end{document}
In the above code, we define four custom colors by using the four types of models. The result is as follows.
Conclusion
This tutorial showed you how to work with the LaTeX xcolor package, especially to change text colors in LaTeX and define custom colors.
To learn more about how the package works, consider the documentation.


