Nonetheless, there is an effective way to change Ubuntu’s hostname on WSL quickly.
Changing Hostname of Ubuntu on WSL on Windows
For this tutorial, we will install Ubuntu 22.04 and proceed to change its hostname. Open Microsoft Store on your Windows and download Ubuntu 22.04. Next, click on the Open button to start the installation.

Proceed with the installation and set the username and password for your Ubuntu.
Once Ubuntu is installed, check the hostname. The default hostname is the name of your computer. We have the username as linuxhint and the hostname as DESKTOP-PTV7941.
When using WSL, you must create a configuration file to change the hostname. Use your editor to create a /etc/wsl.conf file.
Once the config file opens, add the following lines:
hostname = <your-new-hostname>
generateHosts = false
The generateHosts = false ensures WSL will not automatically generate a hosts file. This allows us to use the new hostname and overwrite the existing one. Your configuration file should match the one below except for the hostname. In our case, we are setting our new hostname to be linuxtest.
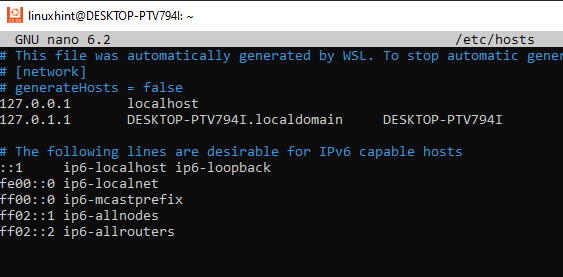
Next, change the /etc/hosts file to ensure we have the same hostname for our Ubuntu. Run the command below.
Once the file opens, locate every instances of the previous hostname and replace it with your new hostname. In our case, we have our hostname as DESKTOP-PTV7941 which we will replace for this case.
Ensure you replace it with the hostname you defined in the /etc/wsl.conf file.
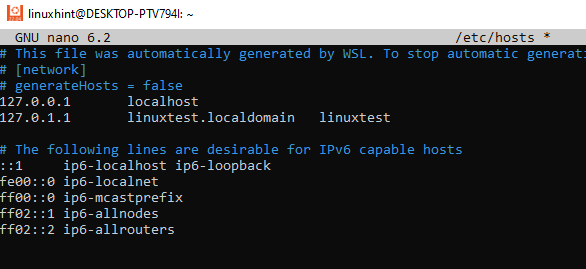
In the example below, we have replaced the hostname with linuxtest. Save and exit the file for the changes to take effect.
Once you have changed the hostname, your changes will be implemented when you restart your Ubuntu WSL.
Open your PowerShell or command prompt and check the running instance of WSL. It should display the current instance, Ubuntu 22.04.
To shut down the WSL, run the command below or click the close button to exit the WSL.
Once you restart your Ubuntu, you will notice the new hostname has changed. Verify it by running the hostname command.
That is how you change your hostname of Ubuntu on WSL on Windows.
Conclusion
WSL is one way of installing Ubuntu on Windows. Installing Ubuntu using this method slightly differs in how you can change your hostname. This post discussed how to change your Ubuntu WSL hostname. Start by creating a WSL config file, then edit the host file to rename the existing hostname to your new one. Restart your Ubuntu, and you will have your new hostname implemented.


