This is a follow-up article to the previous two [2,3]. So far, we loaded indexed data into the Apache Solr storage and queried data on that. Now, you will learn how to connect the relational database management system PostgreSQL [4] to Apache Solr and to do a search in it using the capabilities of Solr. This makes it necessary to do several steps described below in more detail — setting up PostgreSQL, preparing a data structure in a PostgreSQL database, and connecting PostgreSQL to Apache Solr, and doing our search.
Step 1: Setting up PostgreSQL
About PostgreSQL – a short info
PostgreSQL is an ingenious object-relational database management system. It has been available for use and has undergone active development for over 30 years now. It originates from the University of California, where it is seen as the successor of Ingres [7].
From the start, it is available under open-source (GPL), free to use, modify, and distribute. It is widely used and very popular in the industry. PostgreSQL was initially designed to run on UNIX/Linux systems only and was later designed to run on other systems like Microsoft Windows, Solaris, and BSD. The current development of PostgreSQL is being done worldwide by numerous volunteers.
PostgreSQL setup
If not done yet, install PostgreSQL server and client locally, for example, on Debian GNU/Linux as described below using apt. Two articles are dealing with PostgreSQL — Yunis Said’s article [5] discusses the setup on Ubuntu. Still, he only scratches the surface while my previous article focuses on the combination of PostgreSQL with the GIS extension PostGIS [6]. The description here summarizes all the steps we need for this particular setup.
Next, verify that PostgreSQL is running with the help of the pg_isready command. This is a utility that is part of the PostgreSQL package.
/var/run/postgresql:5432 - Connections are accepted
The output above shows that PostgreSQL is ready and waiting for incoming connections on port 5432. Unless otherwise set, this is the standard configuration. The next step is setting the password for the UNIX user Postgres:
Keep in mind that PostgreSQL has its own user database, whereas the administrative PostgreSQL user Postgres does not have a password yet. The previous step has to be done for the PostgreSQL user Postgres, too:
$ psql -c "ALTER USER Postgres WITH PASSWORD 'password';"
For simplicity, the chosen password is just a password and should be replaced by a safer password phrase on systems other than testing. The command above will alter the internal user table of PostgreSQL. Be aware of the different quotation marks — the password in single quotes and the SQL query in double quotes to prevent the shell interpreter from evaluating the command in the wrong way. Also, add a semicolon after the SQL query before the double quotes at the end of the command.
Next, for administrative reasons, connect to PostgreSQL as user Postgres with the previously created password. The command is called psql:
Connecting from Apache Solr to the PostgreSQL database is done as the user solr. So, let’s add the PostgreSQL user solr and set a corresponding password solr for him in one go:
For simplicity, the chosen password is just solr and should be replaced by a safer password phrase on systems that are in production.
Step 2: Preparing a data structure
To store and retrieve data, a corresponding database is needed. The command below creates a database of cars that belongs to the user solr and will be used later.
Then, connect to the newly created database cars as user solr. The option -d (short option for –dbname) defines the database name, and -U (short option for –username) the name of the PostgreSQL user.
An empty database is not useful, but structured tables with contents do. Create the structure of the table cars as follows:
id int,
make varchar(100),
model varchar(100),
description varchar(100),
colour varchar(50),
price int
);
The table cars contain six data fields — id (integer), make (a string of length 100), model (a string of length 100), description (a string of length 100), colour (a string of length 50), and price (integer). To have some sample data add the following values to the table cars as SQL statements:
VALUES (1, 'BMW', 'X5', 'Cool car', 'grey', 45000);
$ INSERT INTO cars (id, make, model, description, colour, price)
VALUES (2, 'Audi', 'Quattro', 'race car', 'white', 30000);
The result is two entries representing a grey BMW X5 that costs USD 45000, described as a cool car, and a white race car Audi Quattro that costs USD 30000.
Next, exit from the PostgreSQL console using \q, or quit.
Step 3: Connecting PostgreSQL with Apache Solr
PostgreSQL and Apache Solr’s connection is based on two pieces of software — a Java driver for PostgreSQL called Java Database Connectivity (JDBC) driver and an extension to the Solr server configuration. The JDBC driver adds a Java interface to PostgreSQL, and the additional entry in the Solr configuration tells Solr how to connect to PostgreSQL using the JDBC driver.
Adding the JDBC driver is done as user root as follows, and installs the JDBC driver from the Debian package repository:
On the Apache Solr side, a corresponding node has to exist, too. If not done yet, as the UNIX user solr, create the node cars as follows:
Next, extend the Solr configuration for the newly created node. Add the lines below to the file /var/solr/data/cars/conf/solrconfig.xml:
Furthermore, create a file /var/solr/data/cars/conf/data-config.xml, and store the following content in it:
The lines above correspond to the previous settings and define the JDBC driver, specify the port 5432 to connect to the PostgreSQL DBMS as the user solr with the corresponding password, and set the SQL query to be executed from PostgreSQL. For simplicity, it is a SELECT statement that grabs the entire content of the table.
Next, restart the Solr server to activate your changes. As the user root execute the following command:
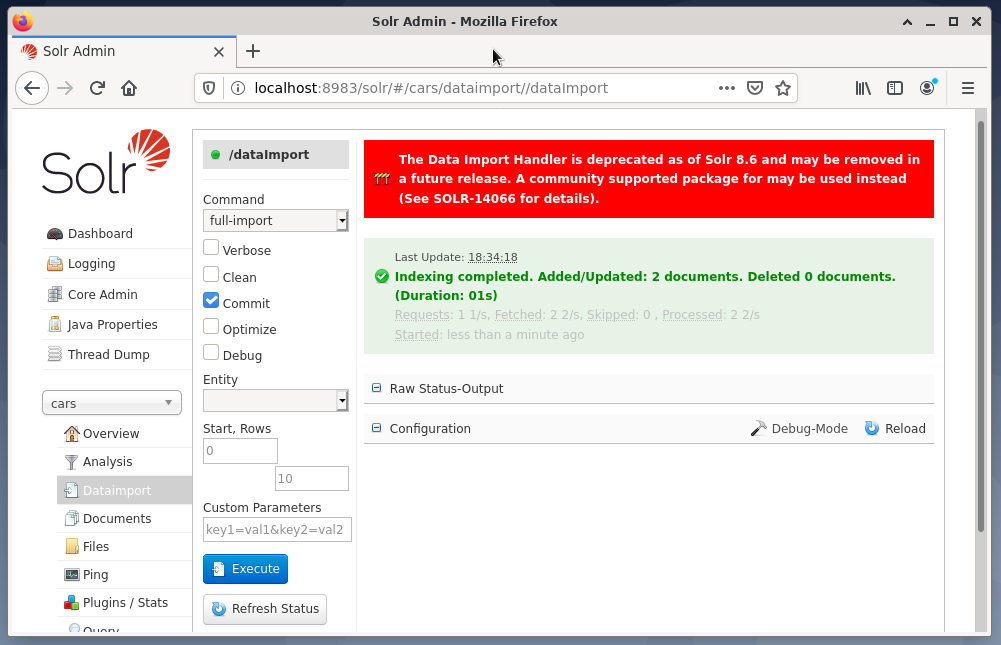
The last step is the import of the data, for example, using the Solr web interface. The node selection box chooses the node cars, then from the Node menu below the entry Dataimport followed by the selection of full-import from the Command menu right to it. Finally, press the Execute button. The figure below shows that Solr has successfully indexed the data.
Step 4: Querying data from the DBMS
The previous article [3] deals with querying data in detail, retrieving the result, and selecting the desired output format — CSV, XML, or JSON. Querying the data is done similarly to what you have learned before, and no difference is visible to the user. Solr does all the work behind the scenes and communicates with the PostgreSQL DBMS connected as defined in the selected Solr core or cluster.
The usage of Solr does not change, and queries can be submitted via the Solr admin interface or using curl or wget on the command-line. You send a Get request with a specific URL to the Solr server (query, update, or delete). Solr processes the request using the DBMS as a storage unit and returns the result of the request. Next, post-process the answer locally.
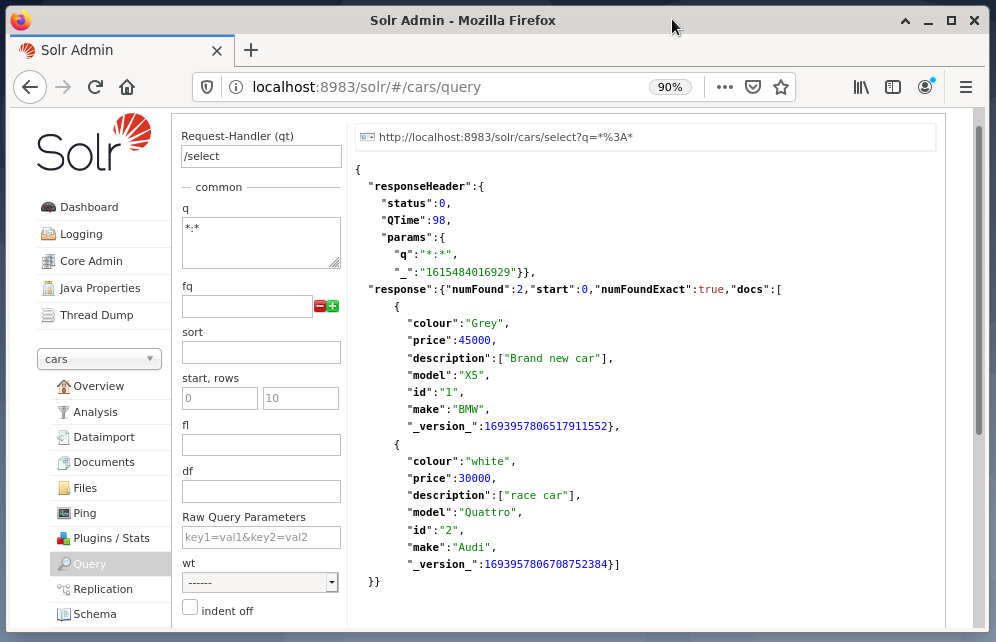
The example below shows the output of the query “/select?q=*. *” in JSON format in the Solr admin interface. The data is retrieved from the database cars that we created earlier.
Conclusion
This article shows how to query a PostgreSQL database from Apache Solr and explains the corresponding setup. In the next part of this series, you will learn how to combine several Solr nodes into a Solr cluster.
About the authors
Jacqui Kabeta is an environmentalist, avid researcher, trainer, and mentor. In several African countries, she has worked in the IT industry and NGO environments.
Frank Hofmann is an IT developer, trainer, and author and prefers to work from Berlin, Geneva, and Cape Town. Co-author of the Debian Package Management Book available from dpmb.org
Links and References
- [1] Apache Solr, https://lucene.apache.org/solr/
- [2] Frank Hofmann and Jacqui Kabeta: Introduction to Apache Solr. Part 1, https://linuxhint.com/apache-solr-setup-a-node/
- [3] Frank Hofmann and Jacqui Kabeta: Introduction to Apache Solr. Querying Data. Part 2, http://linuxhint.com
- [4] PostgreSQL, https://www.postgresql.org/
- [5] Younis Said: How to Install and Set Up PostgreSQL Database on Ubuntu 20.04, https://linuxhint.com/install_postgresql_-ubuntu/
- [6] Frank Hofmann: Setting up PostgreSQL with PostGIS on Debian GNU/Linux 10, https://linuxhint.com/setup_postgis_debian_postgres/
- [7] Ingres, Wikipedia, https://en.wikipedia.org/wiki/Ingres_(database)


