Part 1: Setting up a single node
Today, electronically storing your documents or data on a storage device is both quick and easy, it is comparably cheap, too. In use is a filename reference that is meant to describe what the document is about. Alternatively, data is kept in a Database Management System (DBMS) like PostgreSQL, MariaDB, or MongoDB to just name a few options. Several storage mediums are either locally or remotely connected to the computer, such as USB stick, internal or external hard disk, Network Attached Storage (NAS), Cloud Storage, or GPU/Flash-based, as in an Nvidia V100 [10].
In contrast, the reverse process, finding the right documents in a document collection, is rather complex. It mostly requires detecting the file format without fault, indexing the document, and extracting the key concepts (document classification). This is where the Apache Solr framework comes in. It offers a practical interface to do the steps mentioned — building a document index, accepting search queries, doing the actual search, and returning a search result. Apache Solr thus forms the core for effective research on a database or document silo.
In this article, you will learn how Apache Solr works, how to set up a single node, index documents, do a search, and retrieve the result.
The follow-up articles build on this one, and, in them, we discuss other, more specific use cases such as integrating a PostgreSQL DBMS as a data source or load balancing across multiple nodes.
About the Apache Solr project
Apache Solr is a search engine framework based on the powerful Lucene search index server [2]. Written in Java, it is maintained under the umbrella of the Apache Software Foundation (ASF) [6]. It is freely available under the Apache 2 license.
The topic “Find documents and data again” plays a very important role in the software world, and many developers deal with it intensively. The website Awesomeopensource [4] lists more than 150 search engine open-source projects. As of early 2021, ElasticSearch [8] and Apache Solr/Lucene are the two top dogs when it comes to searching for larger data sets. Developing your search engine requires a lot of knowledge, Frank does that with the Python-based AdvaS Advanced Search [3] library since 2002.
Setting up Apache Solr:
The installation and operation of Apache Solr are not complicated, it is simply a whole series of steps to be carried out by you. Allow about 1 hour for the result of the first data query. Furthermore, Apache Solr is not just a hobby project but is also used in a professional environment. Therefore, the chosen operating system environment is designed for long-term use.
As the base environment for this article, we use Debian GNU/Linux 11, which is the upcoming Debian release (as of early 2021) and expected to be available in mid-2021. For this tutorial, we expect that you have already installed it,–either as the native system, in a virtual machine like VirtualBox, or an AWS container.
Apart from the basic components, you need the following software packages to be installed on the system:
- Curl
- Default-java
- Libcommons-cli-java
- Libxerces2-java
- Libtika-java (a library from the Apache Tika project [11])
These packages are standard components of Debian GNU/Linux. If not yet installed, you can post-install them in one go as a user with administrative rights, for example, root or via sudo, shown as follows:
Having prepared the environment, the 2nd step is the installation of Apache Solr. As of now, Apache Solr is not available as a regular Debian package. Therefore, it is required to retrieve Apache Solr 8.8 from the download section of the project website [9] first. Use the wget command below to store it in the /tmp directory of your system:
The switch -O shortens –output-document and makes wget store the retrieved tar.gz file in the given directory. The archive has a size of roughly 190M. Next, unpack the archive into the /opt directory using tar. As a result, you will find two subdirectories — /opt/solr and /opt/solr-8.8.0, whereas /opt/solr is set up as a symbolic link to the latter one. Apache Solr comes with a setup script that you execute next, it is as follows:
This results in the creation of the Linux user solr runs in the Solr service plus his home directory under /var/solr establishes the Solr service, added with its corresponding nodes, and starts the Solr service on port 8983. These are the default values. If you are unhappy with them, you can modify them during installation or even latersince the installation script accepts corresponding switches for setup adjustments. We recommend you to have a look at the Apache Solr documentation regarding these parameters.
The Solr software is organized in the following directories:
- bin
contains the Solr binaries and files to run Solr as a service - contrib
external Solr libraries such as data import handler and the Lucene libraries - dist
internal Solr libraries - docs
link to the Solr documentation available online - example
example datasets or several use cases/scenarios - licenses
software licenses for the various Solr components - server
server configuration files, such as server/etc for services and ports
In more detail, you can read about these directories in the Apache Solr documentation [12].
Managing Apache Solr:
Apache Solr runs as a service in the background. You can start it in two ways, either using systemctl (first line) as a user with administrative permissions or directly from the Solr directory (second line). We list both terminal commands below:
$ solr/bin/solr start
Stopping Apache Solr is done similarly:
$ solr/bin/solr stop
The same way goes in restarting the Apache Solr service:
$ solr/bin/solr restart
Furthermore, the status of the Apache Solr process can be displayed as follows:
$ solr/bin/solr status
The output lists the service file that was started, both the corresponding timestamp and log messages. The figure below shows that the Apache Solr service was started on port 8983 with process 632. The process is successfully running for 38 minutes.

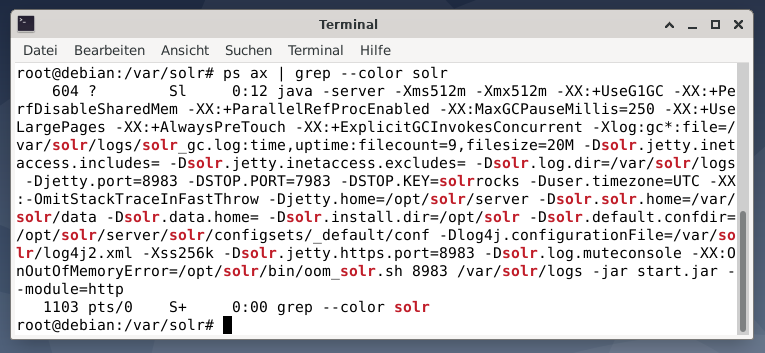
To see if the Apache Solr process is active, you may also cross-check using the ps command in combination with grep. This limits the ps output to all the Apache Solr processes that are currently active.
The figure below demonstrates this for a single process. You see the call of Java that is accompanied by a list of parameters, for example memory usage (512M) ports to listen on 8983 for queries, 7983 for stop requests, and type of connection (http).
Adding users:
The Apache Solr processes run with a specific user named solr. This user is helpful in managing Solr processes, uploading data, and sending requests. Upon setup, the user solr does not have a password and is expected to have one to log in to proceed further. Set a password for the user solr like user root, it is shown as follows:
Solr Administration:
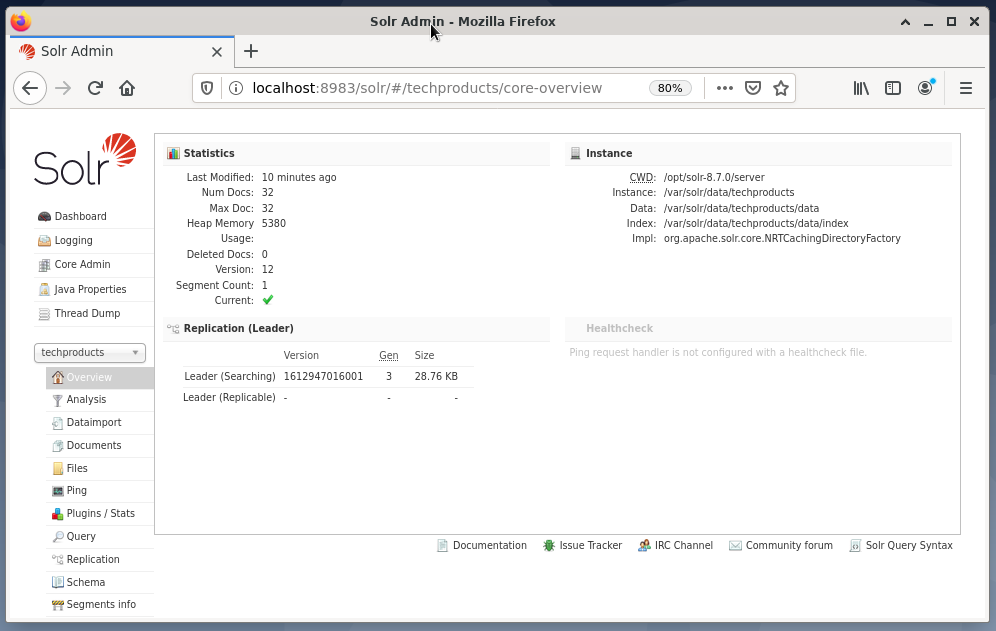
Managing Apache Solr is done using the Solr Dashboard. This is accessible via web browser from http://localhost:8983/solr. The figure below shows the main view.
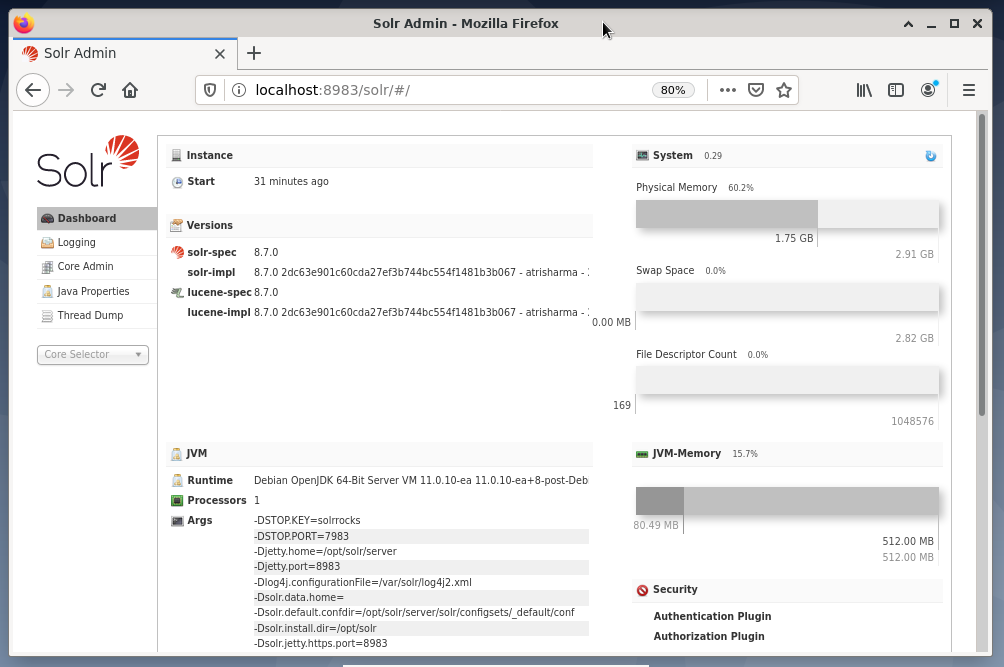
On the left, you see the main menu that leads you to the subsections for logging, administration of the Solr cores, the Java setup, and the status information. Choose the desired core using the selection box below the menu. On the right side of the menu, the corresponding information is displayed. The Dashboard menu entry shows further details regarding the Apache Solr process, as well as the current load and memory usage.
Please know that the contents of the Dashboard changes depending on the number of Solr cores, and the documents that have been indexed. Changes affect both the menu items and the corresponding information that is visible on the right.
Understanding How Search Engines Work:
Simply speaking, search engines analyze documents, categorize them, and allow you to do a search based on their categorization. Basically, the process consists of three stages, which are termed as crawling, indexing, and ranking [13].
Crawling is the first stage and describes a process by which new and updated content is collected. The search engine uses robots that are also known as spiders or crawlers, hence the term crawling to go through available documents.
The second stage is called indexing. The previously collected content is made searchable by transforming the original documents into a format the search engine understands. Keywords and concepts are extracted and stored in (massive) databases.
The third stage is called ranking and describes the process of sorting the search results according to their relevance with a search query. It is common to display the results in descending order so that the result that has the highest relevance to the searcher’s query comes first.
Apache Solr works similarly to the previously described three-stage process. Like the popular search engine Google, Apache Solr uses a sequence of gathering, storing, and indexing documents from different sources and makes them available/searchable in near real-time.
Apache Solr uses different ways to index documents including the following [14]:
- Using an Index Request Handler when uploading the documents directly to Solr. These documents should be in JSON, XML/XSLT, or CSV formats.
- Using the Extracting Request Handler (Solr Cell). The documents should be in PDF or Office formats, which are supported by Apache Tika.
- Using the Data Import Handler, which conveys data from a database and catalogs it using column names. The Data Import Handler fetches data from emails, RSS feeds, XML data, databases, and plain text files as sources.
A query handler is used in Apache Solr when a search request is sent. The query handler analyzes the given query based on the same concept of the index handler to match the query and previously indexed documents. The matches are ranked according to their appropriateness or relevance. A brief example of querying is demonstrated below.
Uploading Documents:
For the sake of simplicity, we use a sample dataset for the following example that is already provided by Apache Solr. Uploading documents is done as the user solr. Step 1 is the creation of a core with the name techproducts (for a number of tech items).
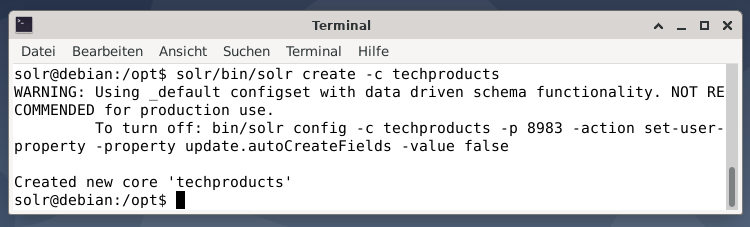
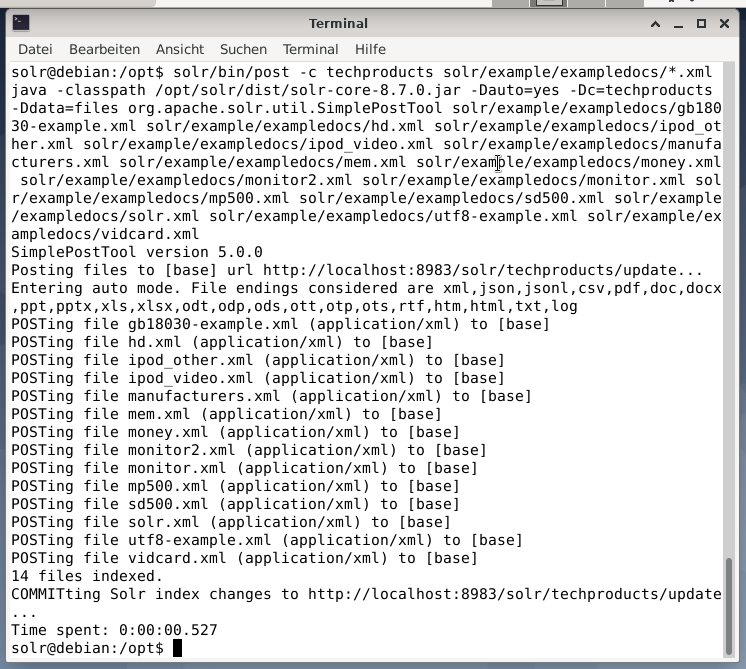
Everything is fine if you see the message “Created new core ‘techproducts’”. Step 2 is adding data (XML data from exampledocs) to the previously created core techproducts. In use is the tool post that is parameterized by -c (name of the core) and the documents to be uploaded.
This will result in the output shown below and will contain the entire call plus the 14 documents that have been indexed.
Also, the Dashboard shows the changes. A new entry named techproducts is visible in the dropdown menu on the left side, and the number of corresponding documents changed on the right side. Unfortunately, a detailed view of the raw datasets is not possible.
In case the core/collection needs to be removed, use the following command:
Querying Data:
Apache Solr offers two interfaces to query data: via the web-based Dashboard and command-line. We will explain both methods below.
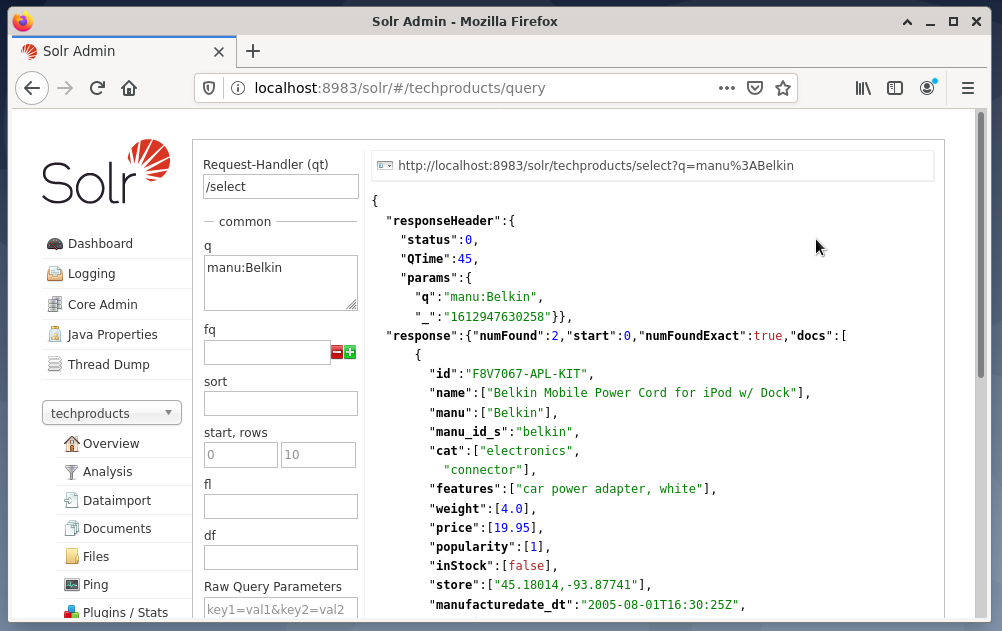
Sending queries via Solr dashboard is done as follows:
- Choose the node techproducts from the dropdown menu.
- Choose the entry Query from the menu below the dropdown menu.
Entry fields pop up on the right side to formulate the query like request handler (qt), query (q), and the sort order (sort). - Choose the entry field Query, and change the content of the entry from “*:*” to “manu:Belkin”. This limits the search from “all fields with all entries” to “datasets that have the name Belkin in the manu field”. In this case, the name manu abbreviates manufacturer in the example data set.
- Next, press the button with Execute Query. The result is a printed HTTP request on top, and a result of the search query in JSON data format below.
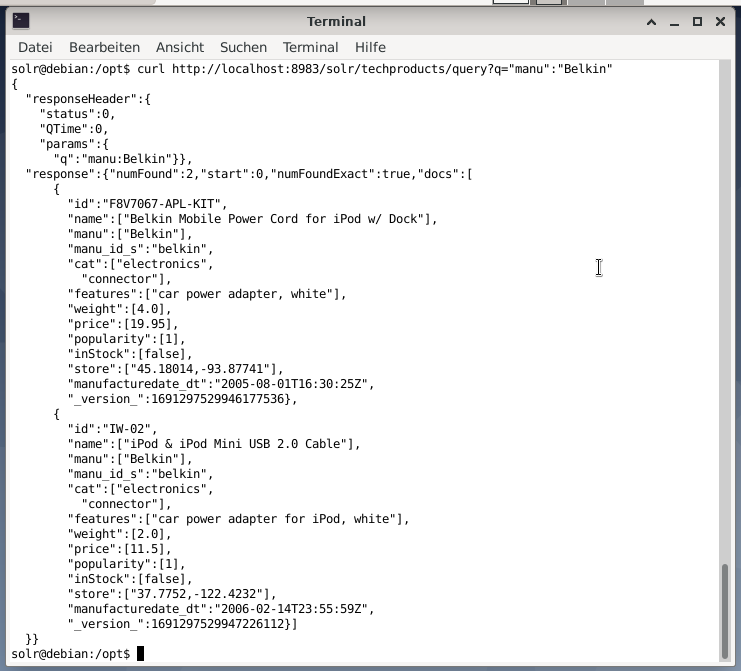
The command-line accepts the same query as in the Dashboard. The difference is that you must know the name of the query fields. In order to send the same query like above, you have to run the following command in a terminal:
http://localhost:8983/solr/techproducts/query?q=”manu”:”Belkin
The output is in JSON format, as shown below. The result consists of a response header and the actual response. The response consists of two data sets.
Wrapping Up:
Congratulations! You have achieved the first stage with success. The basic infrastructure is set up, and you have learned how to upload and query documents.
The next step will cover how to refine the query, formulate more complex queries, and understand the different web forms provided by the Apache Solr query page. Also, we will discuss how to post-process the search result using different output formats such as XML, CSV, and JSON.
About the authors:
Jacqui Kabeta is an environmentalist, avid researcher, trainer, and mentor. In several African countries, she has worked in the IT industry and NGO environments.
Frank Hofmann is an IT developer, trainer, and author and prefers to work from Berlin, Geneva, and Cape Town. Co-author of the Debian Package Management Book available from dpmb.org
- [1] Apache Solr, https://lucene.apache.org/solr/
- [2] Lucene Search Library, https://lucene.apache.org/
- [3]AdvaS Advanced Search, https://pypi.org/project/AdvaS-Advanced-Search/
- [4] The Top 165 Search Engine Open Source Projects, https://awesomeopensource.com/projects/search-engine
- [5] ElasticSearch, https://www.elastic.co/de/elasticsearch/
- [6]Apache Software Foundation (ASF), https://www.apache.org/
- [7]FESS, https://fess.codelibs.org/index.html
- [8] ElasticSearch, https://www.elastic.co/de/
- [9] Apache Solr, Download section, https://lucene.apache.org/solr/downloads.htm
- [10] Nvidia V100, https://www.nvidia.com/en-us/data-center/v100/
- [11] Apache Tika, https://tika.apache.org/
- [12] Apache Solr directory layout, https://lucene.apache.org/solr/guide/8_8/installing-solr.html#directory-layout
- [13] How Search Engines Work: Crawling, Indexing, and Ranking. The beginners guide to SEO https://moz.com/beginners-guide-to-seo/how-search-engines-operate
- [14] Get Started with Apache Solr, https://sematext.com/guides/solr/#:~:text=Solr%20works%20by%20gathering%2C%20storing,with%20huge%20volumes%20of%20data