This guide is a step-by-step process to repair a Windows 10/11 computer using a USB drive:
- How to Create/Make a Windows 10/11 Bootable USB?
- How to Repair Windows 10/11 Computer Using a USB Device?
How to Create/Make a Windows 10/11 Bootable USB?
The “Windows 10/11 Bootable USB” can be created by following these steps:
Step 1: Download Windows 10/11 ISO File
First, download the Windows 10/11 ISO files from the below-mentioned official sources:
Note: Microsoft has discontinued the official ISO files for Windows 10; however, following this guide, you can create a “Windows 10 Recovery USB” using which you can repair Windows 10.
Step 2: Create/Make a Windows 11 Bootable USB
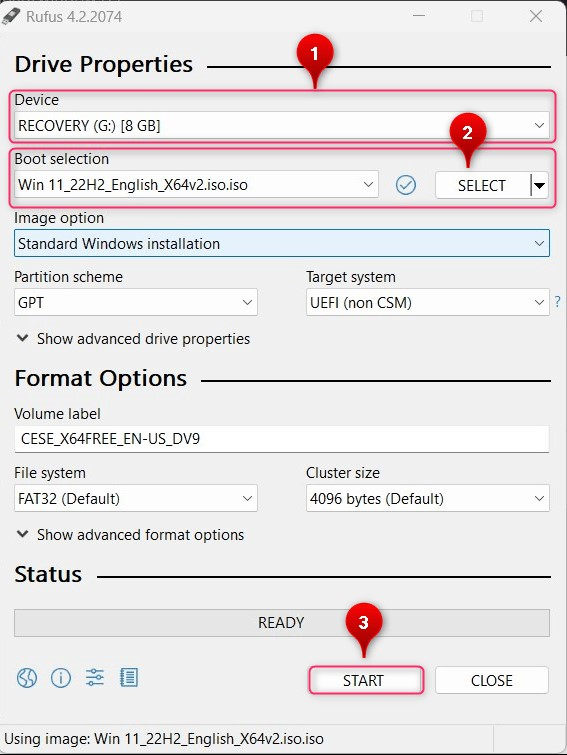
To create/make a “Windows 11 Bootable USB”, download and launch the “Rufus” from the official website. After launching, you must specify
- The USB device that will be used to repair Windows.
- The ISO file that you have downloaded.
- Once done, hit the “Start” button to begin the process:
How to Repair Windows 10/11 Computer Using a USB Device?
The process to “Repair Windows 10/11” is quite similar and to do that, you must boot from the USB you created earlier by following these steps:
Step 1: Boot From Windows 10/11 Bootable USB Drive
Reboot/start the system and trigger its boot options using the “Esc, F2, F10, or F12” keys and select “Boot from USB” and it will take you to the installation process.
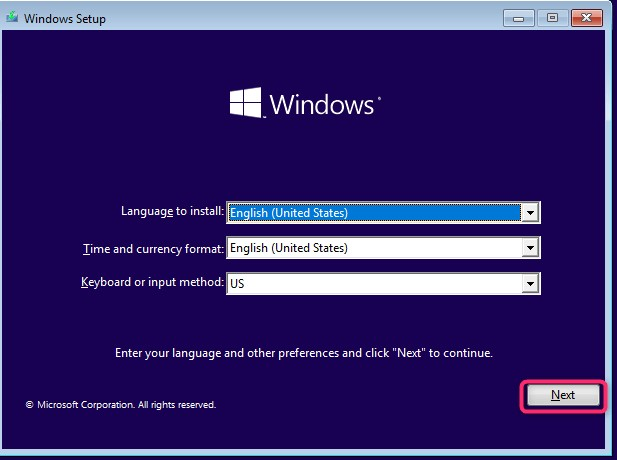
Step 2: Open Repair Windows 10/11 Options From the USB Drive
To open the repair options for “Windows 10/11 Repair Process”, you shall be asked to choose the language, and once done, hit the “Next” button to continue with the process:
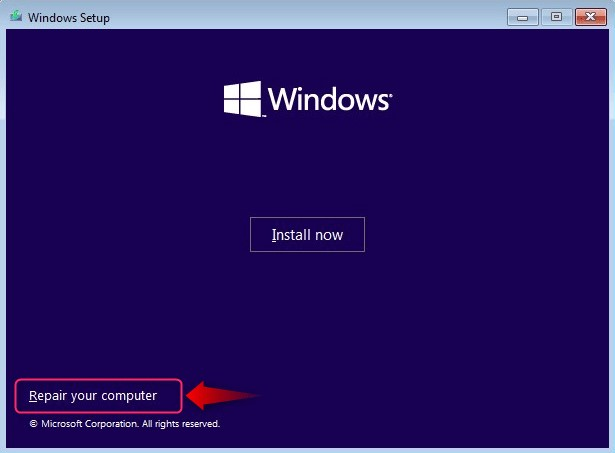
Next, select “Repair your computer” to begin the OS repair process:
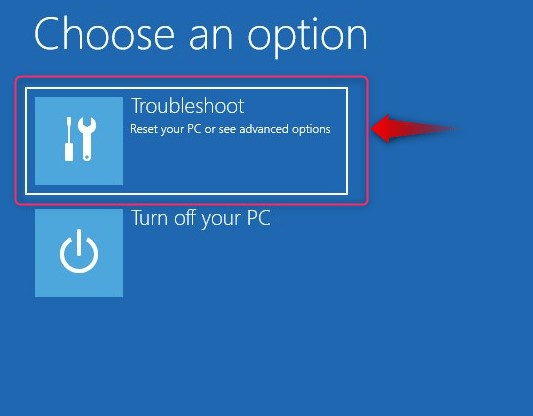
It will now open the following window which is also called “Windows Recovery Environment”, Choose the “Troubleshoot” option from here:
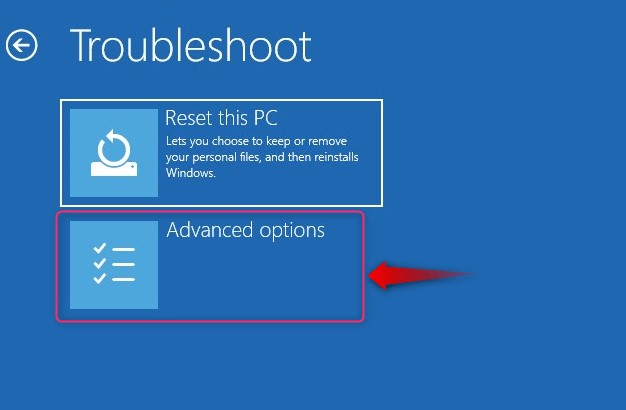
From the following window, select “Advanced options” to view the tools and utilities to “Repair Windows”:
Step 3: Perform a Startup Repair
In the “Advanced options” in “Windows Recovery Environment”, use the “Startup Repair” to trigger the process to automatically detect and fix the issues that are preventing the system from booting. It works by scanning the system for corrupt files and automatically fixes them:

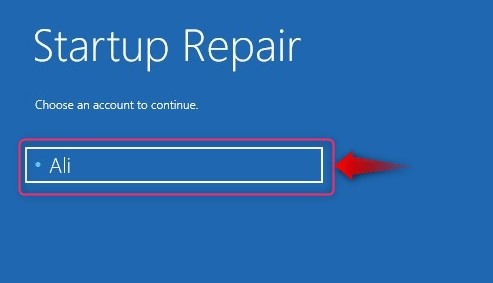
You will now be asked to select the username (choose your username by clicking on it):
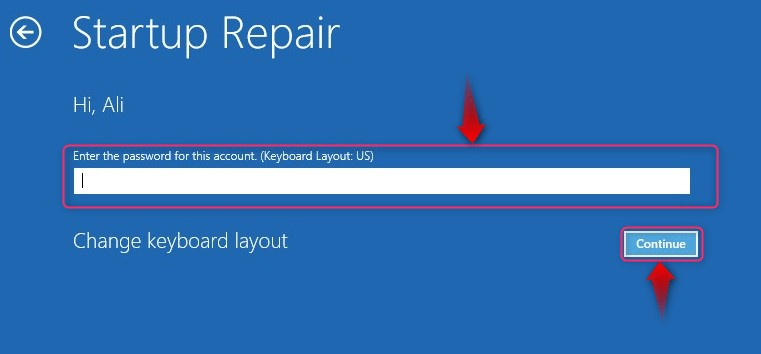
Next, enter the password for the user you selected and hit the “Continue” button and the wizard will attempt to fix the startup issues:
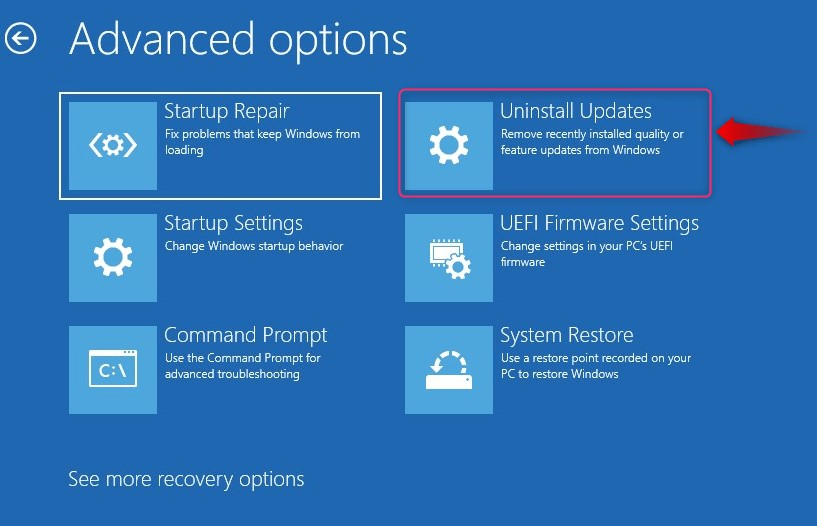
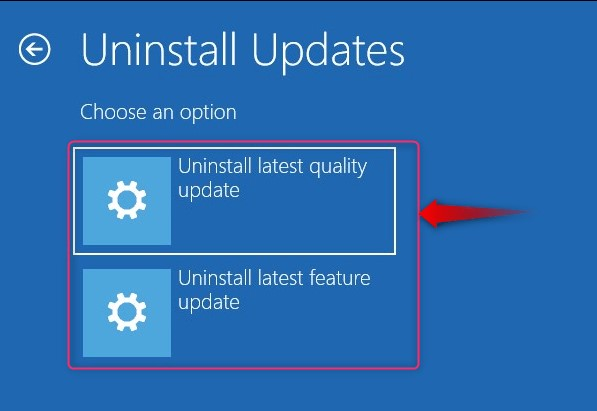
Step 4: Uninstall Updates
A few users faced issues with Windows 10/11 after updating the OS to the latest version. These issues cannot be fixed until there is another update available (could take days) or the latest updates are uninstalled. To uninstall the latest updates, select “Uninstall Updates” from the “Advanced options” of “Windows Recovery Environment”:
Next, choose the type of update you want to uninstall (whether it is a feature update or a quality update) and it will uninstall the latest update from the system:
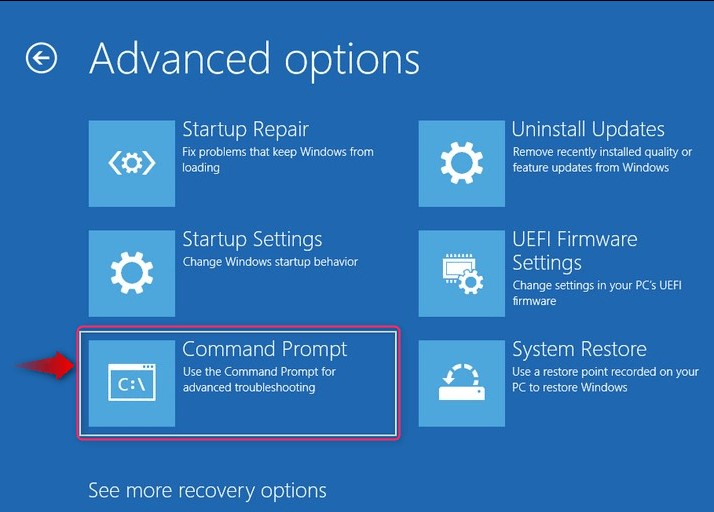
Step 5: Use the Command prompt to Repair Windows 10/11
If none of the other steps are working, try using the “Command Prompt” from the “Advanced options” of “Windows Recovery Environment” to fix the “Boot Codes”. The “Boot Codes” are the set of instructions that provide a guideline for the OS to load and run the OS and the system will not boot:
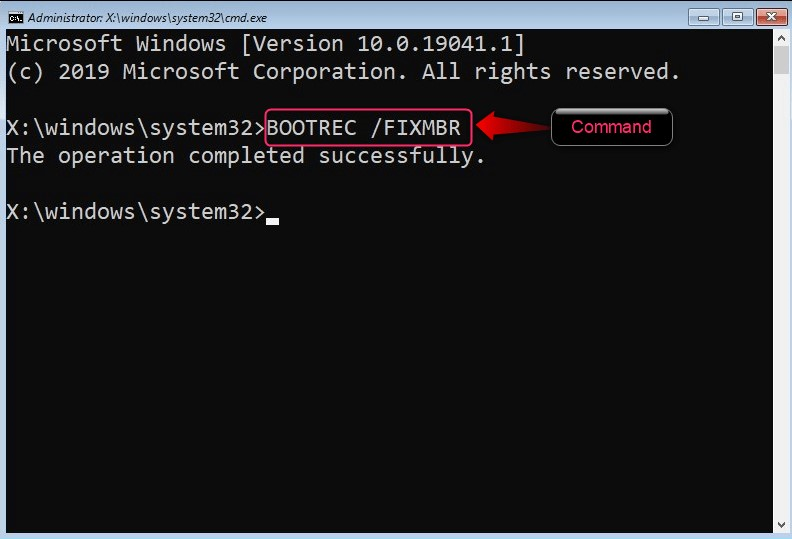
Once the “Command Prompt” is opened, run the following command to fix the error with the “Boot Codes”:
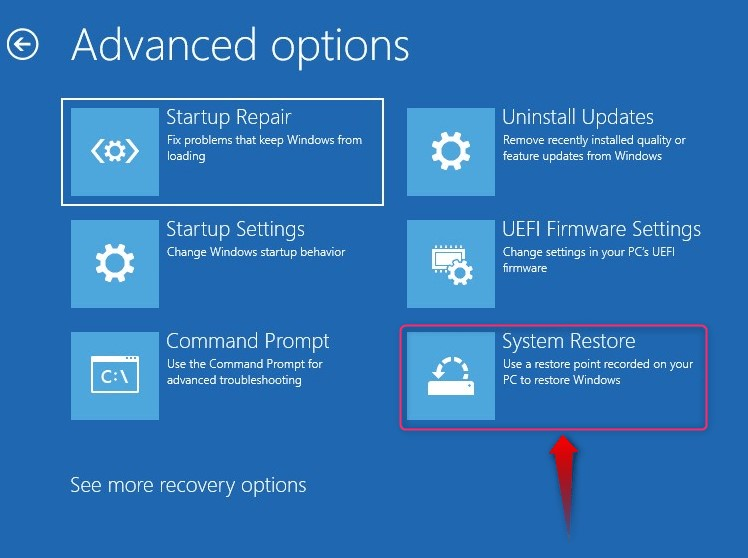
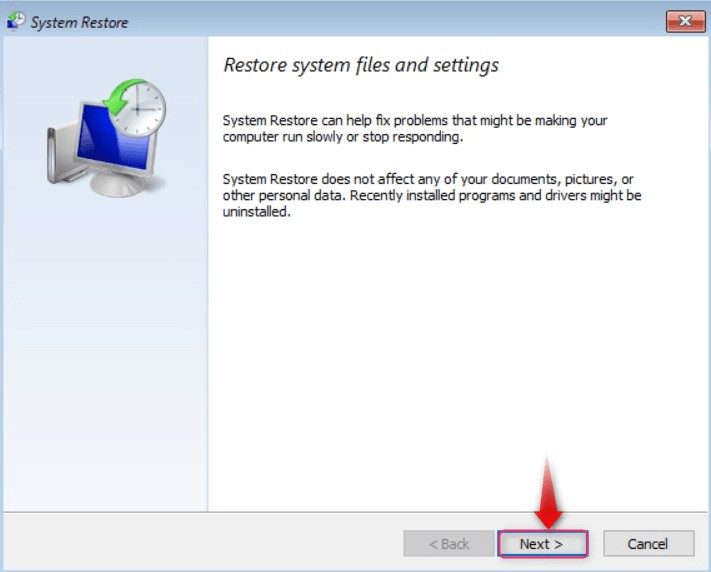
Step 6: Perform a System Restore
While installing new drivers or software, it is recommended to create a system restore point. If you have created one, you can revert Windows 10/11 back to the point it was created. To do that, select “System Restore” from the “Advanced options” of “Windows Recovery Environment”:
The system will now take you to the “System Restore” window. Hit the “Next” button to start the process:
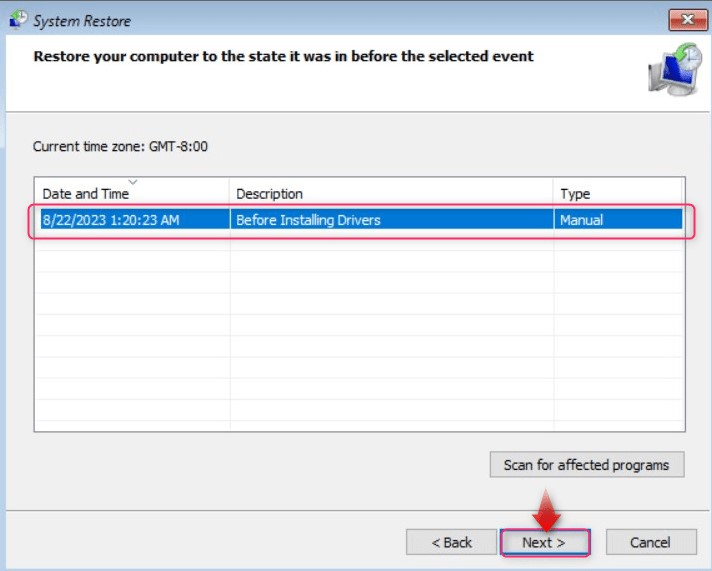
Next, select the “System Restore” point and hit the “Next” button:
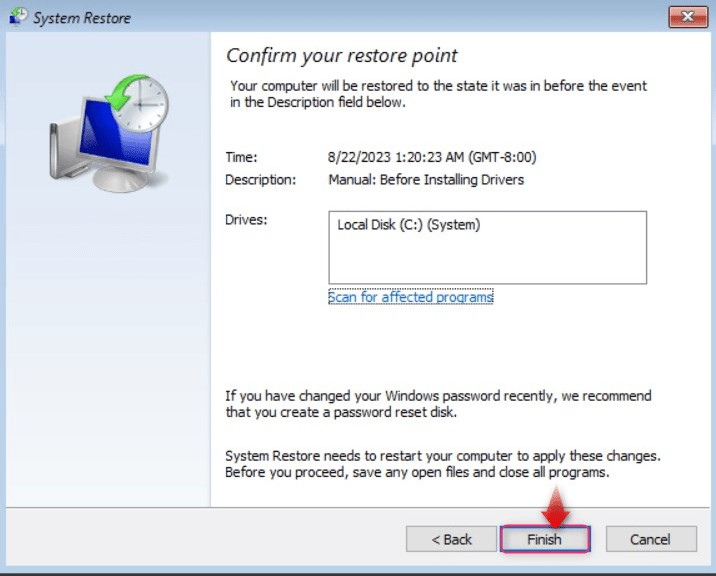
Finally, confirm the action using the “Finish” button:
That’s it for repairing a Windows 10/11 computer using a USB drive.
Conclusion
To repair a Windows 10/11 computer using a USB drive, create a bootable USB drive first, boot from it, and using the “Repair your computer” option, enter the “Windows Recovery Environment”. From here, you can find several tools and utilities to repair Windows 10/11, as explained above in detail. This guide has provided the steps to repair a Windows 10/11 computer using a USB device.