In this tutorial, we will learn how to configure a partition in Milvus and use Milvus to load the partition for use.
What Is Partition Loading?
In Milvus, loading a partition refers to moving the data of a given partition from the system’s permanent disk to the system memory. This process is essential because the data in the memory can be accessed and searched significantly faster than the data that is stored on the disk.
When you load a partition, you’re essentially preparing that partition for fast and efficient vector similarity searches. This can be particularly useful when working with large datasets and only need to perform the searches within a specific subset (or partition) of data.
Once a partition is loaded into the memory, any searches against that partition is performed in the memory which leads to faster search speeds. Conversely, when a partition is released from the memory, it frees up the memory resources but it also means that the subsequent searches will need to access the data from the disk, which could be slower.
Requirements:
To follow along with this tutorial, ensure that you have the following:
- Milvus database server, local or remote
- The Milvus CLI utility
Create a Partition Using the Milvus CLI
To create a partition for a given collection using the Milvus CLI utility, we can use the “create partition” command as shown in the following syntax:
The parameters of the previous command are explained as follows:
-c – It denotes the collection name on which you wish to create the partition.
-p – It allows you to specify the name of your target partition.
-d – This is an optional parameter that denotes the description of the target partition.
Let us demonstrate how to create a new Milvus partition using the Milvus CLI.
Start by creating a basic Milvus collection as shown in the following command:
The previous command should create a new film collection with the defined schema fields and types.
To ensure that Milvus will initialize the default partition once the collection is created, we use the -p parameter which ensures that Milvus configures a default partition.
Load a Partition in Milvus
We can load a Milvus collection to the memory using the “load partition” command in the Milvus CLI.
The command syntax is as follows:
The command accepts the collection and partition names that are denoted by the -c and -p parameters, respectively.
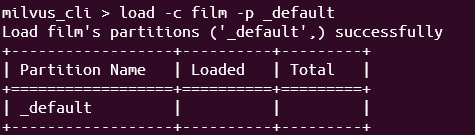
For example, suppose we wish to load the default partition of the film collection. We can use the following command:
The previous command loads the default partition of the film collection into the memory which allows for faster operations.
Conclusion
We learned how to use the “load” command in the Milvus CLI to load a given partition into the memory. We recommend you to explore our other Milvus tutorials to learn more about Milvus features such as collections, indexes, schema types, fields, and more. See you there!