Tools to Use in ARP Spoofing Attack
There are many tools like Arpspoof, Cain & Abel, Arpoison, and Ettercap which are available to start the ARP spoofing.
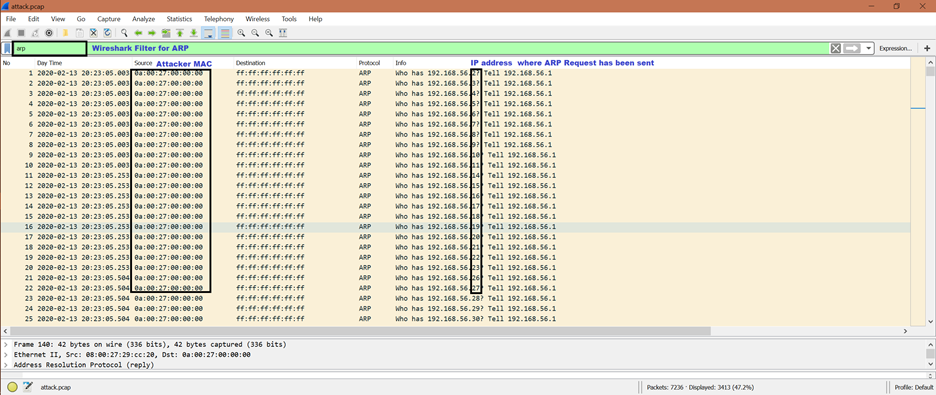
Here is the screenshot to show how the mentioned tools can send the ARP request contentiously:
ARP Spoofing Attack in Details
Let us see some screenshots and understand the ARP spoofing step-by-step:
Step 1:
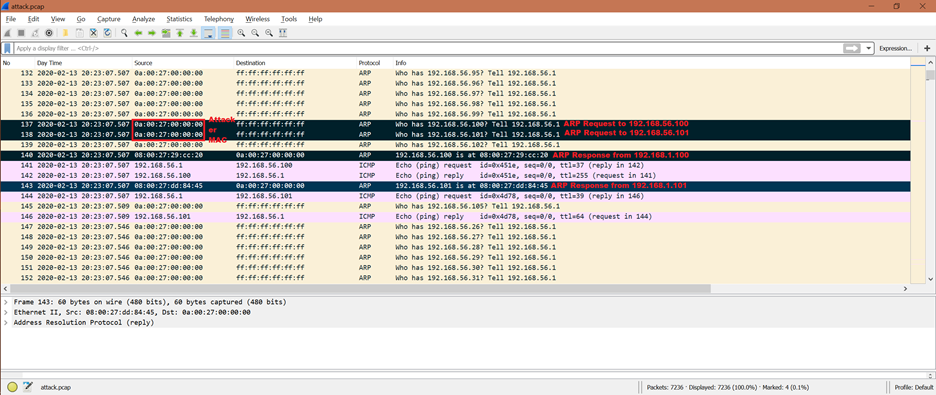
The attacker’s expectation is to get the ARP reply so that it can learn the victim’s MAC address. Now, if we go further in the given screenshot, we can see that there are 2 ARP replies from the 192.168.56.100 and 192.168.56.101 IP addresses. After this, the victim [192.168.56.100 and 192.168.56.101] updates its ARP cache but did not query back. So, the entry in the ARP cache never gets corrected.
The ARP request packet numbers are 137 and 138. The ARP response packet numbers are 140 and 143.
Thus, the attacker finds the vulnerability by doing the ARP spoofing. This is called as the “entry of attack”.
Step 2:
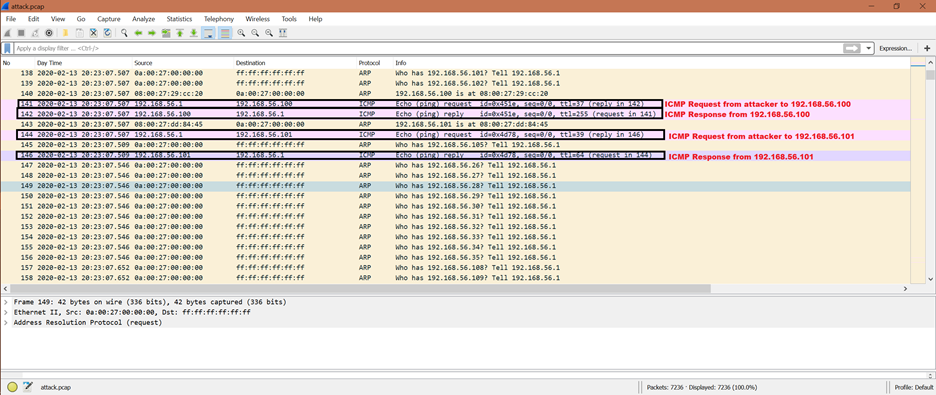
The packet numbers are 141, 142 and 144, 146.
From the previous activity, attacker now has valid MAC addresses of 192.168.56.100 and 192.168.56.101. The next step for the attacker is to send the ICMP packet to the victim’s IP address. And we can see from the given screenshot that the attacker sent an ICMP packet and got an ICMP reply from 192.168.56.100 and 192.168.56.101. This means that both IP addresses [192.168.56.100 and 192.168.56.101] are reachable.
Step 3:
We can see that there is the last ARP request for 192.168.56.101 IP address to confirm that the host is active and it has the same MAC address of 08:00:27:dd:84:45.
The given packet number is 3358.
Step 4:
There are another ICMP request and response with the 192.168.56.101 IP address. The packet numbers are 3367 and 3368.
We can think from here that the attacker is targeting the victim whose IP address is 192.168.56.101.
Now, any information that comes from the IP address of 192.168.56.100 or 192.168.56.101 to IP 192.168.56.1 reaches to the MAC address attacker whose IP address is 192.168.56.1.
Step 5:
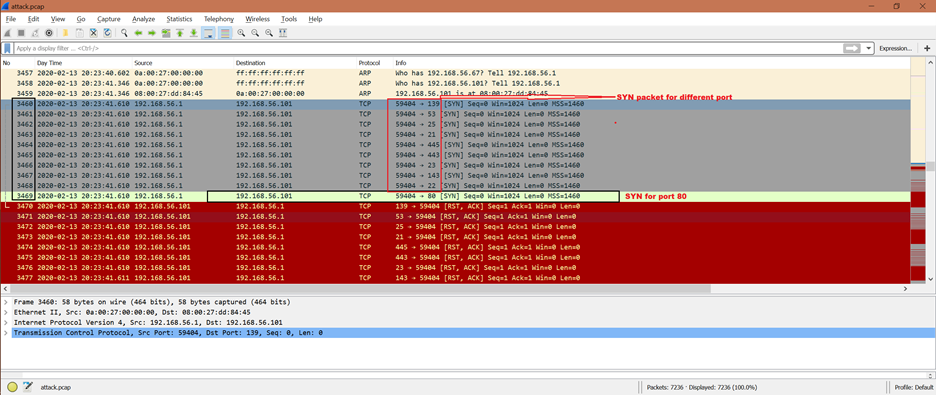
Once the attacker has access, it tries to establish an actual connection. From the given screenshot, we can see that the HTTP connection establishment is being tried from the attacker. There is a TCP connection inside the HTTP which means that there should be a 3-WAY handshake. These are the packet exchanges for TCP:
SYN -> SYN+ACK -> ACK.
From the given screenshot, we can see that the attacker is retrying the SYN packet multiple times on different ports. The frame number 3460 to 3469. The packet number 3469 SYN is for port 80 which is HTTP.
Step 6:
The first successful TCP handshake is shown at the following packet numbers from the given screenshot:
4488: SYN frame from attacker
4489: SYN+ACK frame from 192.168.56.101
4490: ACK frame from attacker
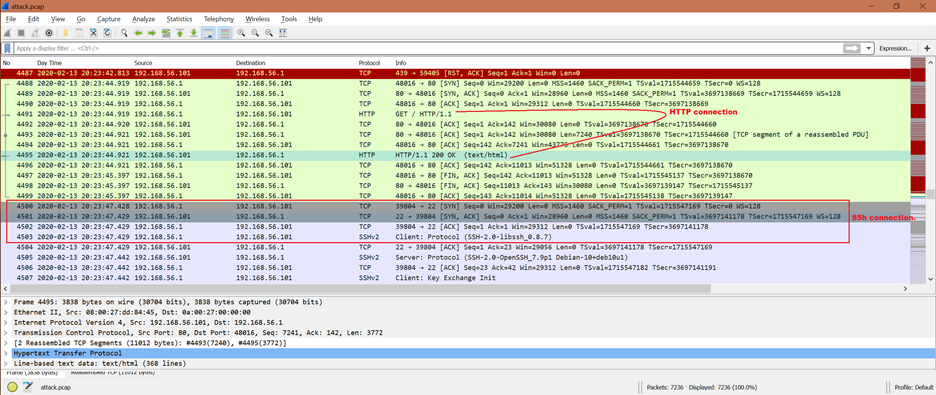
Step 7:
Once the TCP connection is successful, the attacker is able to establish the HTTP connection [frame number 4491 to 4495] followed by the SSH connection [frame number 4500 to 4503].
Now, the attack has enough control so that it can do the following:
- Session hijacking attack
- Man in the middle attack [MITM]
- Denial of Service (DoS) attack
How to Prevent the ARP Spoofing Attack
Here are some protections that can be taken to prevent the ARP spoofing attack:
- Use of “Static ARP” entries
- ARP spoofing detection and prevention software
- Packet filtering
- VPNs, etc.
Also, we could stop this from happening again if we use HTTPS instead of HTTP and use the SSL (Secure Socket layer) transport layer security. This is so that all communications are encrypted.
Conclusion
From this article, we got some basic idea on ARP spoofing attack and how it can access any system’s resource. Also, we now know how to stop this kind of attack. This information helps the network administrator or any system user to protect from ARP spoofing attack.

