In this article, we will be taking a look at the Vacuum instruction while using the Ubuntu 20.04 system. Let’s get started with the launch of Ubuntu’s console application. Use the “Ctrl+Alt+T” shortcut to open it quickly. Try using the apt “update” keyword instruction at the shell as shown. It may ask you for a logged-in user password.
If you want, you can upgrade it as well. Otherwise, open the SQLite database within the shell. For the opening of the SQLite database, try out the one-word instruction “sqlite3” at this shell. The database console will be generated as shown. Now, you need to create tables and insert records within them.
So, we have been creating a new table named “TEST” with two columns using the CREATE TABLE instruction (i.e., ID and SAL.) Both its columns are of integer type. After the creation of this table “TEST”, we will have to insert some records within it with the help of an INSERT INTO instruction followed by the table name, column names in which we want to put values, and the keyword “VALUES” followed by the records to be inserted. A total of 5 records for the ID and SAL column of table TEST have been added successfully. The SELECT instruction has been showing a total of 5 records at our SQLite shell screen.
INSERT INTO TEST(ID, SAL) VALUES (1, 25600), (2, 34000), (3, 56000), (4, 44000), (5, 66000);
SELECT * FROM TEST;
After this, we need to create one more table without any fault. For this, we will be again using the CREATE TABLE instruction with a new table named DATA and the columns mentioned within the brackets along with their types. Two columns ID and NAME have been created for this table. After this, the INSERT INTO instruction has been used once again to insert some records within the ID and NAME columns of a table within this newly generated table “DATA”.
After inserting the total of 5 records within this new table “DATA”, we have tried the SELECT instruction to see the data that has been inserted by the user. The output of the SELECT instruction has been showing us the new 5 records for this table.
INSERT INTO DATA(ID, NAME) VALUES (1, "Ema"), (2, "Emerald"), (3, "Bryan"),
(4, "Leonardo"), (5, "Decaprio");
SELECT * FROM DATA;
While adding these records to their respective tables, we have encountered many problems and errors. These problems and errors have been presented in the attached photo to let you know that the vacuum command will be used to free up the space that these errors and problems have been taken and have not been removed yet. Even though we have removed the table DATA within the shown image, the process of dropping will not release the space occupied by these errors and tables that have been created.
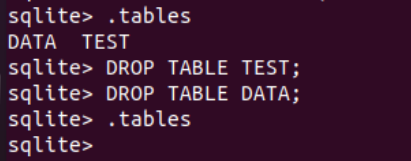
The .tables instruction has been used to display the list of tables. A total of 2 tables have been found so far. Let’s use the DROP instruction to remove both the tables from our database, TEST and DATA. After deleting both these tables, we have found no tables within the table list displayed by the “.tables” instruction. Although we have removed these tables from our system, the memory they occupied has not been released yet. To free up that space, we need to perform the VACUUM instruction on our shell after that.
DROP TABLE TEST;
DROP TABLE DATA;
To manually perform the vacuum on your SQLite database, you need to use the simple VACUUM instruction at the shell. The image below is showing its demonstration. It will free up the space occupied by the incomplete processes and Drop commands.
Let’s suppose, you have created a new database. Also, you have added some tables to it and now you want to vacuum it fully. Then, you can also perform the manual way of using the VACUUM instruction. For instance, we have created a new database named “test” using the sqlite3 instruction. The database was created successfully. After that, we tried to create some tables within it and tried to insert some records in the tables as well (i.e., TEST.) At last, we have tried the VACUUM instruction to clean up the database “test” manually.
Another way to use the VACUUM instruction to clean up your specific database is to try out the VACUUM instruction at the Linux shell. We have tried the sqlite3 instruction with the newly made database name “test” followed by the auto vacuum type we want to perform. The value of “PRAGMA auto vacuum” can be set by users themselves. You can simply use the VACUUM keyword with the test name on the shell as well.
sqlite3 database_name "VACUUM"
We can set the value of the PRAGMA auto_vacuum variable to FULL for full-fledged auto clean-up, to INCREMENTAL for supporting clean-up in increments, and NONE to avoid an auto vacuum.
Conclusion:
This was on the use of VACUUM instruction of a Linux shell and SQLite database to clean up the already existing databases and tables by saving them to duplicate databases and putting them back after the VACUUM has been performed.


