Install Pygame using:
Step 1: Creating the initial window
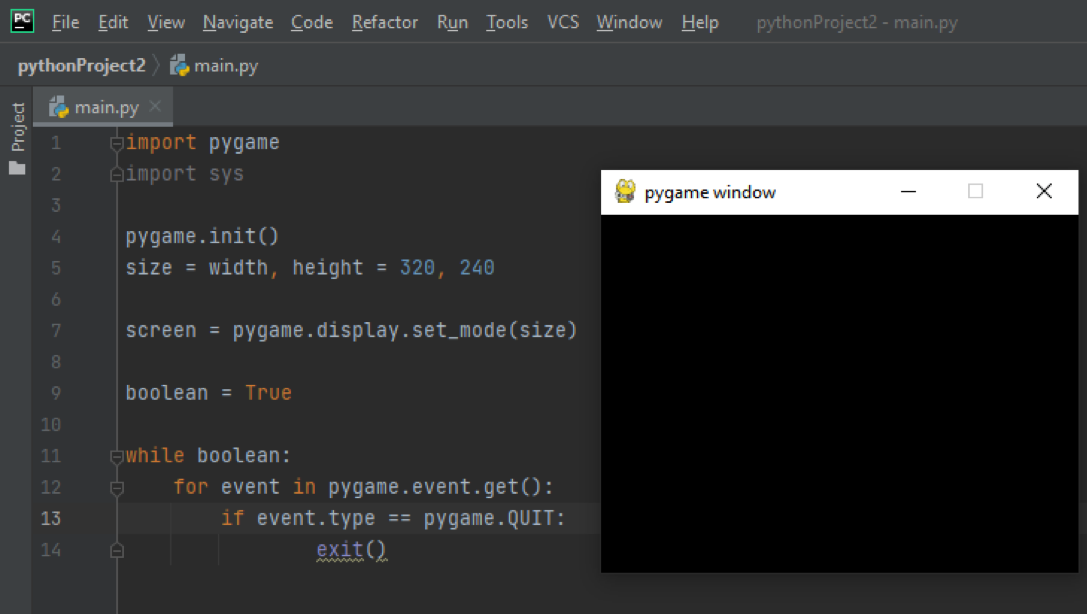
The first step in creating a video game is initializing the pygame using the init() method. Next, we set the geometry of the screen using pygame.display.set_mode(), where we pass the width and the height of the screen (in that order). These two lines of code will create a window that will quickly disappear, so we need a mainloop to keep the window running. Within this mainloop, we will add an exit strategy. The exit strategy is created by selecting an event from the events list (this event list lies within pygame.event.get() which harbours all the events available). Next, we state that if the event that we have selected is pygame.QUIT, then exit. The latter will create a mainloop for the window, which will keep the window running until you press the quit button.
import sys
pygame.init()
size = width, height = 800, 600
screen = pygame.display.set_mode(size)
while True:
for event in pygame.event.get():
if event.type == pygame.QUIT:
sys.exit()
Step 2: Adding titles, icons, background colors and images
In this section, we’ll be adding titles, background colors and images, and icons to the window.
(a) The title is added using:
pygame.display.set_caption("Video Game")
(b) I got my logo from https://icons8.com/icon/set/computer-hardware/doodle. If you’re using PyCharm, please place the icon you download in the appropriate folder (in my case, it was C:\Users\never\PycharmProjects\pythonProject2\icon.png). The logo is added using:
image = pygame.image.load("icon.png")
pygame.display.set_icon(image)
(c) You can also change the backgound color. For this, we use screen.fill() which takes an RGB color. In my case, I have set it to (0,0,0). Once you set the colour, you must also update the pygame for the color change to take effect.
screen.fill((0, 0, 0))
pygame.display.update()
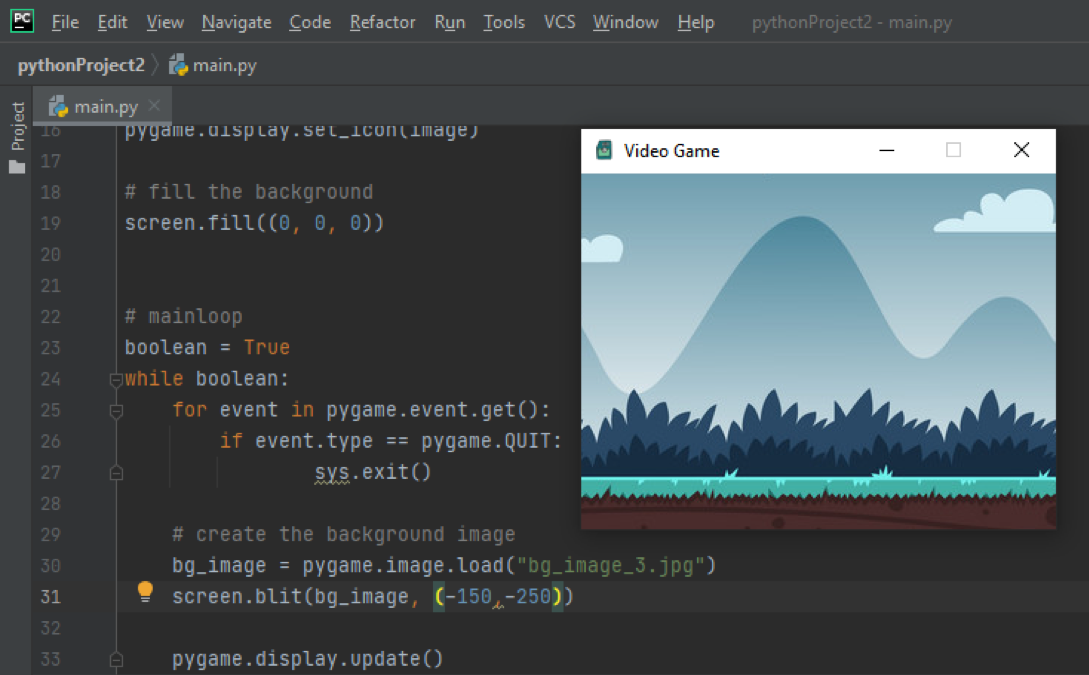
(d) What if you wanted to set a background picture on your screen? That is possible as well. Since you want the image to run all the time, it must be placed within the while loop. In fact, anything that must run constantly must be placed in the mainloop. We use pygame.image.load() to select a picture we want to load and the blit() method to place it. Here, screen.blit() takes two arguments – the loaded image, the tuple of the location where the image’s top-left corner will be placed. Further, pygame.display.update() must be placed at the very end to update the screen! When designing video games, the order in which you place the code matters!!! For example, the update cannot come before the pictures!
bg_image = pygame.image.load("bg_image.jpg")
screen.blit(bg_image, (-15,-25))
pygame.display.update()
Alternatively, we can also dump it into a background function (which will be useful later), so we rewrite the background as follows:
bg_image = pygame.image.load("bg_image_3.jpg")
def background():
screen.blit(bg_image, (-15, -25))
Please note that we have placed the background in a function called background(), which we will activate in the while loop later.
Step 3: Adding images of the player onto window
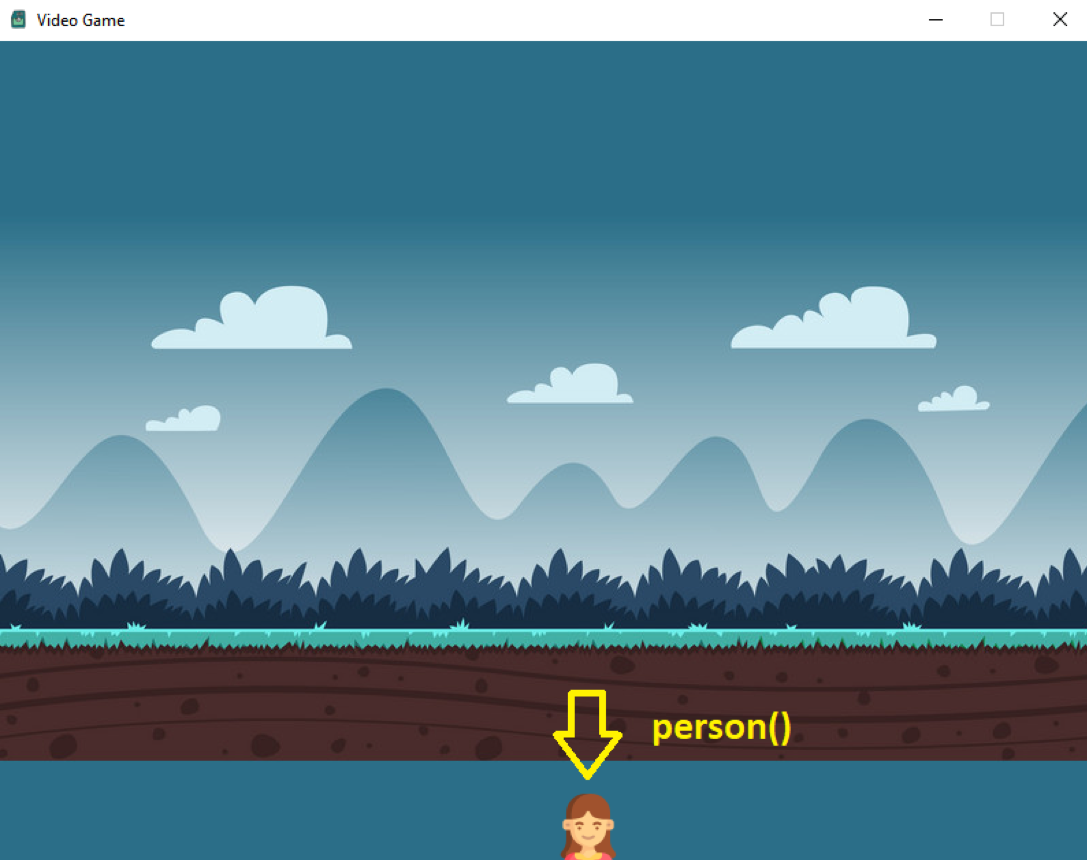
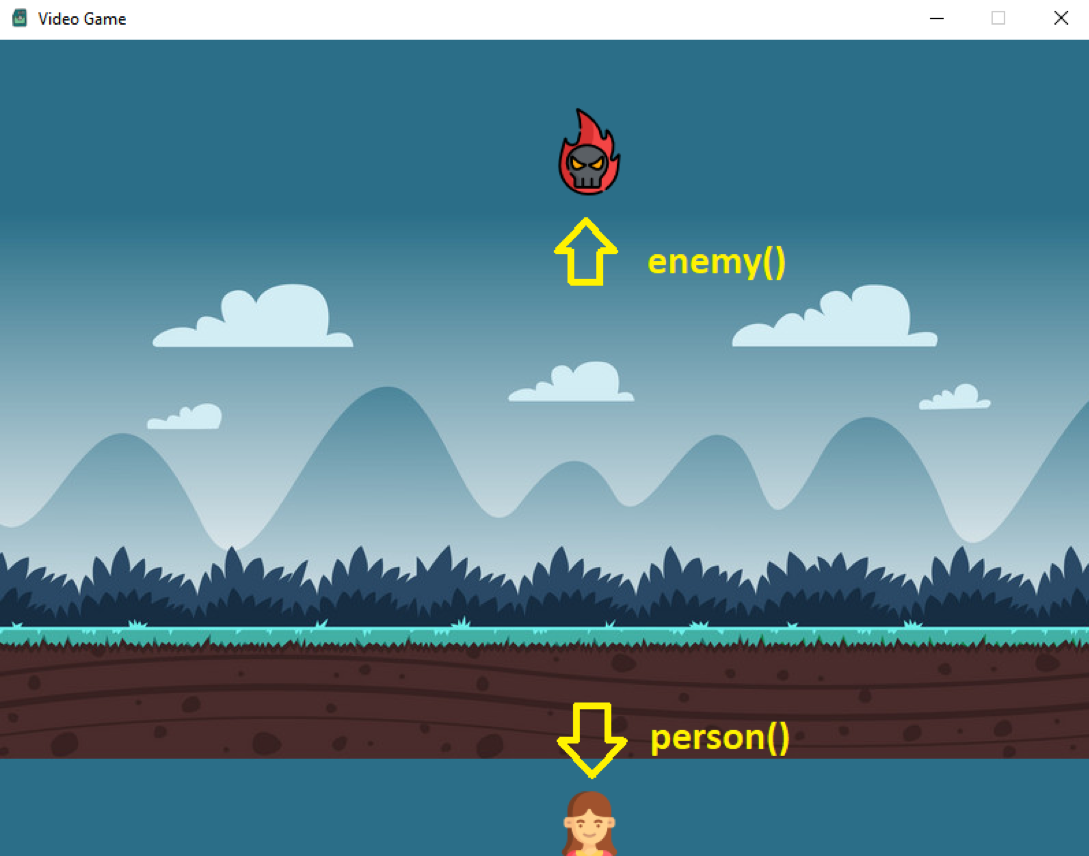
Next, let’s create a person. This is done by first loading the image and then using screen.blit() to place the image.
image_person = pygame.image.load("person.png")
screen.blit(image_person, (400, 550))
Please note that the order in which you place the code also matters! If you place the code for the background after the code for the enemy, neither the person nor the enemy will be visible!
However, once again, for the purpose of whole code, we will place it in a function. So the code can be re-written as follows:
person_x = 400
person_y = 550
image_person = pygame.image.load("girl.png")
def person(x,y):
screen.blit(image_person, (x, y))
This function can be activated in the while loop as follows:
Step 4: Move person()
Now, it gets tricky so pay attention. We need to press keys to move the person right, so we will input them in the while loop as follows:
if pressed_keys[pygame.K_RIGHT]:
person_x += 0.1
if pressed_keys[pygame.K_LEFT]:
person_x += -0.1
We use pygame.key.get_pressed() to get the pressed key, then check it. If the pressed key is the right arrow key (pygame.K_RIGHT), then our variable person_x is incremented by a value of 0.1. If, on the other hand, the key pressed is the left arrow (pygame.K_LEFT), then we decrement by 0.1. What we are doing is changing the location of the picture on the console. If the right arrow is pressed, the initial tuple of (400, 550) will become (400.1, 550) – and this is the location of the image!
We must also activate both functions – background() and person(). The function background() will clear the screen each time the loop starts, and without it, you will have a “drag”.
The code as a whole right at this point would look like this:
import sys
# initialize
pygame.init()
# set screen geometry
size = width, height = 800, 600
screen = pygame.display.set_mode(size)
# set title of window
pygame.display.set_caption("Video Game")
# set the icon
image = pygame.image.load("icon.png")
pygame.display.set_icon(image)
# create the background image
bg_image = pygame.image.load("bg_image_3.jpg")
def background():
screen.blit(bg_image, (-15, -25))
# person image
person_x = 400
person_y = 550
image_person = pygame.image.load("girl.png")
def person(x,y):
screen.blit(image_person, (x, y))
# mainloop
while True:
for event in pygame.event.get():
if event.type == pygame.QUIT:
sys.exit()
# check for keys pressed
pressed_keys = pygame.key.get_pressed()
# if the key pressed is the right arrow,
# then move to the right
if pressed_keys[pygame.K_RIGHT]:
person_x += 0.1
# if the key pressed is the left arrow,
# then move to the left
if pressed_keys[pygame.K_LEFT]:
person_x += -0.1
# activate the background function
background()
# activate the person function
person(person_x,person_y)
# update everything
pygame.display.update()
Step 5: Set border limits
When we press the right or left arrow key, at the moment, the person (or the main character) in our game will keep moving and moving even out of range or outside the console window. So the next thing we must do is to set limits on the movement.
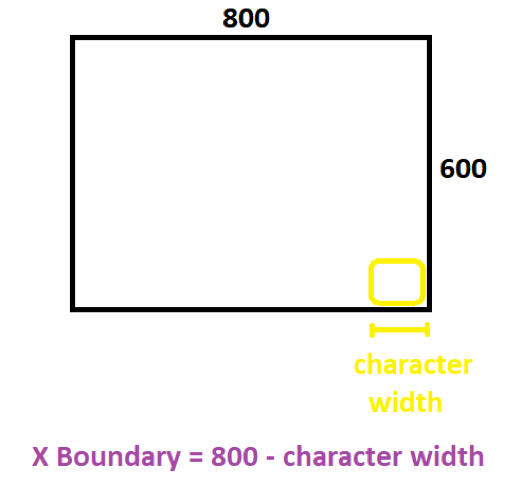
Setting limits is easy. We go to our pressed_keys[pygame.K_RIGHT] argument and add a condition. We add the condition that x must be less than our screen width – character’s width.
In my case, the character’s width was 50 pixels, and my screen’s x width was 800. So I set my right side to 800 – 50 = 750 pixels. What this does is limit my character’s movement. My character cannot go beyond 750 pixels and thus will remain on the console screen at all times.
# if the key pressed is the right arrow,
# then move to the right
if pressed_keys[pygame.K_RIGHT] and person_x < 750:
person_x += 0.1
# if the key pressed is the left arrow,
# then move to the left
if pressed_keys[pygame.K_LEFT] and person_x > 0:
person_x += -0.1
Step 6: Creating the enemy
Creating the enemy is the easy part. We do it in the same manner in which we created the main character. Here, we would like to randomize the location where the enemy appears, so we will use the random module to do it. We use random.randint() to set a random location.
# enemy image
enemy_x = random.randint(0, 750)
enemy_y = random.randint(0, 300)
image_enemy = pygame.image.load("enemy.png")
def enemy(x,y):
screen.blit(image_enemy, (x, y))
Remember to active the enemy in the while loop:
enemy(enemy_x, enemy_y)
Step 7: Moving the enemy
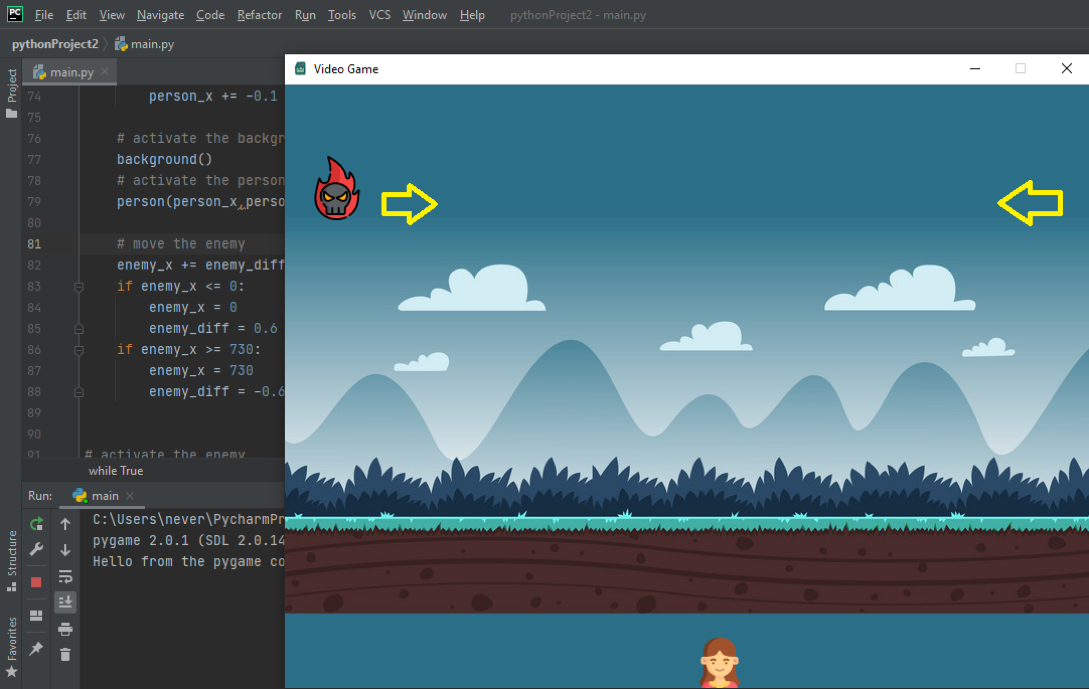
Moving the enemy requires a bit of imagination. We initialize the variables (outside the while loop):
enemy_diff = 0.6
enemy_x = 0
And within the while loop, we write:
enemy_x += enemy_diff
if enemy_x <= 0:
enemy_x = 0
enemy_diff = 0.6
if enemy_x >= 730:
enemy_x = 730
enemy_diff = -0.6
What this does is that if the image of the enemy is within bounds (in this case, between 0 and 730), it will calculate the equation enemy_x = enemy_x + enemy_diff and move it. If, on the other hand, the location of the enemy is greater than 730, then we set the enemy_x location to 730 and reverse the speed by writing -0.6 instead of 0.6. If the location of the enemy is less than 0, then we set the enemy_x variable to 0 and tell it to move forward by 0.6 pixels. Because we’re dealing with a while loop, every time the loop starts over, it causes the enemy_x variable to change and, therefore, the enemy’s location to change. In the end, all of this will do is move the enemy back and forth left and right forever.
Step 8: Creating and shooting multiple bullets
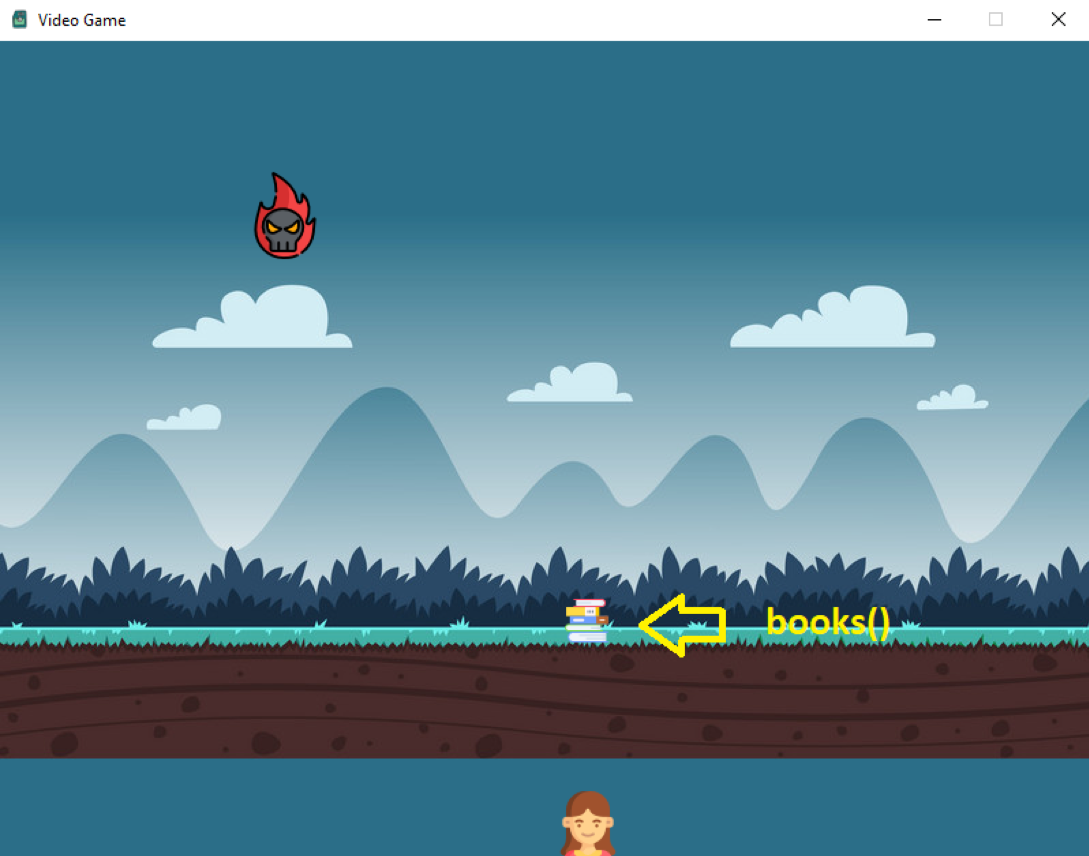
In my case, I’m going to throw books at the fireball. So my bullet is a book or multiple books. Let’s first initialize all the variables we need:
books_diff = 4
books_y = 520
books_x = 420
Books_x and books_y are their initial location; I have placed them near the main character. Books_diff is its speed. Next, we initialize its state, which is “not moving,” and load the picture.
books_state = "not moving"
image_books = pygame.image.load("books.png")
We then create a function that takes the books_state. If we place the book on the grid, then we change its state to “moving”. This function is the main function that will place the bullet on the map/console. Further, in the function books(), I’ve written x+15 and y+1 to center the image. Without the latter, the books look off to one side.
global books_state
books_state = "moving"
screen.blit(image_books, (x + 15, y + 1))
And within the main loop, you’d write:
if books_y <= 0:
books_y = 420
books_state = "not moving"
if books_state is "moving":
books_x = person_x
books(books_x, books_y)
books_y -= books_diff
# fire if the space button is pressed
if pressed_keys[pygame.K_SPACE]:
books_x = person_x
books(books_x, books_y)
We first define what happens when the bullet/books move off the grid or are at position y<0. In this case, we change the state back to “not moving” and place the books back on the y-axis at 420. If, on the other hand, the state of the book is “moving”, we say that we want it to move (books_y -= books_diff where books_diff is its speed). Next, we also state that if the key is pressed, we want the books() function to be activated, placing the books' image onto the console grid.
The code as a whole at this point would look something like this:
import sys
# initialize
pygame.init()
# initialize the clock
clock = pygame.time.Clock()
# set screen geometry
size = width, height = 800, 600
screen = pygame.display.set_mode(size)
# set title of window
pygame.display.set_caption("Video Game")
# set the icon
image = pygame.image.load("icon.png")
pygame.display.set_icon(image)
# create the background image
bg_image = pygame.image.load("bg_image_3.jpg")
def background():
screen.blit(bg_image, (-15, -25))
# person image
person_x = 400
person_y = 550
image_person = pygame.image.load("girl.png")
def person(x,y):
screen.blit(image_person, (x, y))
import random
# enemy image
enemy_x = random.randint(0, 750)
enemy_y = random.randint(0, 300)
image_enemy = pygame.image.load("enemy.png")
def enemy(x,y):
screen.blit(image_enemy, (x, y))
#initialize enemy variables
enemy_diff = 0.6
enemy_x = 0
#initialize variables
books_diff = 4
books_y = 520
books_x = 420
# books image
books_state = "not moving"
image_books = pygame.image.load("books.png")
def books(x,y):
global books_state
books_state = "moving"
screen.blit(image_books, (x + 15, y + 1))
# mainloop
while True:
for event in pygame.event.get():
if event.type == pygame.QUIT:
sys.exit()
# check for keys pressed
pressed_keys = pygame.key.get_pressed()
# if the key pressed is the right arrow,
# then move to the right
if pressed_keys[pygame.K_RIGHT] and person_x < 750:
person_x += 0.8
# if the key pressed is the left arrow,
# then move to the left
if pressed_keys[pygame.K_LEFT] and person_x > 0:
person_x += -0.8
# activate the background function
background()
# activate the person function
person(person_x,person_y)
# move the enemy
enemy_x += enemy_diff
if enemy_x <= 0:
enemy_x = 0
enemy_diff = 0.6
if enemy_x >= 730:
enemy_x = 730
enemy_diff = -0.6
# books movement
if books_y <= 0:
books_y = 420
books_state = "not moving"
if books_state is "moving":
books_x = person_x
books(books_x, books_y)
books_y -= books_diff
# fire if the space button is pressed
if pressed_keys[pygame.K_SPACE]:
books_x = person_x
books(books_x, books_y)
# activate the enemy
enemy(enemy_x, enemy_y)
# update everything
pygame.display.update()
clock.tick(60)
This code will shoot multiple books one after the other when the space key is pressed.
Step 9: Collision detection
The next step is to detect a collision, and this seems quite straightforward. You’d use the pygame.Rect(x, y, width, height) to define a rectangle. Then use the colliderect() method to detect collision between two rectangles. We also say that if it detects a collision, we increment the score by 1, re-locate the enemy, and remove the bullet by resetting it.
enemy_rect = pygame.Rect(enemy_x, enemy_y, 64, 64)
books_rect = pygame.Rect(books_x, books_y, 64, 64)
if books_rect.colliderect(enemy_rect):
enemy_x = random.randrange(0, 800)
enemy_y = random.randrange(0, 300)
score += 1
bullet_state = "not moving"
enemy(enemy_x, enemy_y)
books_y = 0
Step 10: Displaying text
Outside of the mainloop, you’d write:
#initialize font
pygame.font.init()
myfont = pygame.font.SysFont('Comic Sans MS', 50)
def text_score(x, y):
text_score = myfont.render('Score: '+ str(score), True, (0, 0, 0))
screen.blit(text_score, (x, y))
Within the main loop, you’d write:
text_score(6, 6)
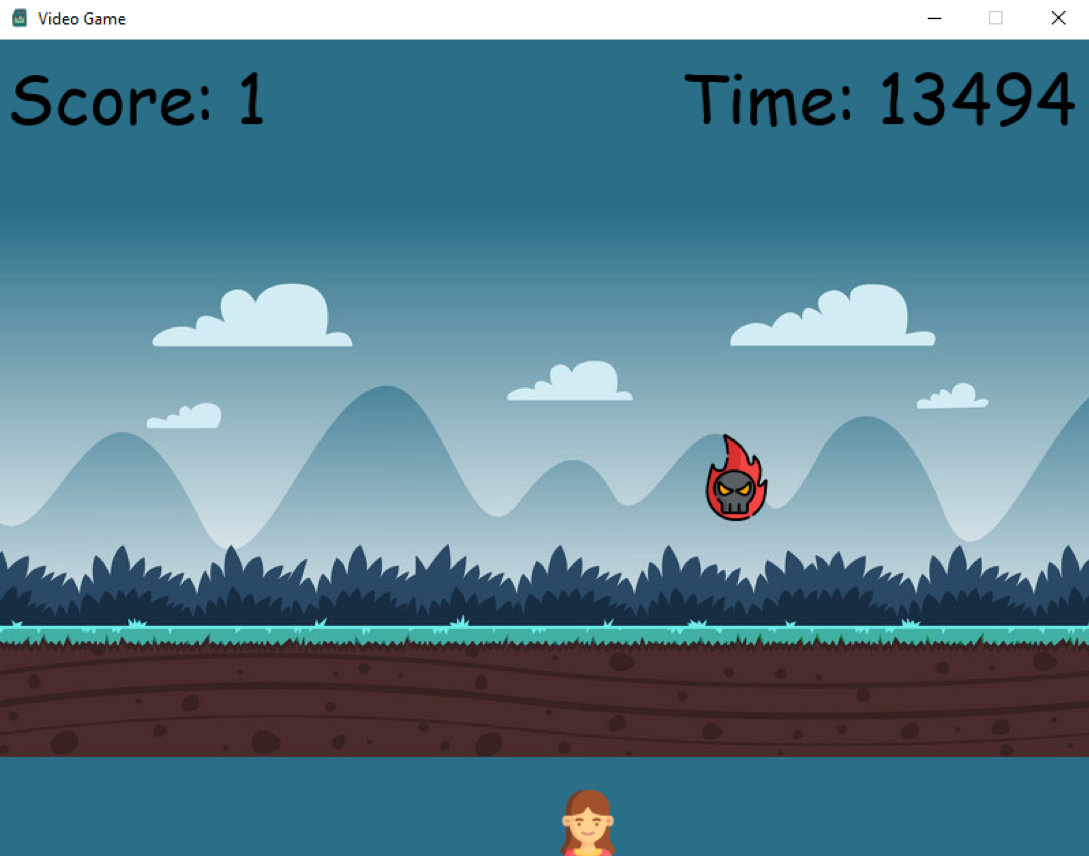
Here, fonts must be initialized, so initialize it using pygame.font.init(). Then you choose your font using pygame.font.SysFont() where you pass the font and the size. Next, let’s define a function where we use the render method to render it. Here, since the score is an integer, we use str(score). And then, we place them onto the screen using the blit() method.
At this point, the entire code would look like this:
import sys
# initialize
pygame.init()
# initialize the clock
clock = pygame.time.Clock()
# set screen geometry
size = width, height = 800, 600
screen = pygame.display.set_mode(size)
# set title of window
pygame.display.set_caption("Video Game")
# set the icon
image = pygame.image.load("icon.png")
pygame.display.set_icon(image)
# create the background image
bg_image = pygame.image.load("bg_image_3.jpg")
def background():
screen.blit(bg_image, (-15, -25))
# person image
person_x = 400
person_y = 550
image_person = pygame.image.load("girl.png")
def person(x,y):
screen.blit(image_person, (x, y))
import random
# enemy image
enemy_x = random.randint(0, 750)
enemy_y = random.randint(0, 300)
image_enemy = pygame.image.load("enemy.png")
def enemy(x,y):
screen.blit(image_enemy, (x, y))
#initialize enemy variables
enemy_diff = 0.6
enemy_x = 0
#initialize variables
books_diff = 4
books_y = 520
books_x = 420
# books image
books_state = "not moving"
image_books = pygame.image.load("books.png")
def books(x,y):
global books_state
books_state = "moving"
screen.blit(image_books, (x + 15, y + 1))
score = 0
#initialize font
pygame.font.init()
myfont = pygame.font.SysFont('Comic Sans MS', 50)
def text_score(x, y):
text_score = myfont.render('Score: '+ str(score), True, (0, 0, 0))
screen.blit(text_score, (x, y))
# mainloop
while True:
for event in pygame.event.get():
if event.type == pygame.QUIT:
sys.exit()
# check for keys pressed
pressed_keys = pygame.key.get_pressed()
# if the key pressed is the right arrow,
# then move to the right
if pressed_keys[pygame.K_RIGHT] and person_x < 750:
person_x += 0.8
# if the key pressed is the left arrow,
# then move to the left
if pressed_keys[pygame.K_LEFT] and person_x > 0:
person_x += -0.8
# activate the background function
background()
# activate the person function
person(person_x,person_y)
# move the enemy
enemy_x += enemy_diff
if enemy_x <= 0:
enemy_x = 0
enemy_diff = 0.6
if enemy_x >= 730:
enemy_x = 730
enemy_diff = -0.6
# books movement
if books_y <= 0:
books_y = 420
books_state = "not moving"
if books_state is "moving":
books_x = person_x
books(books_x, books_y)
books_y -= books_diff
# fire if the space button is pressed
if pressed_keys[pygame.K_SPACE]:
books_x = person_x
books(books_x, books_y)
# activate the enemy
enemy(enemy_x, enemy_y)
# collision detection
enemy_rect = pygame.Rect(enemy_x, enemy_y, 64, 64)
books_rect = pygame.Rect(books_x, books_y, 64, 64)
if books_rect.colliderect(enemy_rect):
enemy_x = random.randrange(0, 800)
enemy_y = random.randrange(0, 300)
score += 1
bullet_state = "not moving"
enemy(enemy_x, enemy_y)
books_y = 0
# activate text score
text_score(6, 6)
# update everything
pygame.display.update()
clock.tick(60)
Step 11: Adding sounds
Adding sounds is super duper easy!
Outside the main loop, you’d write:
pygame.mixer.init()
pygame.mixer.music.load("gun-cocking-01.wav")
Within the mainloop, I’m going to activate the sound if there’s a collision! Here, we use pygame.mixer.music.play().
enemy_rect = pygame.Rect(enemy_x, enemy_y, 64, 64)
books_rect = pygame.Rect(books_x, books_y, 64, 64)
if books_rect.colliderect(enemy_rect):
enemy_x = random.randrange(0, 800)
enemy_y = random.randrange(0, 300)
score += 1
bullet_state = "not moving"
enemy(enemy_x, enemy_y)
books_y = 0
pygame.mixer.music.play()
Step 12: Ending the game
I’m going to set this game to a win if the score is greater than 5. So outside the main loop, we write the following code:
# game over function
def game_over(x, y):
text_game_over_2 = myfont.render('YOU WON', True, (0, 0, 0))
screen.blit(text_game_over_2, (x, y))
And within the main loop, you’d write:
if score > 5:
game_over(400, 300)
pygame.display.flip()
time.sleep(5)
break
# activate text score
text_score(6, 6)
timer(500, 6)
This means that if the score is greater than 5, then the game_over() function will be activated, the screen will be refreshed, and then we say, sleep for a bit before quitting.
The whole code would look like this:
import sys
import time
# initialize
pygame.init()
# initialize the clock
clock = pygame.time.Clock()
# set screen geometry
size = width, height = 800, 600
screen = pygame.display.set_mode(size)
# set title of window
pygame.display.set_caption("Video Game")
# set the icon
image = pygame.image.load("icon.png")
pygame.display.set_icon(image)
# create the background image
bg_image = pygame.image.load("bg_image_3.jpg")
def background():
screen.blit(bg_image, (-15, -25))
# person image
person_x = 400
person_y = 550
image_person = pygame.image.load("girl.png")
def person(x,y):
screen.blit(image_person, (x, y))
import random
# enemy image
enemy_x = random.randint(0, 750)
enemy_y = random.randint(0, 300)
image_enemy = pygame.image.load("enemy.png")
def enemy(x,y):
screen.blit(image_enemy, (x, y))
#initialize enemy variables
enemy_diff = 0.6
enemy_x = 0
#initialize variables
books_diff = 4
books_y = 520
books_x = 420
# books image
books_state = "not moving"
image_books = pygame.image.load("books.png")
def books(x,y):
global books_state
books_state = "moving"
screen.blit(image_books, (x + 15, y + 1))
score = 0
#initialize font
pygame.font.init()
myfont = pygame.font.SysFont('Comic Sans MS', 50)
def text_score(x, y):
text_score = myfont.render('Score: '+ str(score), True, (0, 0, 0))
screen.blit(text_score, (x, y))
# initialize sounds
pygame.mixer.init()
pygame.mixer.music.load("gun-cocking-01.wav")
text_game_over = pygame.font.SysFont('Comic Sans MS', 80)
# game over function
def game_over(x, y):
text_game_over_2 = myfont.render('YOU WON', True, (0, 0, 0))
screen.blit(text_game_over_2, (x, y))
def timer(x, y):
text_timer = myfont.render('Time: '+ str(pygame.time.get_ticks()), True, (0, 0, 0))
screen.blit(text_timer, (x, y))
# mainloop
while True:
for event in pygame.event.get():
if event.type == pygame.QUIT:
sys.exit()
# check for keys pressed
pressed_keys = pygame.key.get_pressed()
# if the key pressed is the right arrow,
# then move to the right
if pressed_keys[pygame.K_RIGHT] and person_x < 750:
person_x += 0.8
# if the key pressed is the left arrow,
# then move to the left
if pressed_keys[pygame.K_LEFT] and person_x > 0:
person_x += -0.8
# activate the background function
background()
# activate the person function
person(person_x,person_y)
# move the enemy
enemy_x += enemy_diff
if enemy_x <= 0:
enemy_x = 0
enemy_diff = 0.6
if enemy_x >= 730:
enemy_x = 730
enemy_diff = -0.6
# books movement
if books_y <= 0:
books_y = 420
books_state = "not moving"
if books_state is "moving":
books_x = person_x
books(books_x, books_y)
books_y -= books_diff
# fire if the space button is pressed
if pressed_keys[pygame.K_SPACE]:
books_x = person_x
books(books_x, books_y)
# activate the enemy
enemy(enemy_x, enemy_y)
# collision detection
enemy_rect = pygame.Rect(enemy_x, enemy_y, 64, 64)
books_rect = pygame.Rect(books_x, books_y, 64, 64)
if books_rect.colliderect(enemy_rect):
enemy_x = random.randrange(0, 800)
enemy_y = random.randrange(0, 300)
score += 1
bullet_state = "not moving"
enemy(enemy_x, enemy_y)
books_y = 0
pygame.mixer.music.play()
# check for win
if score > 5:
game_over(400, 300)
pygame.display.flip()
time.sleep(5)
break
# activate text score
text_score(6, 6)
timer(500, 6)
# update everything
pygame.display.update()
clock.tick(60)
This, of course, is the simplest of all games that you can possibly create! However, it’s a start for those who want to learn pygame and design better video games.
Happy Gaming!

