This tutorial aims to teach you how to use LaTeX to create various table types and populate them with data.
NOTE: This tutorial assumes you are not new to LaTeX; it does not serve as an introduction to LaTeX.
How to Create a Simple Table With LaTeX
Tables are standard when working with scientific documents. LaTeX offers an extensive collection of tools you can use to create and customize various table elements.
To create a simple table in LaTeX, use the tabular environment.
To separate columns, use the ampersand symbol &. To separate rows, use the new line symbol \
The following LaTeX code creates a simple table.
\usepackage[utf8]{inputenc}
\title{LinuxHint - LaTeX tables}
\author{LinuxHint}
\date{June 2021}
\begin{document}
\begin{center}
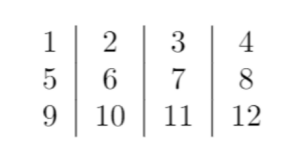
\begin{tabular}{c|c|c|c}
1 & 2 & 3 & 4 \\
5 & 6 & 7 & 8 \\
9 & 10 & 11 & 12 \\
\end{tabular}
\end{center}
\maketitle
\end{document}
Use the tabular environment to tell the LaTeX compiler that you wish to create a table.
Inside the tabular environment, you must specify the parameters defining the number of columns to insert. For example, four (c) values indicate four centered columns.
Once you compile the code below, you should get an output as:
How to Add A Horizontal Line
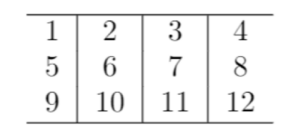
You can use the \hline command to add a horizontal line at the top and bottom of the table.
The code for that is:
\usepackage[utf8]{inputenc}
\title{LinuxHint - LaTeX tables}
\author{LinuxHint}
\date{June 2021}
\begin{document}
\begin{center}
\begin{tabular}{c|c|c|c}
\hline
1 & 2 & 3 & 4 \\
5 & 6 & 7 & 8 \\
9 & 10 & 11 & 12 \\
\hline
\end{tabular}
\end{center}
\maketitle
\end{document}
Once you compile the code, you should get a table with a horizontal line at the top and bottom as:
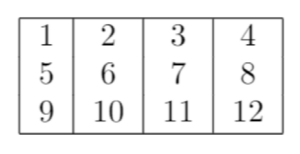
To create an enclosed table with vertical lines on both sides, you can specify two pipes at the beginning of the column definition as:
A full example code for this is:
\usepackage[utf8]{inputenc}
\title{LinuxHint - LaTeX tables}
\author{LinuxHint}
\date{June 2021}
\begin{document}
\begin{center}
\begin{tabular}{ | c|c|c|c | }
\hline
1 & 2 & 3 & 4 \\
5 & 6 & 7 & 8 \\
9 & 10 & 11 & 12 \\
\hline
\end{tabular}
\end{center}
\maketitle
\end{document}
Once you compile the code above, you should get an output similar to the one shown below:
How to Align Column Text
LaTeX allows us to allow column text to the right, left, and center. By default, LaTeX uses {c} to align the text center.
To set the text to right or left, use {r} and {l} respectively.
For example, the following blocks show how to create tables with the right text-align.
\usepackage[utf8]{inputenc}
\title{LinuxHint - LaTeX tables}
\author{LinuxHint}
\date{June 2021}
\begin{document}
\begin{center}
\begin{tabular}{ | r|r|r|r | }
\hline
1 & 2 & 3 & 4 \\
5 & 6 & 7 & 8 \\
9 & 10 & 11 & 12 \\
\hline
\end{tabular}
\end{center}
\maketitle
\end{document}
How to Create a Multi-Page Table With LaTeX
To create a table that takes up two or more pages, you need to use the longtable package. To do this, enter: the line
Specifying the longtable package allows the tables to be broken down and combined using LaTeX page break tools.
To create a long table, you need to add four commands.
- \endfirsthead – The content that precedes this command is allocated at the beginning of the table on the first page.
- \endhead – The content between this command and endfirsthead is allocated at the top of the table on every page except the first one.
- \endfoot – The content is allocated at the bottom of every page except the last one.
- \endlastfoot – Displayed at the bottom on the last page where the table ends.
The following creates a simple multi-page table.
\usepackage[utf8]{inputenc}
\usepackage{longtable}
\begin{document}
\begin{longtable} [c] { | c | c | }
\label{long} \\
\hline
\multicolumn{2}{ | c | }{ Start Table} \\
\hline
Hello & World \\
\hline
\endfirsthead
\hline
\multicolumn{2}{ | c | }{Continue table to pages} \\
\hline
Hello & World \\
\endfirsthead
\hline
\multicolumn{2}{ | c | }{Start Another Table}\ref{long}\\
\hline
\endhead
\hline
\endfoot
\hline
\multicolumn{2}{ | c | }{This Ends the Table} \\
\hline
\endlastfoot
[REPEAT multi-column]
\end{longtable}
\end{document}
How to Combine Rows and Columns In LaTeX
You can use the command \multirow and \ multi-column to combine rows and columns.
Multi-columns
The general syntax to combine multiple columns is:
\multicolumn{Number_of_columns}{align}{content}
For example, consider the code below:
\usepackage[utf8]{inputenc}
\begin{document}
\begin{tabular}{ | p {5cm} | p {3cm} | p {3cm} | p {3cm} |}
\hline
\multicolumn{4}{ | c | }{Trek List} \\
\hline
Name & Release Date & Director & Story By \\
\hline
Star Trek: The Motion Picture & December 7, 1979, & Robert Wise & Alan Dean Foster \\
Star Trek II: The Wrath of Khan & June 4, 1982, & Nicholas Meyer & Harve Bennett \\
Star Trek V: The Final Frontier & June 9, 1989, & William Shatner & William Shatner \\
\hline
\end{tabular}
% Data Source -> "https://en.wikipedia.org/wiki/List_of_Star_Trek_films
\end{document}
NOTE: It is good to ensure the columns are spaced evenly by specifying the dimensions.
In the the command \multicolumn{4}{ | c | }{Trek List}
The {4} defines the number of columns to combine.
The next part {|c|} defines the delimiters and the alignments for the columns.
{Trek List } – The name for the combined columns.
Once you compile the LaTeX code above, you should get an output as:
Multi-Rows
To combine rows using the multirow command, you need to import the multirow package.
The following example code shows how to combine rows.
\usepackage[utf8]{inputenc}
\usepackage{multirow}
\begin{document}
\begin{center}
\begin{tabular}{ |c|c|c|c| }
\hline
Column1 & Column2 & Column3 & Column4 \\
\hline
\multirow{3}{6cm}{Combined rows (cells)} & cell1 & cell2 \\
& cell3 & cell4 \\
& cell5 & cell6 \\
\hline
\end{tabular}
\end{center}
\end{document}
Examining the command: \multirow{3}{6cm}{Combined rows (cells)} & cell1 & cell2
You will get three parameters:
The first one is the number of rows to combine. So in this example, 3 rows.
Next, the second parameter defines the width of the column. In this example, 6cm.
Finally, the last parameter defines the content inside the cell.
Compiling the code above should give a table similar to
About Table Captions, Label, and References
You can create table captions and labels, which you can use to display information about the table or reference it.
To add a caption to a table, use the \caption command. You can place the table caption below or above the table.
For example:
\usepackage[utf8]{inputenc}
\begin{document}
\begin{table}[h!]
\centering
\caption{Information about Star Trek Films}
\begin{tabular}{ | p {5cm} | p {3cm} | p {3cm} | p {3cm} |}
\hline
\multicolumn{3}{ | c | }{Trek List} \\
\hline
Name & Release Date & Director \\
\hline
Star Trek: The Motion Picture & December 7, 1979, & Robert Wise\\
Star Trek II: The Wrath of Khan & June 4, 1982, & Nicholas Meyer\\
Star Trek V: The Final Frontier & June 9, 1989, & William Shatner\\
\hline
\end{tabular}
\label{treks}
\end{table}
% Data Source -> "https://en.wikipedia.org/wiki/List_of_Star_Trek_films
\end{document}
Once you compile the code, you should get a table with a caption at the top, as shown in the image below:
Conclusion
This tutorial has discussed the basics of creating and working with Tables in LaTeX.
As you know, LaTeX is a powerful tool, and this tutorial does not scratch the surface of how to work with LaTex tables.
The LaTex documentation is a great reference guide. Please refer to it as needed.


