Deployment vs. Statefulset
Most people get themselves confused with deployment and Statefulset. Deployment is the simplest and most common method of deploying your app. It’s a Kubernetes controller that compares your cluster’s present state to the ideal state defined in your Deployment catalog. For stateless applications, deployments are commonly used. You will save the states of deployment by adding a Persistent Volume to it and making it stateful, and then all the pods in the deployment will share the same Volume and the content, which would be the same throughout them. However, A Kubernetes resource called StatefulSet is used to handle stateful applications. It oversees the deployment and growth of a set of Pods and ensures their order and quality. StatefulSet is a Controller as well, though, unlike Deployments, it does not generate ReplicaSet; instead, it generates the Pod with its name.
Pre-requisites to create Statefulset
To create Kubernetes statefulsets, make sure that you have installed Ubuntu 20.04 operating system. Also, you have to install the minikube cluster in the ubuntu 20.04 Linux system to create successful Kubernetes statefulsets.
Usage and Creation of Kubernetes Statefulsets
To create Kubernetes statefulsets, you have to follow the steps described in this guide.
Step 1: Start Minikube via terminal
To create Kubernetes statefulsets, you must initially open the command line terminal in your Ubuntu 20.04. You can open the command line terminal using the “Ctrl+Alt+T” shortcut key or by searching the terminal in the application area. It is all your choice to use either of these methods. As soon as the terminal window appears, you have to start the minikube cluster. Without starting it, you would not be able to create statefulsets in Kubernetes. So, let’s write the below-written command in the shell and hit the Enter button on your keyboard.
You can check that the minikube has been started and the version installed on our system has been shown in the output.
Step 2: Create a configuration file
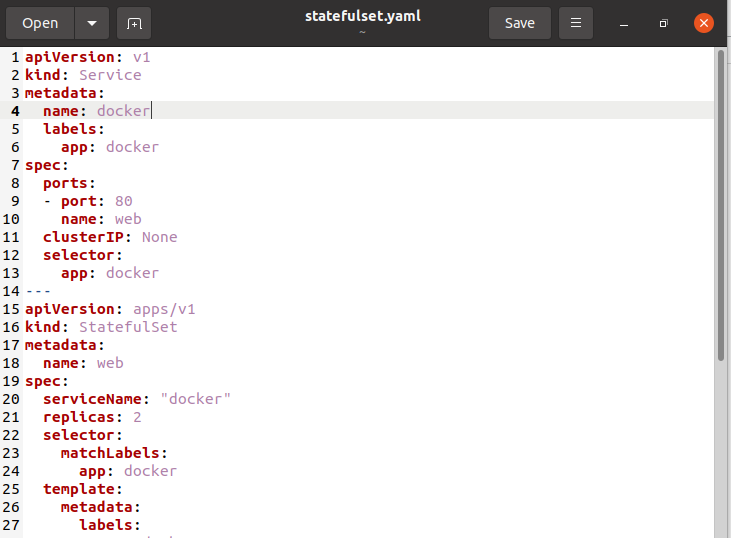
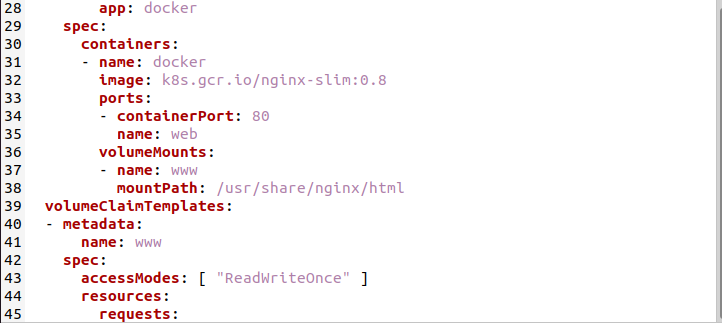
Now you have to create a configuration file for statefulsets. You have to create a file with an extension of.YAML. In our example, we have named our file as “statefulset.yaml”. You can follow any of your desired names. The StatefulSet determines that the required number of Pods are operating and accessible at all times once it has been built. The StatefulSet substitutes Pods that fail or are ejected from respective nodes and integrates new Pods to storage resources. An illustration of a Service and StatefulSet configuration file is shown below.
In the example as mentioned above file, you can view all the information regarding statefulset.
Step 3. Create stateful set via terminal
Now we have to use the kubectl command to create a service and statefulset. You have to write the below-cited command in the terminal window and tap the Enter key from your keyboard.
In the output of this command, you can see that the service, along with statefulset, has been created effectively. A pod may reach another one by name annotated with the service name when the StatefulSet and the Headless Service have been established.
Step 4. Get docker service
Now we can get docker service by executing the below written kubectl command. Write the same command in the command line terminal and hit enter button for its execution.
You can see the name, type, port, and age of the service in the output.
Step 5. Get web statefulset
Now to verify both pods, you have to execute the below written kubectl command on your terminal.
In the output of the above-executed command, you can view the ready pods, name, and age.
Conclusion
Among the most popular kinds of apps containerized and migrated to Kubernetes-managed environments is stateful applications. We tried to explain the basic concept of statefulsets in Kubernetes and its difference with deployments. Also, we have covered the basic steps for the creation of statefulsets Kubernetes using the minikube cluster. Now, I hope you are much clear about the concept of Kubernetes statefulsets.


