Jobs running in parallel with a fixed completion count
Jobs that are running in parallel with a fixed completion count are the one that launches numerous pods. The Job covers the overall task and is finished when each number in the range 1 to the completions value has one valid Pod.
Jobs in parallel with a work queue
In a particular pod, a job with numerous concurrent worker processes occurs in a job that is in parallel with a work queue. Each Pod can detect if all peer pods are done and the job is finished on its own. No other Pods are formed when any Pod from the Job ends successfully. The Job is effectively completed while at least one Pod has ended properly and all Pods have been stopped.
Non-parallel Jobs
In the non-parallel jobs category, when the Job’s Pod ends appropriately, the Job is finished.
Pre-requisites
Now we are ready to create a Kubernetes job using minikube in Ubuntu 20.04 LTS. For this purpose, you must have installed Ubuntu 20.04 LTS on your system. After that, you have to install minikube in it. Make sure to have sudo privileges.
Create a job in Kubernetes
To create a job in Kubernetes, you have to follow the basic steps described below:
Step 1: Now, let us discuss some necessary steps to create a job in Kubernetes. Open the terminal in Ubuntu 20.04 LTS by using the shortcut key of Ctrl+Alt+T or by directly going through the application search area. After that, you have to start the minikube for the successful usage of Kubernetes jobs. Sor for this particular purpose, write down the following below-listed command in the terminal. Hit the “Enter” button from your system.
It will take some time for the execution of the command, as mentioned above. You can see the version of minikube that is installed on your system. However, you can update it as well if it is required. You have to wait and don’t ever quit your terminal during execution.
Step 2. In the meantime, you have to make a file with the extension of. yaml in your home directory. We utilize YAML files to set up Kubernetes features within the cluster and make modifications to existing aspects. To build a Job in Kubernetes, we may alternatively use a YAML configuration file. Let’s have a look at a basic Job configuration file. In our example, I have named this file as jobs.YAML. You can name the file as per your desire. Just save this example file in your home directory. The job calculates to 2000 decimal places and publishes the result. It tends to take about ten seconds to finish. You can check out the apiVersion, kind, metadata, name, and related information in the configuration file.
Step 3. Now, we have to run this example job by executing this below-listed command with the –f flag. Hit the “Enter” button from your system.
In the output of this command, you can view that the job has been created effectively.
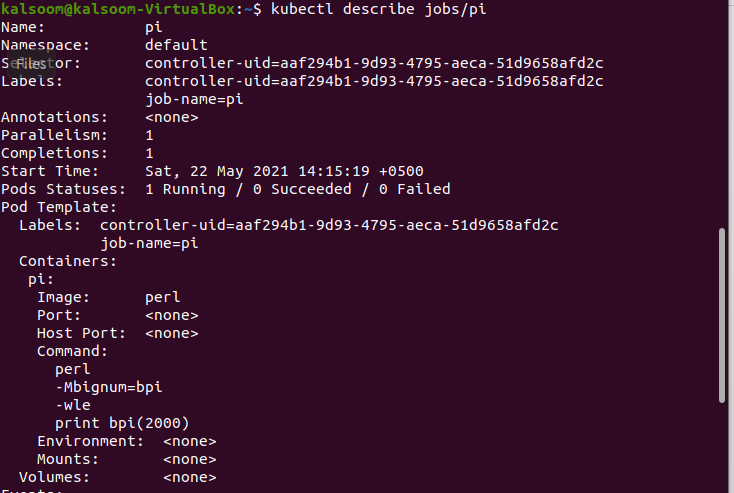
Step 4. Now we have to check the status of the already created job named “pi.” Try out the below-stated command. Hit the “Enter” button from your system for its execution.
In the above-attached image, you can view the information and status of the already created job. You can verify that the pods are running successfully,
Step 5. Now, you can use the following appended command to get a machine-readable overview of almost all of the Pods that pertain to a Job:
$ echo $pods
The selection is identical to the Job selector in this case.
Conclusion
In Kubernetes application deployment methods, jobs are significant because they provide a communication channel and connections among pods and platforms. In this detailed guide, you have gone over the essentials of Kubernetes jobs. I hope you found the knowledge in this post to be helpful. Also, you can easily create a job in Kubernetes by implementing this tutorial.


