DaemonSets are quite simple to understand. In Kubernetes, a DaemonSet architecture guarantees that a pod operates on each node in a cluster (when applicable). For each daemon, a single DaemonSet encompassing all nodes would be utilized in the simplest instance. Numerous DaemonSets for the same type of daemon might be used in a more complicated arrangement, each with distinct flags and/or memory and CPU requirements for various hardware types. Garbage collection is used to remove pods as nodes are eliminated from the cluster. When you delete a DaemonSet, it will also delete the Pods it produced.
DaemonSets are analogous to Kubernetes deployments; in that way, they are automatically dispersed to assure that pods are deployed on every node in the cluster. In addition, if a new node is added to the cluster after the DaemonSet is already deployed, the scheduler would deploy the DaemonSet to a new node upon the join.
Uses of DaemonSet
Logging is a frequent use for DaemonSets. Maybe we need to ensure that our log collecting service is installed on each node in our cluster to collect logs from that node. This could be an essential spot for a DaemonSet. Consider it this way: by launching the app on the OS, we could execute and deploy services on every one of our Kubernetes nodes. By deploying Pods that conduct basic maintenance and service activities to each node, DaemonSets increase cluster performance. Through an OpenShift Container Platform cluster, a Daemonset is used to run duplicates of a pod on particular or all nodes.
Updating a DaemonSet
If node identifiers are updated, the DaemonSet will install pods to new corresponding nodes and remove pods from newly non-matching nodes as soon as possible. The pods generated by DaemonSet can be changed. Pods, on the other hand, do not enable all fields to be modified. The DaemonSet controller will use the original template the next time a node is formed (even if it has the same name).
A DaemonSet can be deleted. The pods will be maintained on the nodes if you set —cascade=false with kubectl. After that, you can make a new DaemonSet using a different template. All old pods will be recognized as having identical labels by the new DaemonSet with the updated template. Despite a discrepancy in the pod template, it will not alter or remove them.
Create a Daemonset in Kubernetes
Now we are giving a practical example for the creation of Daemonset in Kubernetes. For this particular purpose, we have installed Ubuntu 20.04 Linux operating system. Inside it, we have installed a minikube cluster for successful execution. You must have installed both minikube and Ubuntu. So initially, you have to log in to your Ubuntu 20.04 operating system. After login, you have to open the command line terminal. You can easily open it by pressing the “Ctrl+Alt+T” shortcut key altogether or simply type the “terminal” keyword in the search bar of the application area. Following either of these methods will open up the Ubuntu 20.04 terminal window.
Now it is compulsory to start a minikube cluster before moving to the creation of Daemonset. So, you have to write the below-listed command in the terminal. After writing it, you have to press the “Enter” button from your system’s keyboard.

You can see the version of the minikube cluster installed on your system in the command’s output. You can update it if required. It might take some time to start the minikube cluster.
Now you are ready to create a configuration file for Daemonset. You have to confirm that the configuration file with the .yaml extension should exist. A YAML file can be used to define a DaemonSet. We have listed an example of a Daemonset configuration file in the attached images.

In the above-attached image, you can see that we have mentioned apiVersion, Kind, name, namespace, specifications, and the information regarding containers.
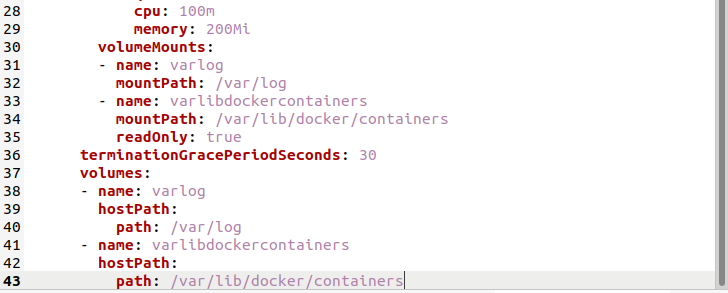
In the above-attached image, you can see that we have mentioned the details related to CPU, memory volumeMounts and hostpath, etc., in the configuration file of Daemonset.
Now, we can create a Daemonset on the terminal window by using the same configuration file that we have created earlier. So, execute the following command in the shell.
![]()
In the output of the command, you can view that it has been created successfully. You can further utilize it as per your requirements.
Conclusion
In the article, as mentioned above, we have illustrated the basic concept of Daemonset in Kubernetes. Also, we have explained the uses of Daemonset and its update. Finally, we explained it by the practical example. Now, I believe that you can easily use Daemon set in Kubernetes.