The advantages of using the Btrfs filesystem are:
i) Metadata mirroring and increased data availability: The Btrfs filesystem keeps 2 copies of the filesystem metadata on a volume. This allows the Btrfs filesystem to recover data in case the hard drive is damaged or suffers from errors.
ii) File self-healing: The Btrfs filesystem provides checksums for the data and metadata. It verifies the checksums of the data or metadata each time they are accessed. So, any filesystem errors will be detected and the necessary steps will be taken to recover the corrupted files.
iii) Snapshots and data protection: The Btrfs filesystem allows you to take instant snapshots of an entire shared folder. If you accidentally removed important files or folders from a shared folder, you can easily recover them to their earlier state from snapshots.
iv) Low impact, big benefit: Because of the copy-on-write (CoW) architecture of the Btrfs filesystem, a Btrfs snapshot consumes a small amount of disk space. Also, Btrfs snapshots do not impact the filesystem performance very much.
v) Instantaneous snapshots: Because of the copy-on-write (CoW) architecture of the Btrfs filesystem, taking a Btrfs snapshot is an instantaneous process. You also don’t have to worry about files being modified or deleted when a snapshot is being taken.
vi) Frequent, scheduled backup: You can configure a shared folder to take snapshots automatically after a given interval of time without any performance impact on the storage device.
vii) Customizable retention policy: You can configure the number of snapshots you want to keep for each of the shared folders. This way the older unnecessary snapshots are automatically removed.
viii) Self-service recovery: The NAS users can view earlier versions of files and restore them to an early state using the File Station app or Windows File Explorer.
ix) Instant SMB/AFP server-side copy: Btrfs fast-clone technology allows the users to copy files between shared folders instantly using the SMB/AFP protocols if the source and destinations are on the same Btrfs volume.
x) Efficient Drive storage: If you use Synology Drive, then file versioning on EXT4 volumes takes double storage space. However, this is not the case for the Btrfs volumes.
xi) Data consistency of backups: When you take a backup of a Btrfs volume, a snapshot is created before starting the backup, and files are copied to the destination from the snapshot. So, you don’t have to worry about files being modified, moved, or deleted while the backup is in progress.
xii) Quotas for shared folders: You can limit the amount of storage space a shared folder can use if the shared folder is created on a Btrfs volume.
xiii) Clone entire shared folders: As Btrfs is a copy-on-write filesystem, you can make an instant clone of an entire shared folder very easily.
In this article, I am going to show you how to create a Btrfs volume and work with Btrfs snapshots on your Synology NAS. So, let us get started.
How to Create a Btrfs Volume?
In this section, I am going to show you how to create a Btrfs volume on your Synology NAS.
First, open the Storage Manager app from the Application Menu of your Synology NAS web management GUI.
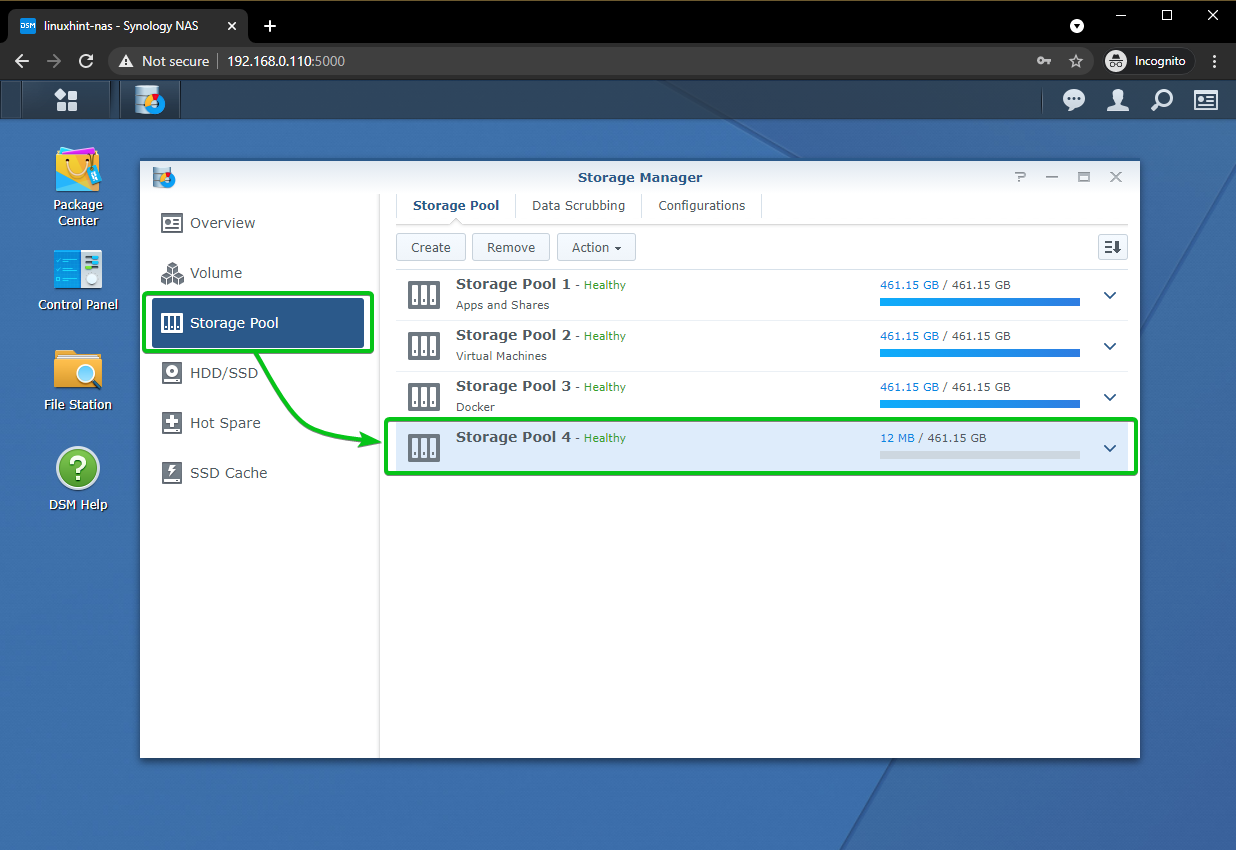
To create a new Btrfs volume, you must have a free storage pool.
Here, I have a Storage Pool 4 that has some free spaces.
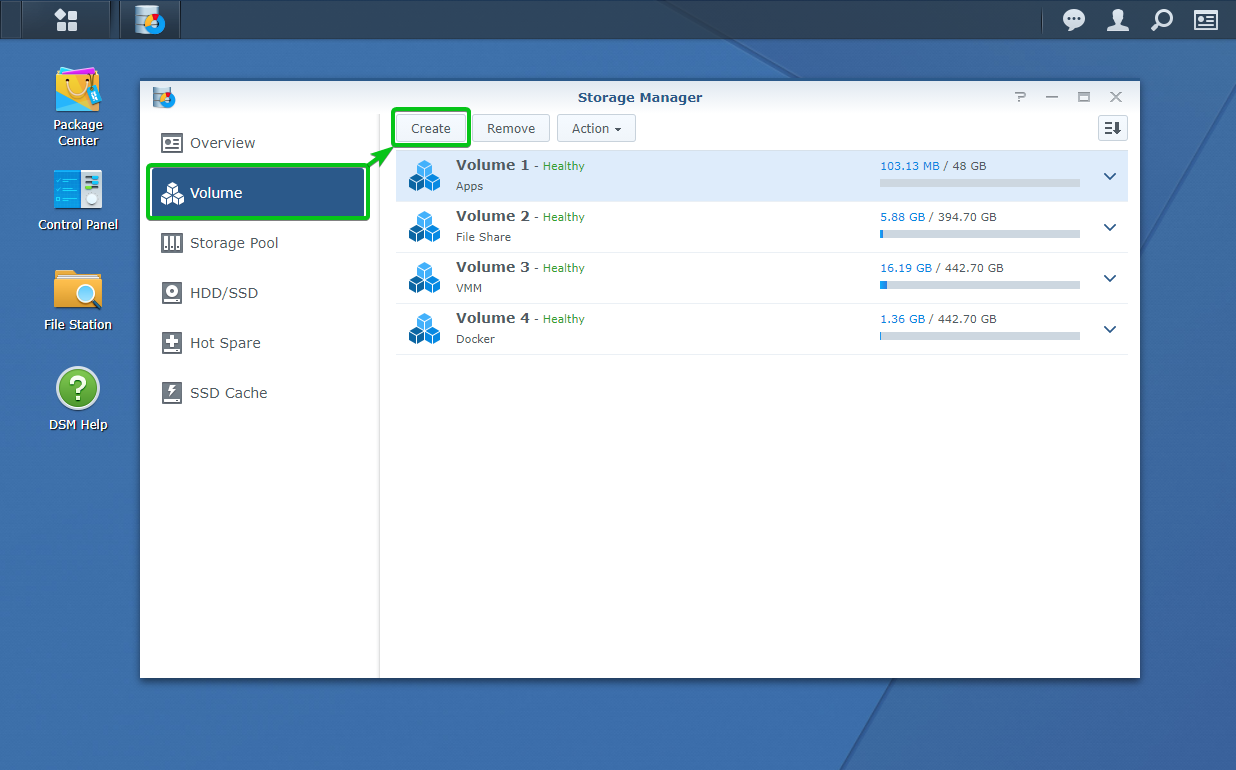
To create a new volume, navigate to the Volume section of the Storage Manager app and click on Create.
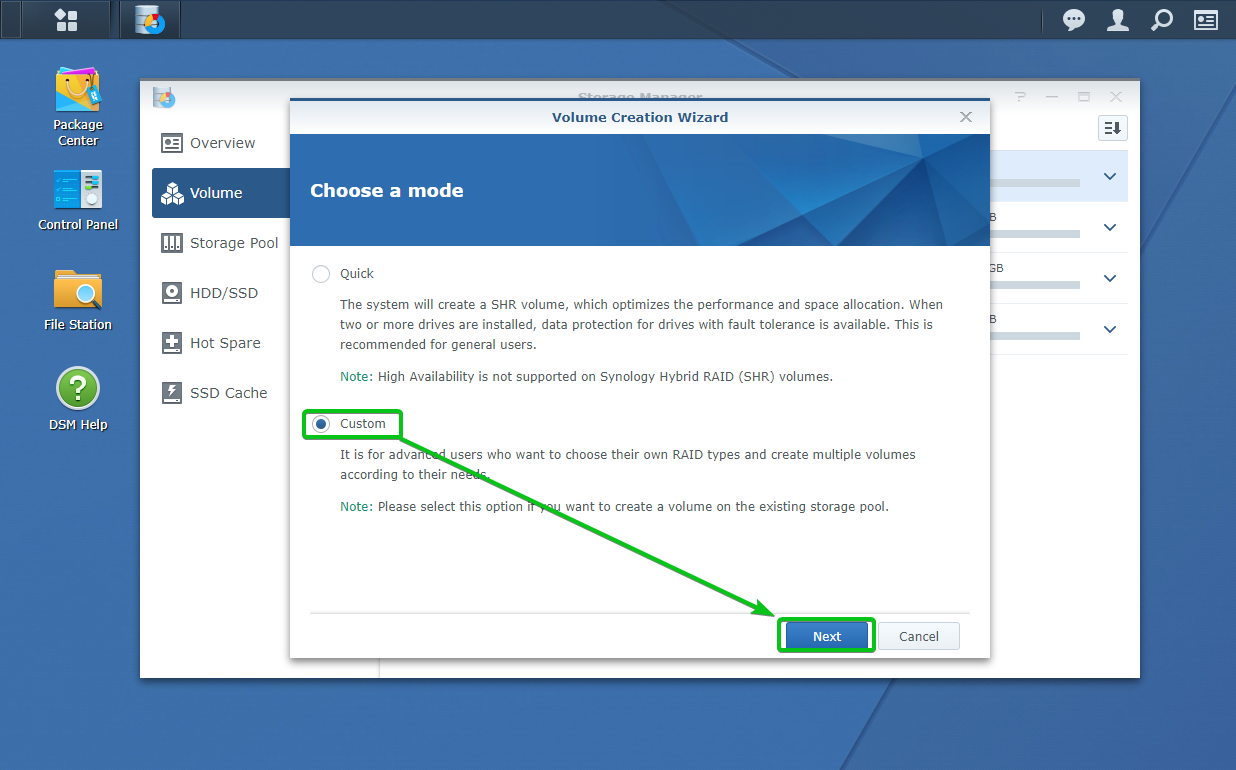
From the Volume Creation Wizard, select Custom and click on Next.
Select Choose an existing storage pool and click on Next.
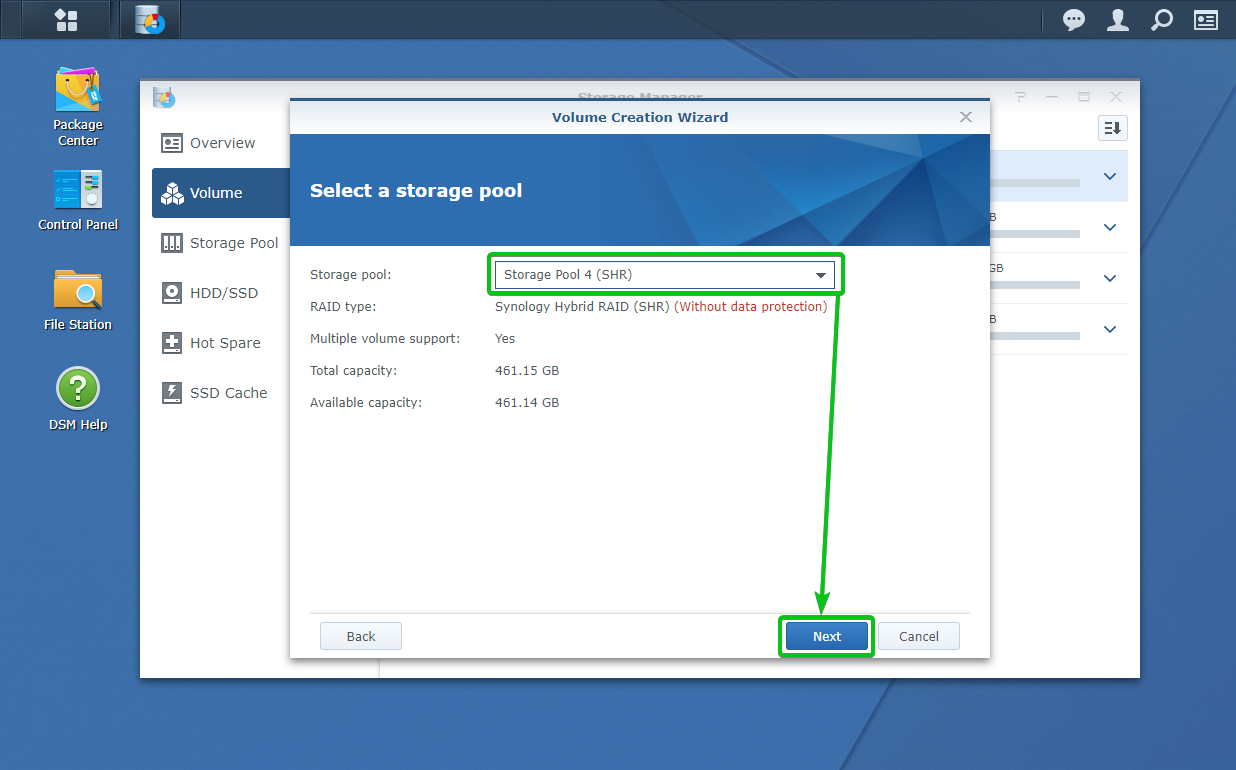
Select the storage pool (Storage Pool 4 in my case) where you want to create the volume from the Storage pool dropdown menu and click on Next.
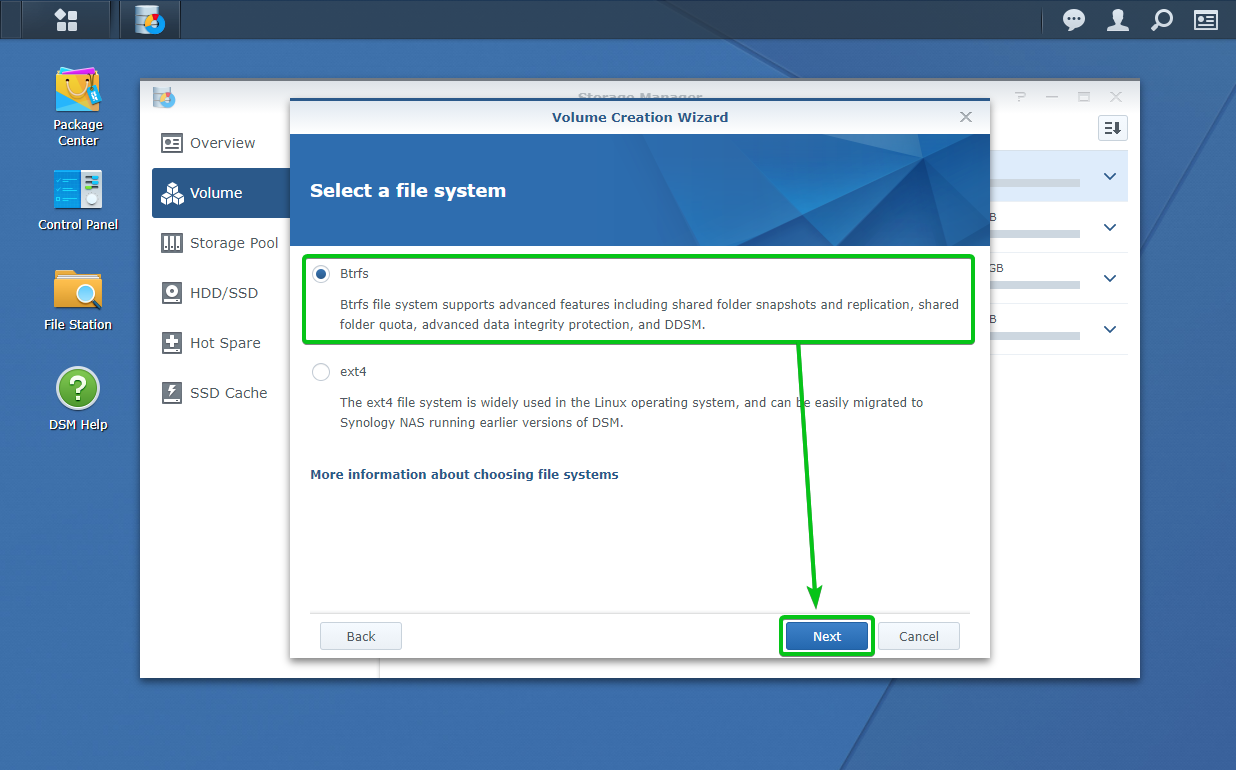
Select Btrfs and click on Next.
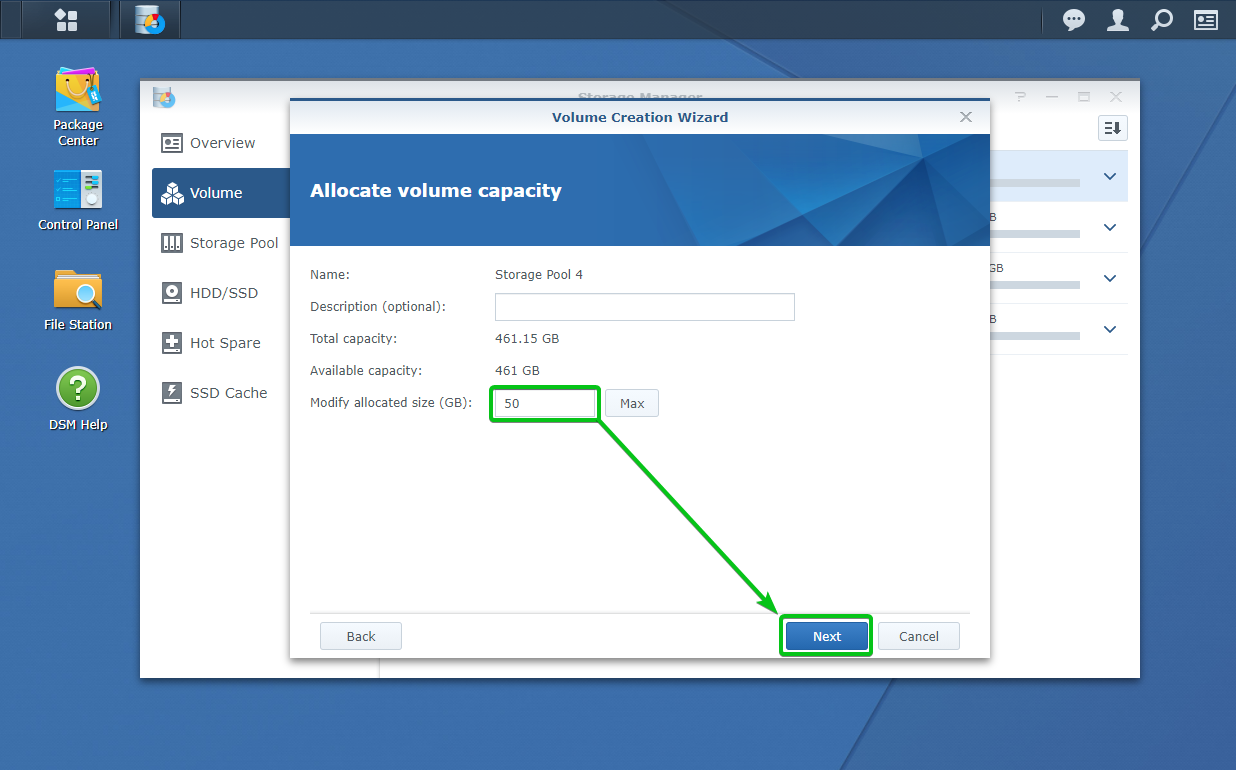
Type in the amount of storage space (in GB unit) you want to allocate to the new volume of your selected storage pool and click on Next.
The settings to be used to create the Btrfs volume should be displayed. To create a volume with these settings, click on Apply.
A new Btrfs volume is being created. It may take a while to complete.
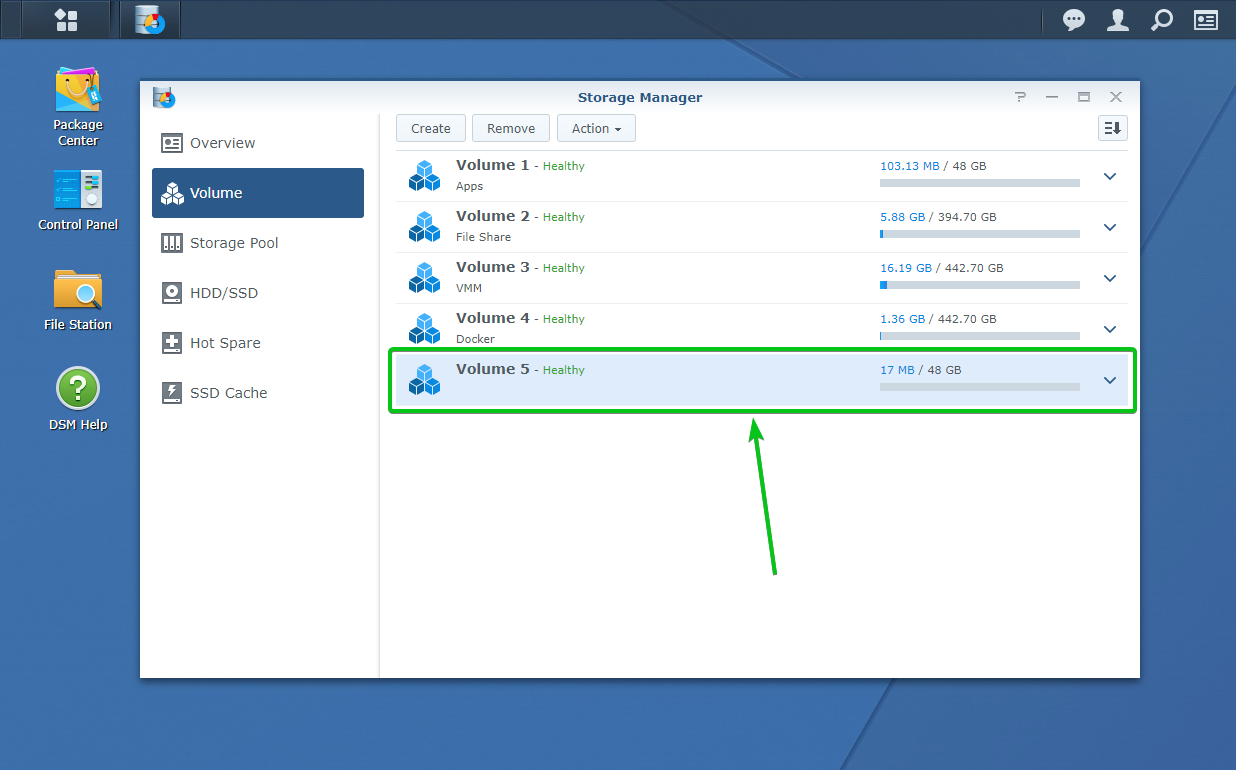
A new Btrfs volume (Volume 5 in my case) should be created, as shown in the screenshot below.
Creating a Shared Folder:
To use the Btrfs volume you have created for storing data, you need to create a shared folder on your Synology NAS.
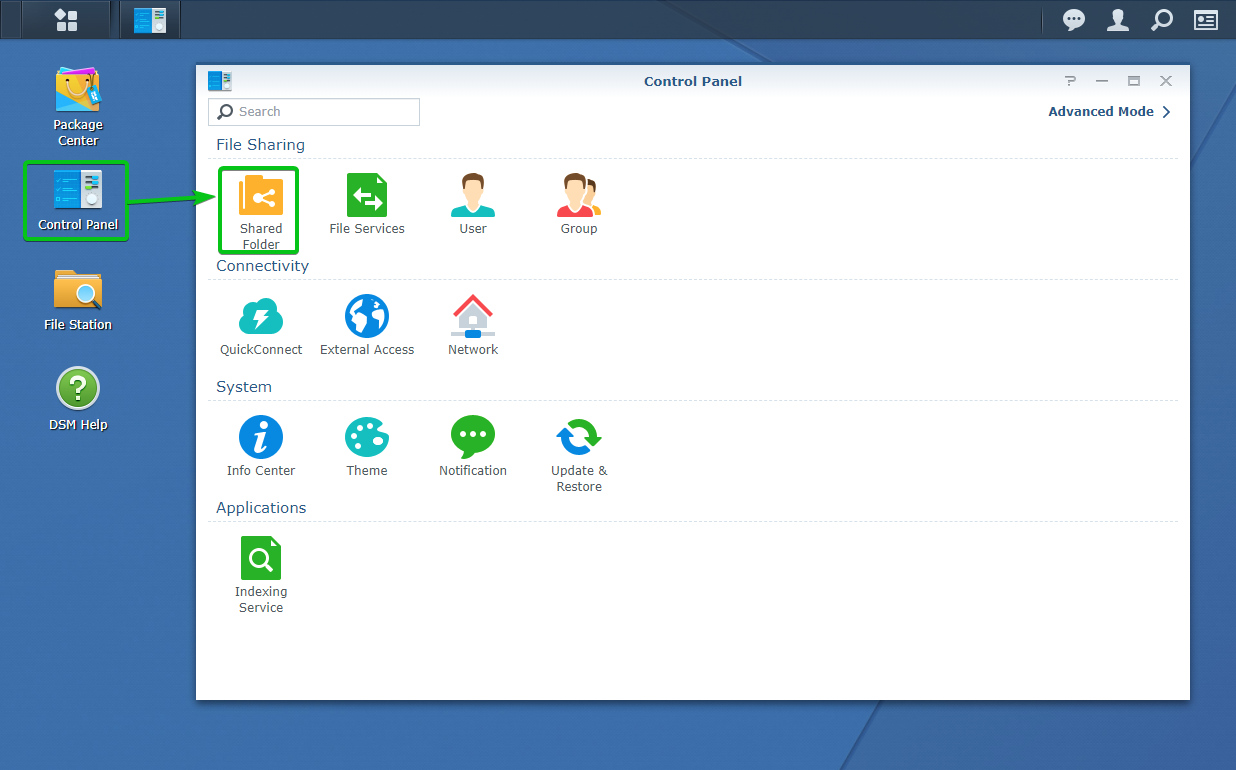
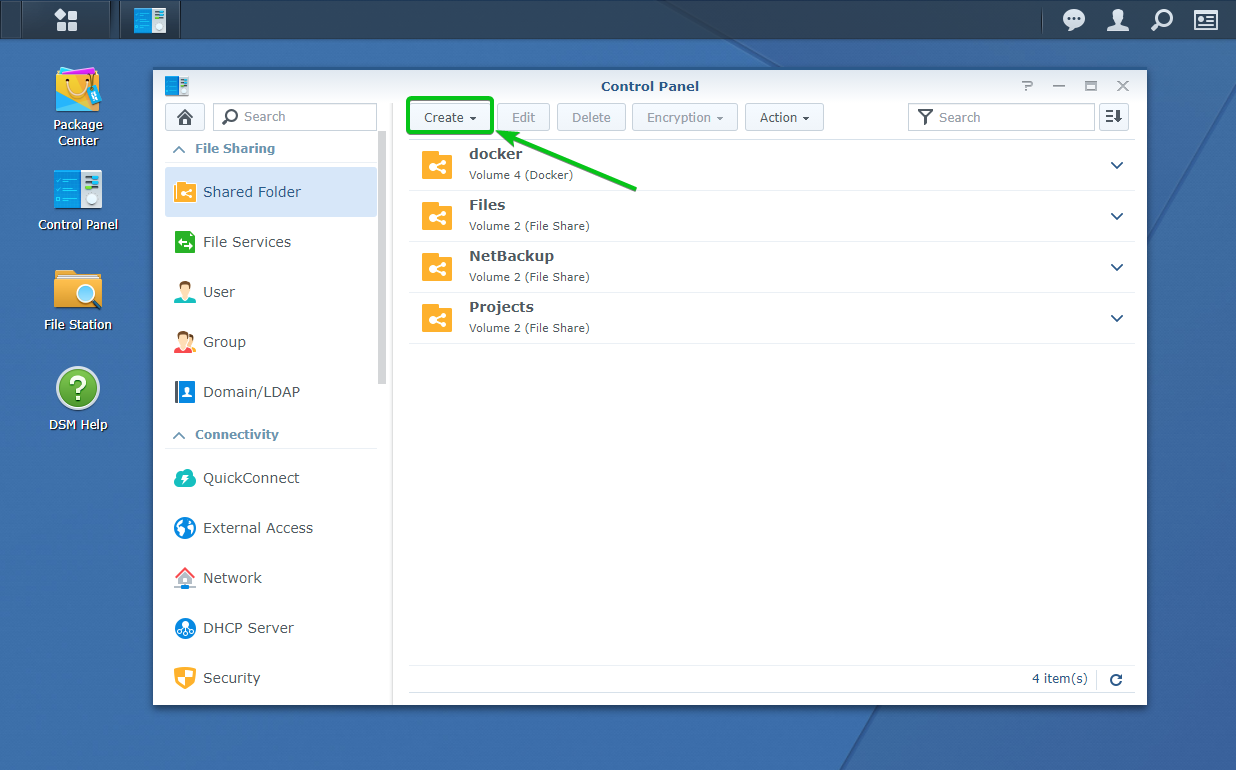
To create a shared folder, click on Shared Folder from the Control Panel app, as marked in the screenshot below.
Click on Create.
Click on Create.
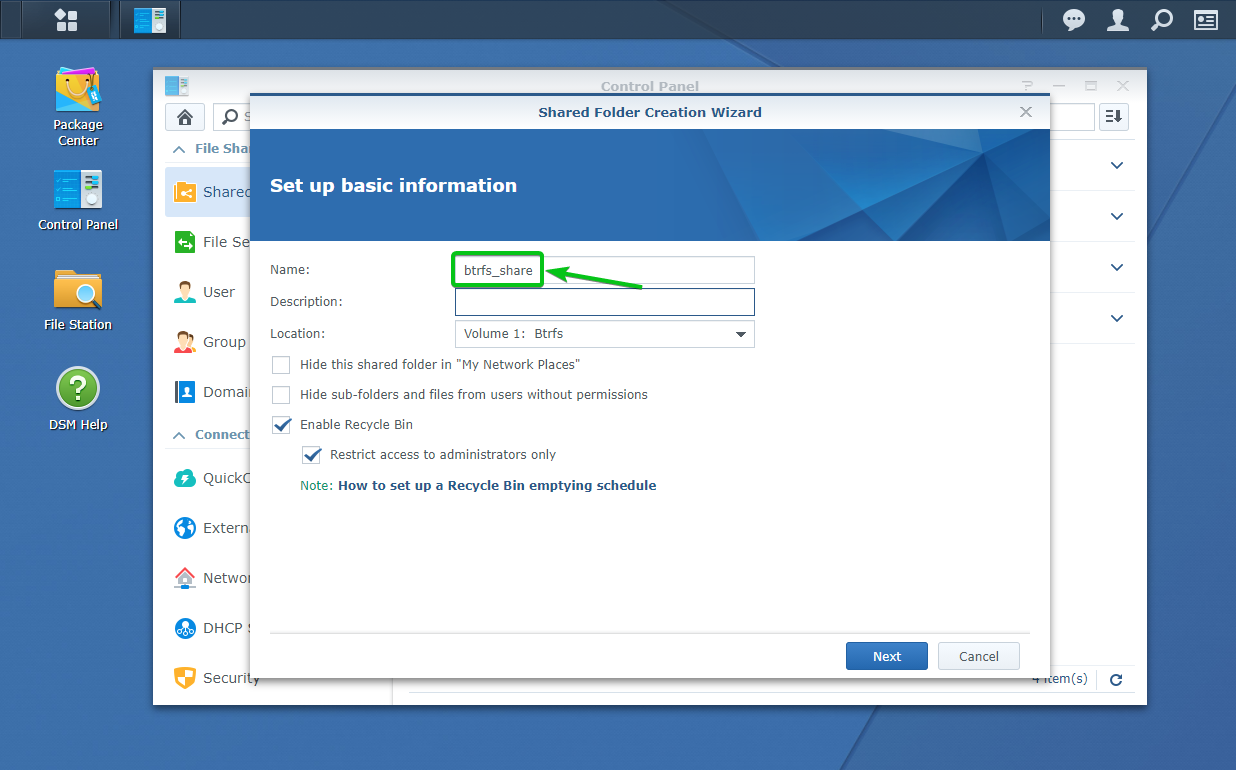
Type in the shared folder name. I will name it btrfs_share. Nonetheless, you can name it anything you want.
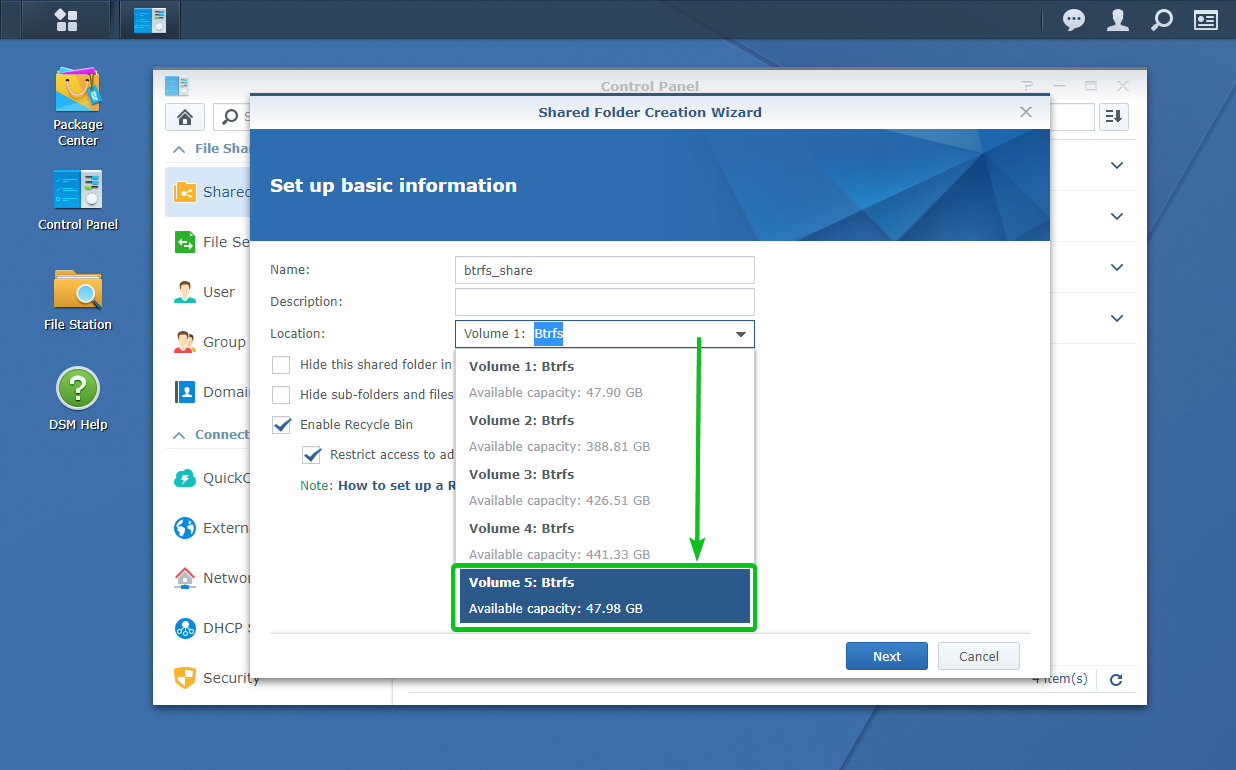
Select the newly created Btrfs volume (Volume 5 in this case) from the Location dropdown menu, as shown in the screenshot below.
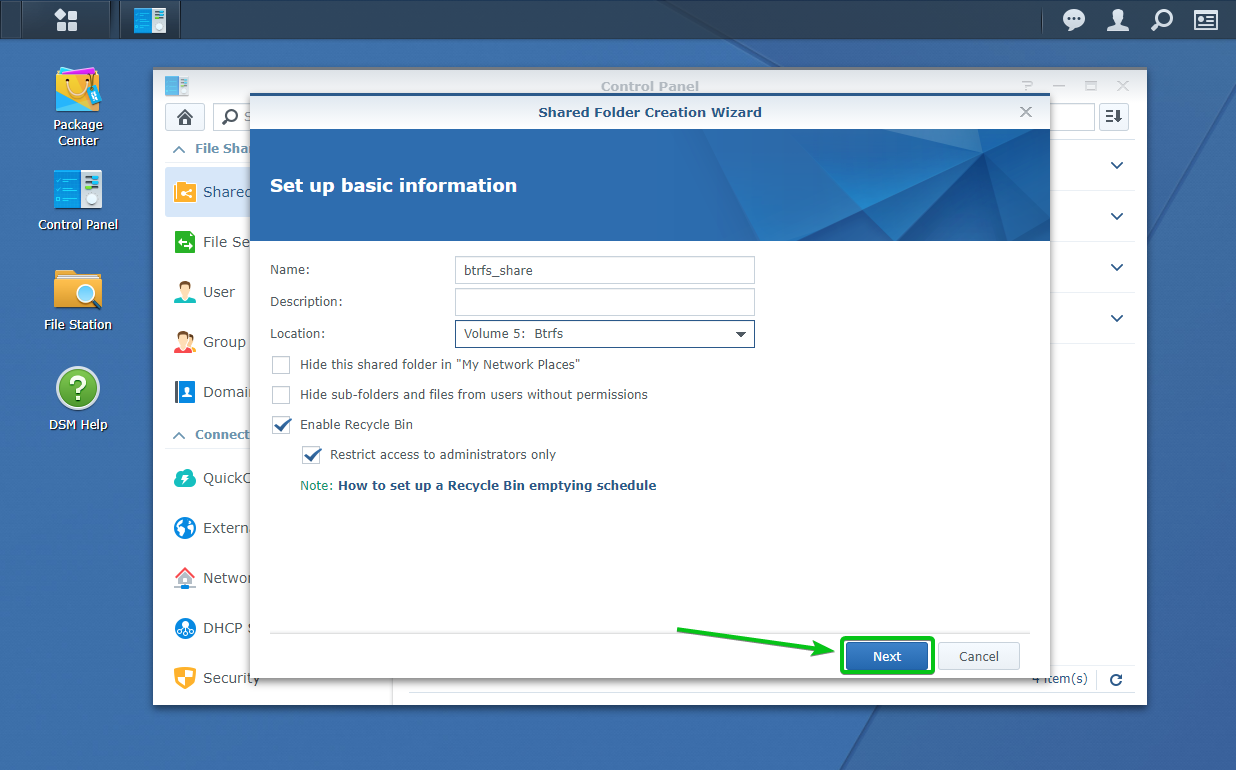
Once you are done, click on Next.
If you want to encrypt the shared folder, you can check the Encrypt this shared folder checkbox and type in an encryption key.
If you do not want to encrypt the shared folder, you do not have to do anything here.
Once you are done with this step, click on Next.
You can configure some advanced settings for the shared folder from here.
If you want to perform checksums on the files you store on this shared folder to make sure not a single bit is flipped in any way, check the Enable data checksum for advanced data integrity checkbox.
If you enable data checksum, then you can also check the Enable file compression checkbox to compress the files you store on this shared folder automatically.
You can enable quota for this shared folder by checking the Enable shared folder quota checkbox and type in the amount of storage space (in GB) you want this share to use from your selected volume (Volume 5 in this case).
Once you are done, click on Next.
The settings to be used to create the shared folder btrfs_share should be displayed. To create a shared folder with these settings, click on Apply.
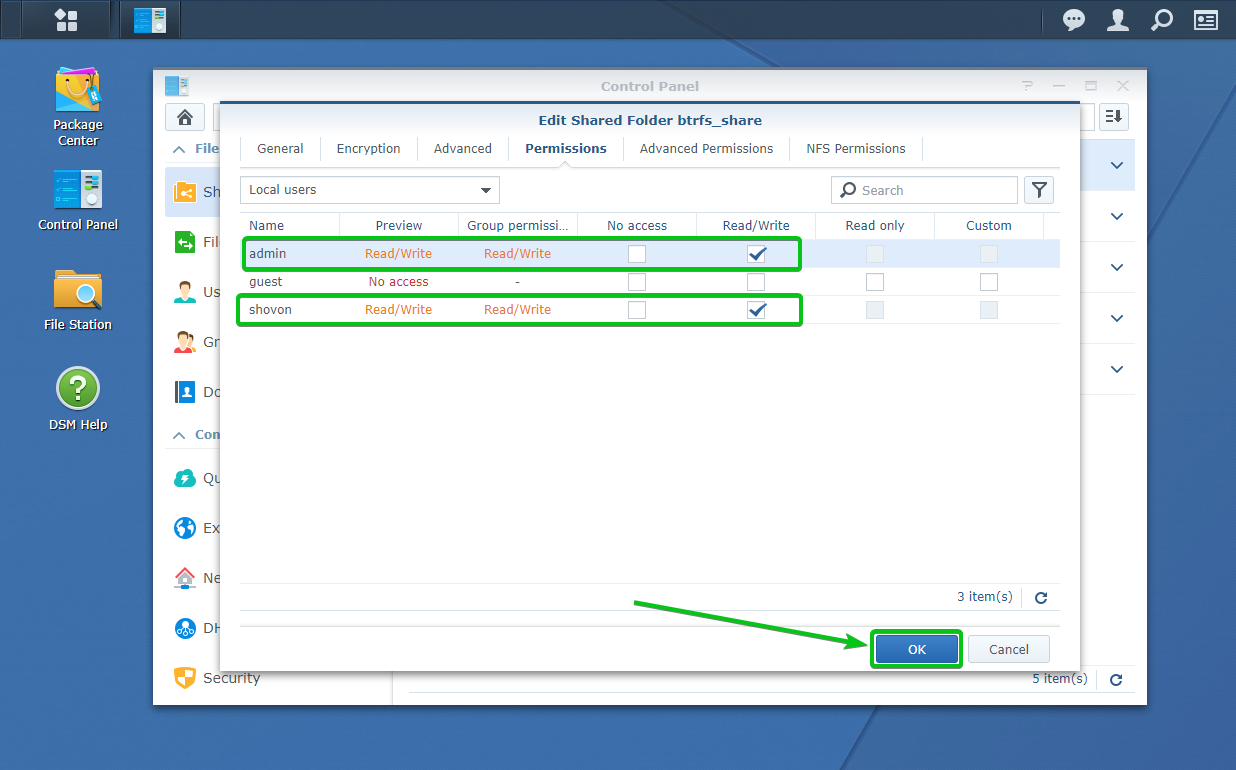
Now, you have to set the necessary permissions for the users you want to give access to this shared folder.
Once you are done, click on OK.
A new shared folder btrfs_share should be created.
Installing Snapshot Replication:
You can use the official Snapshot Replication app to take, restore, and remove snapshots of your shared folders that you have created on a Btrfs volume.
The Snapshot Replication app is not installed by default. But, you can easily install it on your Synology NAS from the Package Center app.
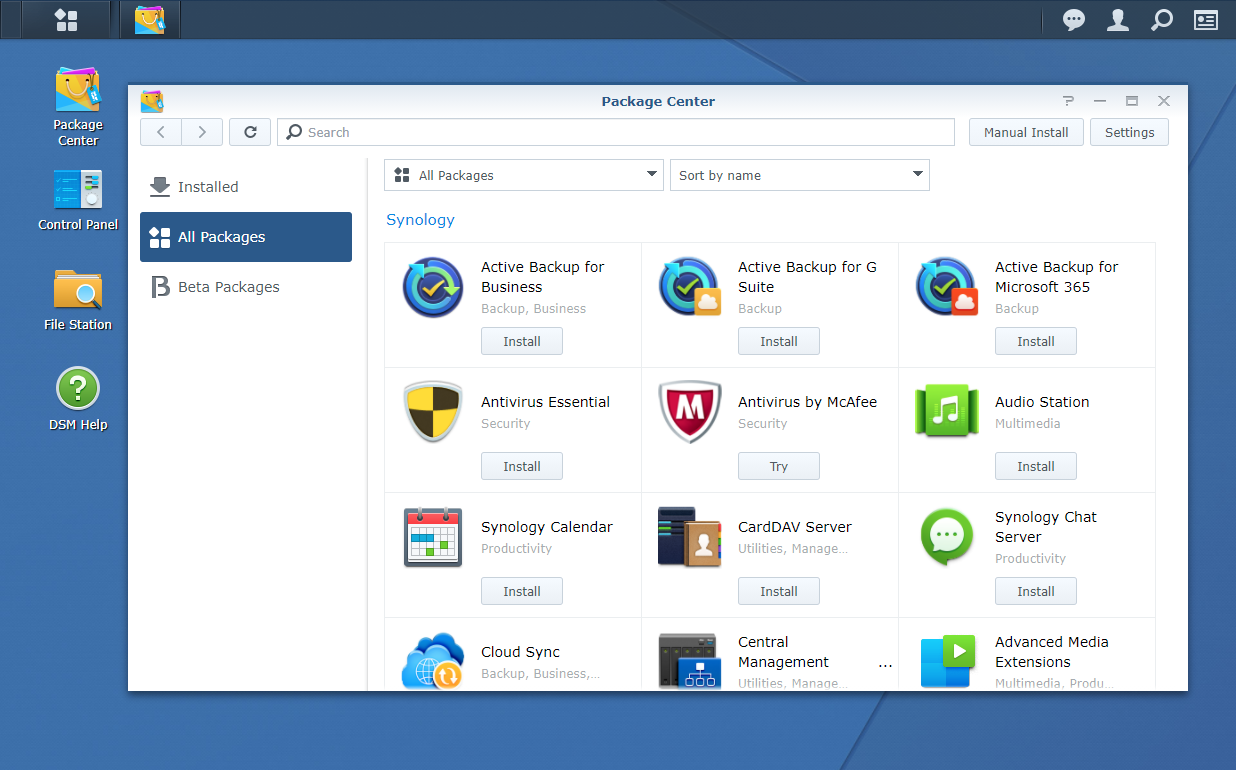
First, open the Package Center app from the Main Menu of Synology Web GUI, as marked in the screenshot below.
The Package Center app should be opened.
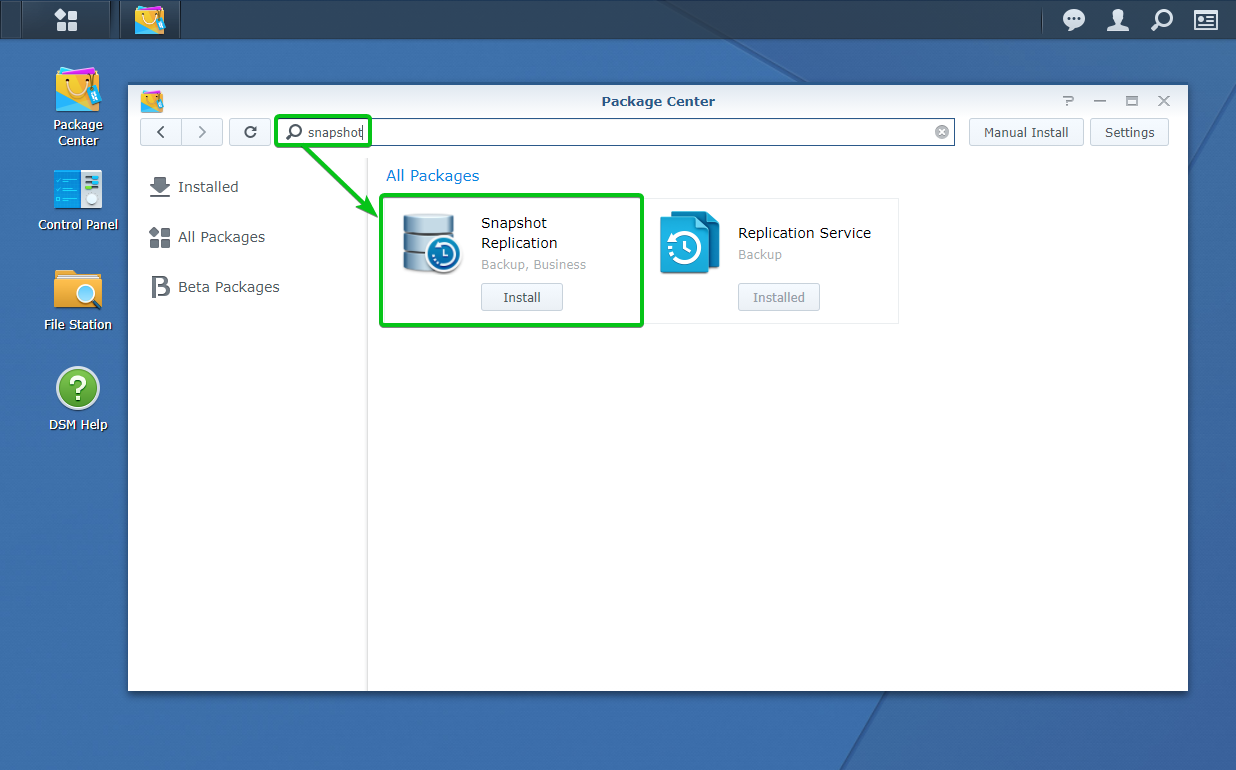
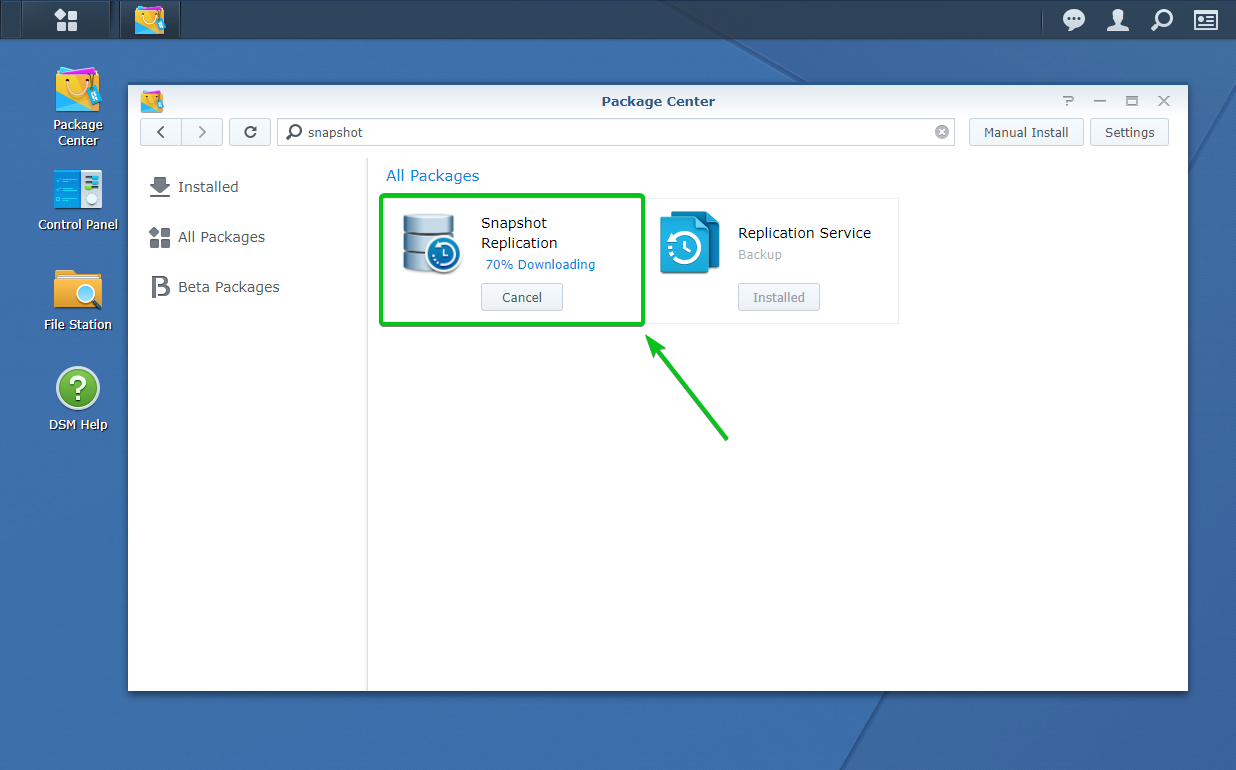
Search the keyword snapshot and you will find the Snapshot Replication app, as you can see in the screenshot below.
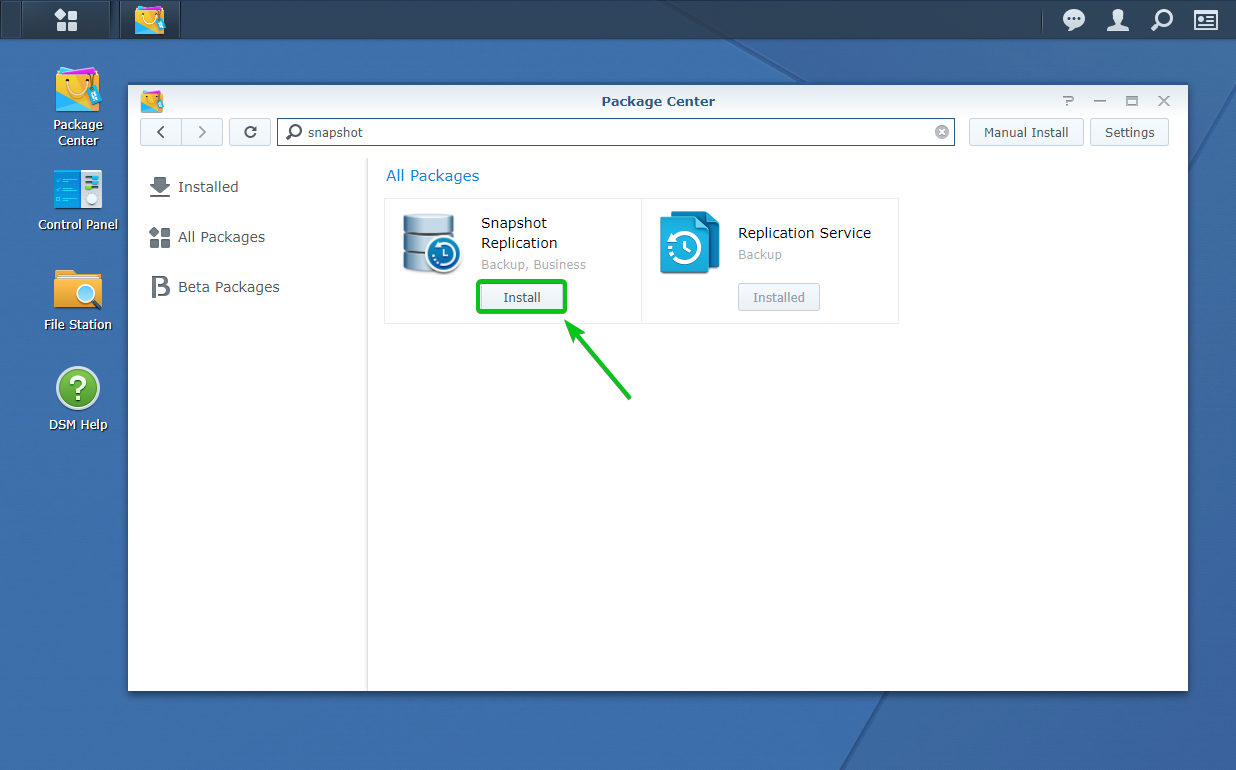
To install the Snapshot Replication app, click on Install, as shown in the screenshot below.
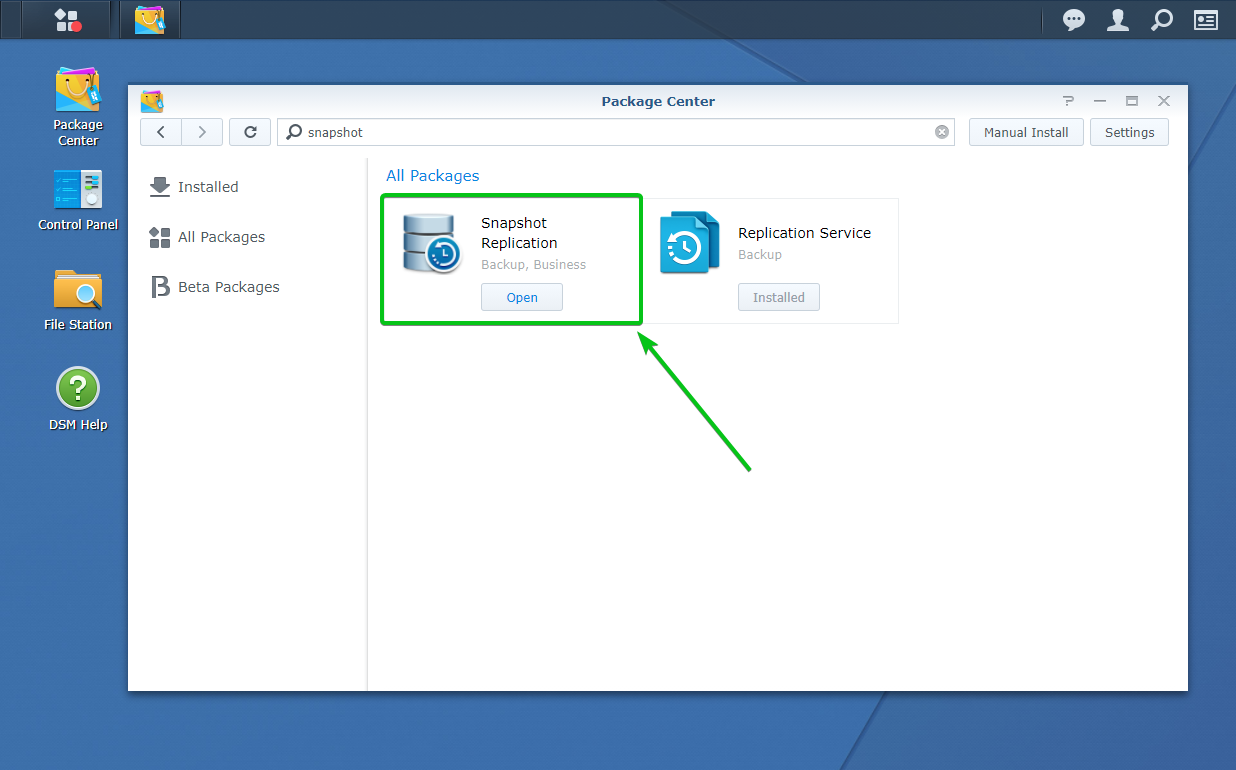
The Snapshot Replication app is being installed. It may take a few seconds to complete.
At this point, the Snapshot Replication app should be installed.
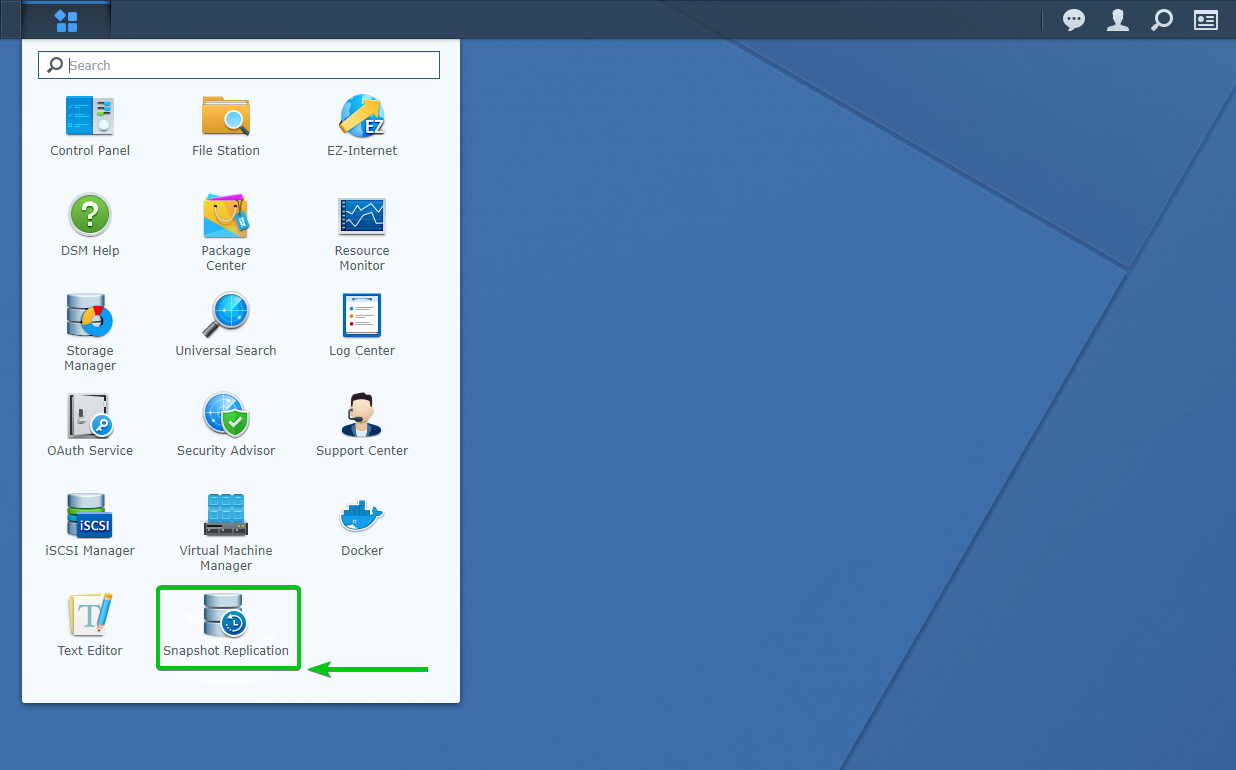
Once the Snapshot Replication app is installed, you can run it from the Main Menu of your Synology Web GUI, as you can see in the screenshot below.
Click on OK.
The Snapshot Replication app should be ready to use.
Take Btrfs Snapshots of Shared Folders:
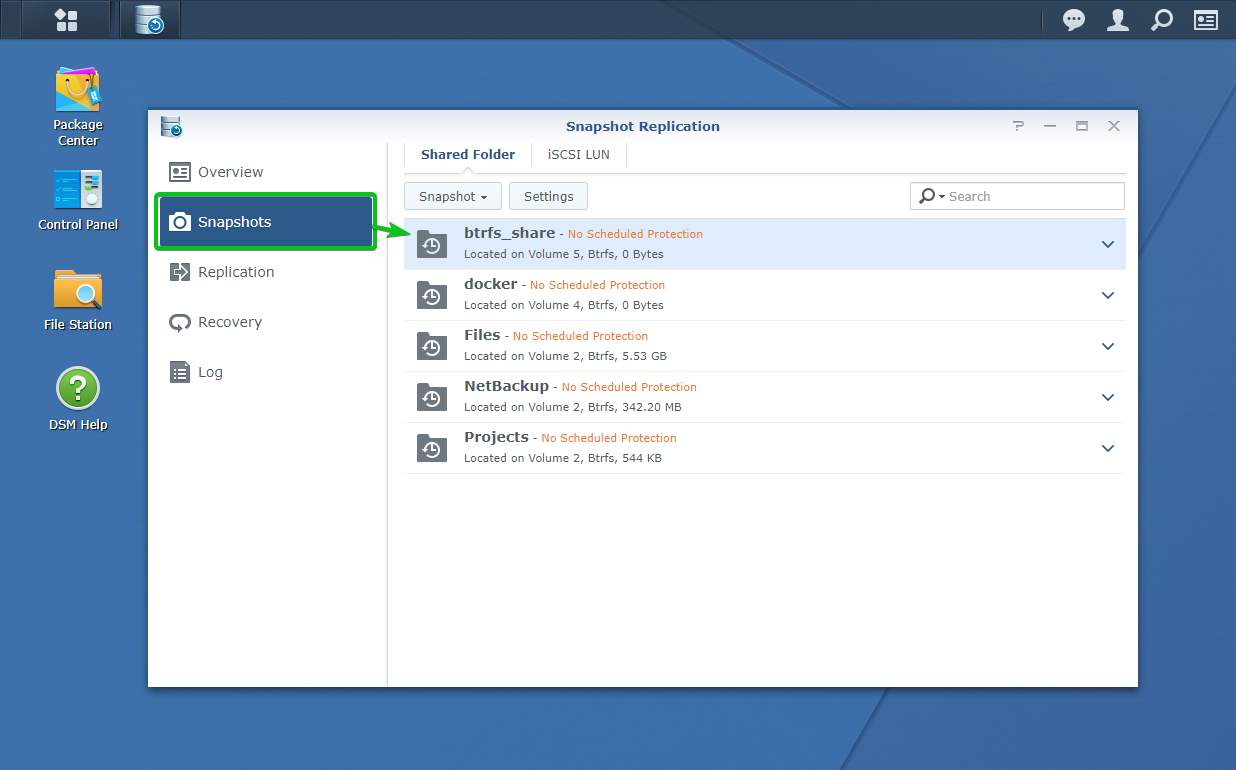
To take snapshots of shared folders that were created on Btrfs formatted volumes, navigate to the Snapshots section of the Snapshot Replication app.
You should see all the shared folders that support the Btrfs snapshot feature, as shown in the screenshot below.
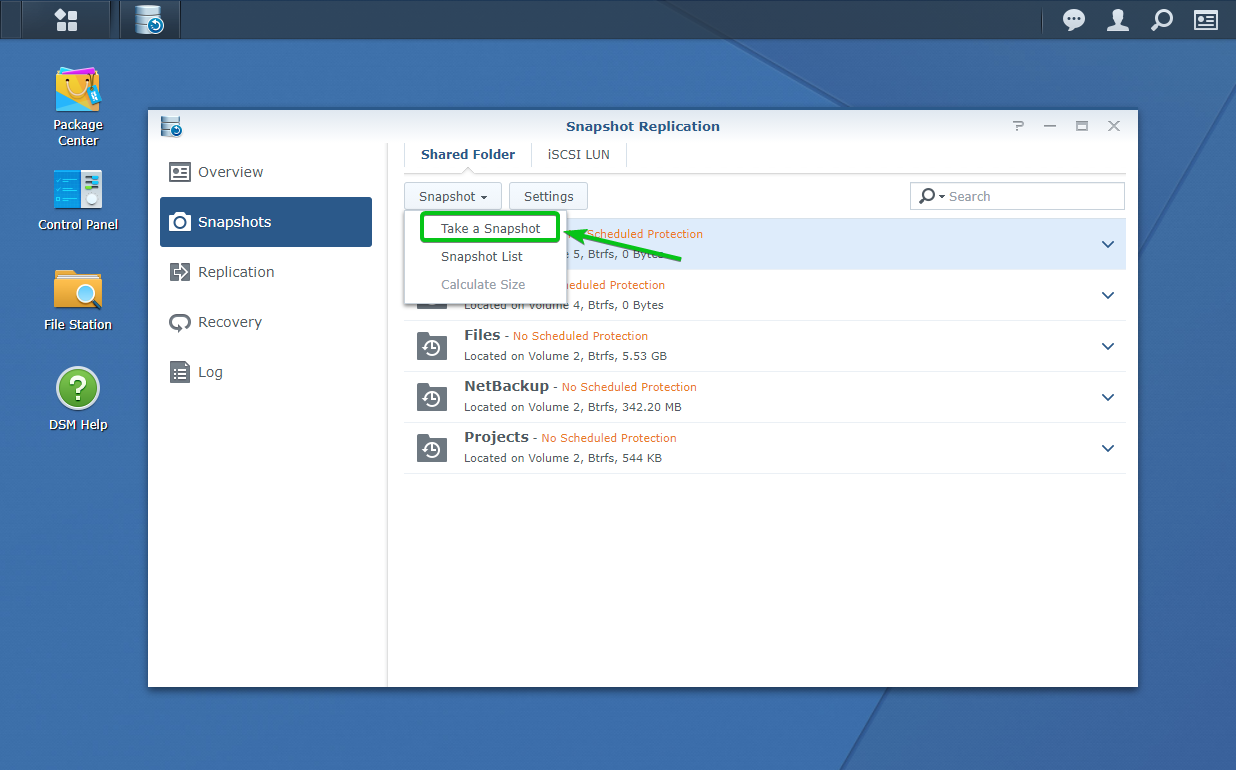
To take a snapshot of the shared folder btrfs_share, select it and click on the Snapshot drop-down menu, as marked in the screenshot below.
Click on Take a Snapshot.
Type a description for the snapshot.
Once you are done, click on OK.
A snapshot of the shared folder btrfs_share should be taken.
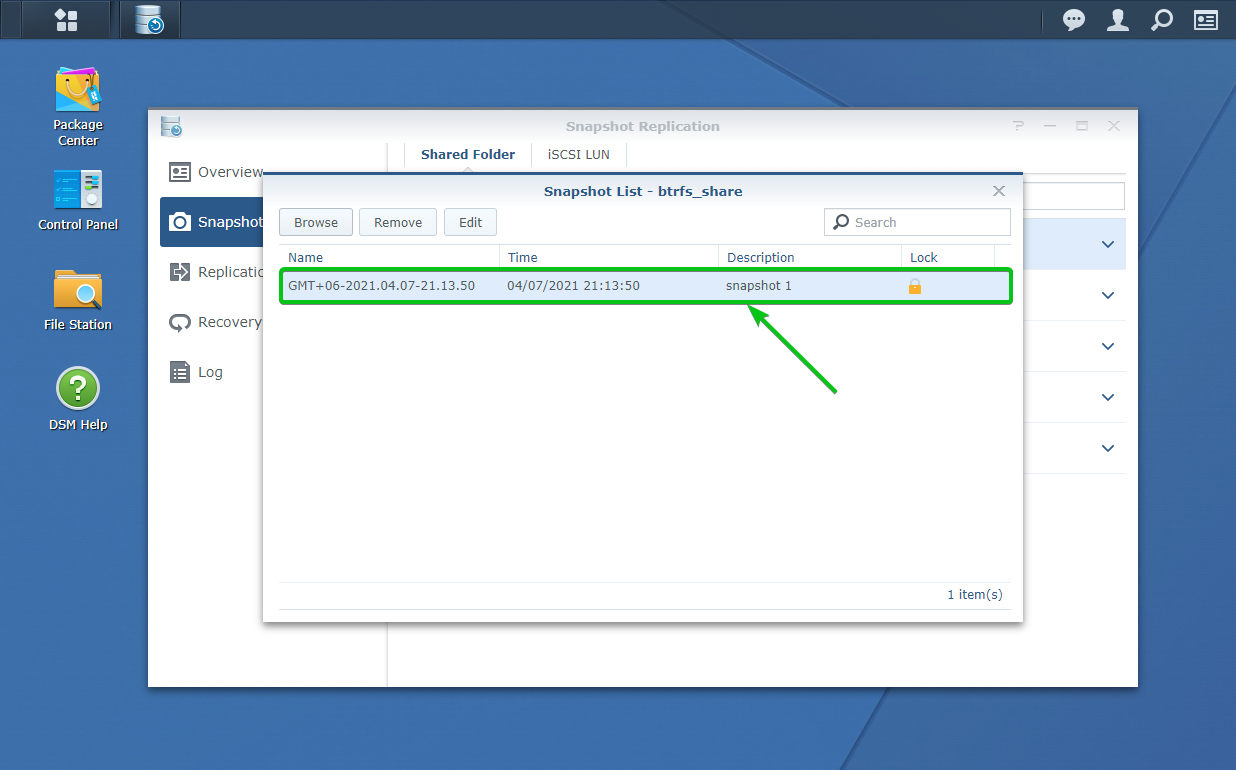
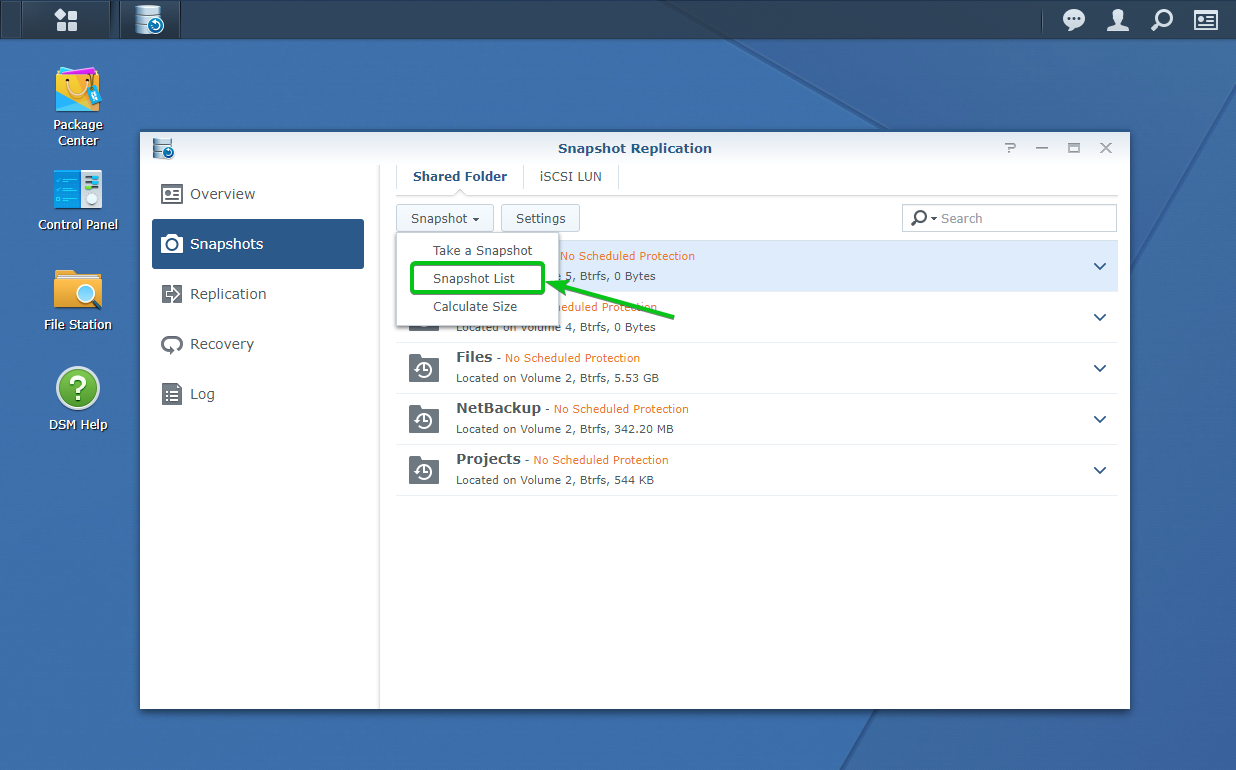
To see the snapshots you have taken of the shared folder, select it and click on Snapshot > Snapshot List, as marked in the screenshot below.
As you can see, the snapshot I have taken earlier on the shared folder btrfs_share is listed.
Restore Shared Folders from Btrfs Snapshots:
In this section, I am going to show you how to restore a shared folder to its earlier state from a snapshot.
To demonstrate the process, I have created a new file message.txt in the btrfs_share shared folder with the following content before taking the snapshot in the Take Btrfs Snapshots section of this article.
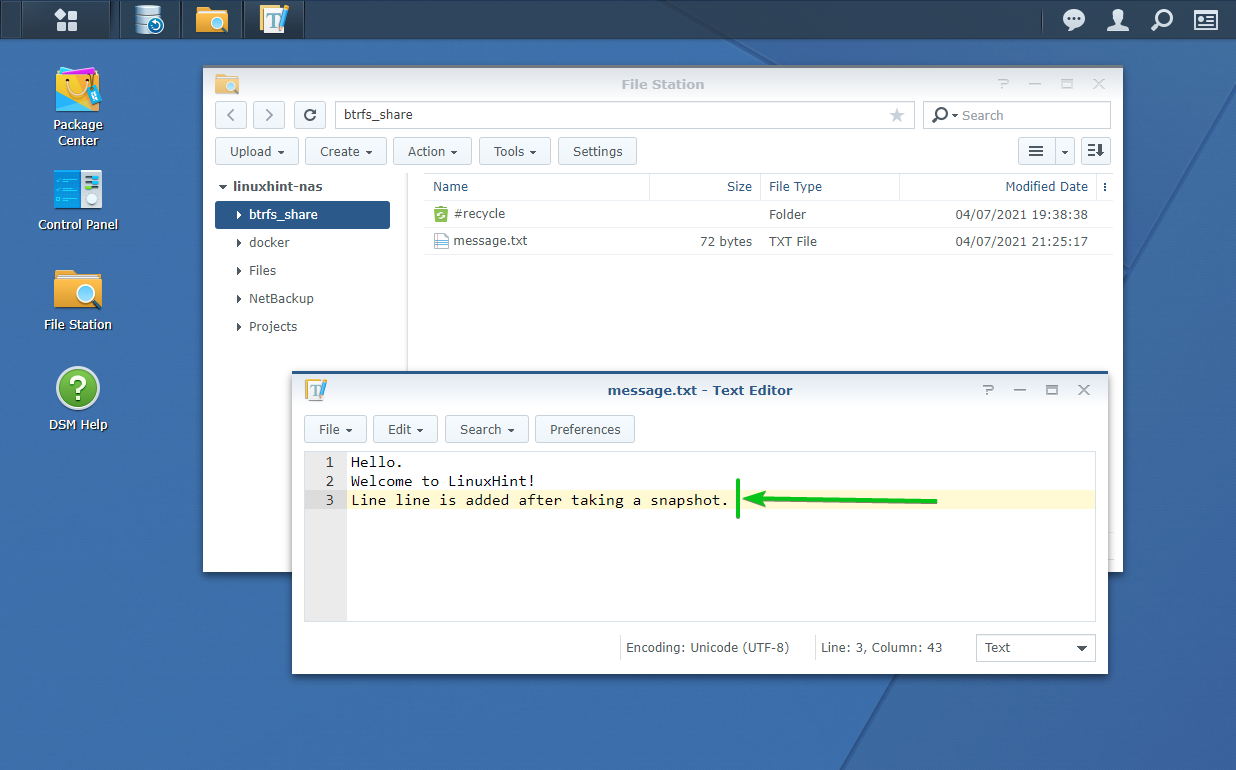
After I have taken a snapshot of the btrfs_share shared folder, I have added a new line to the message.txt file, as you can see in the screenshot below.
Let’s recover the shared folder btrfs_share to its earlier state, before adding a new line to the message.txt file in this case.
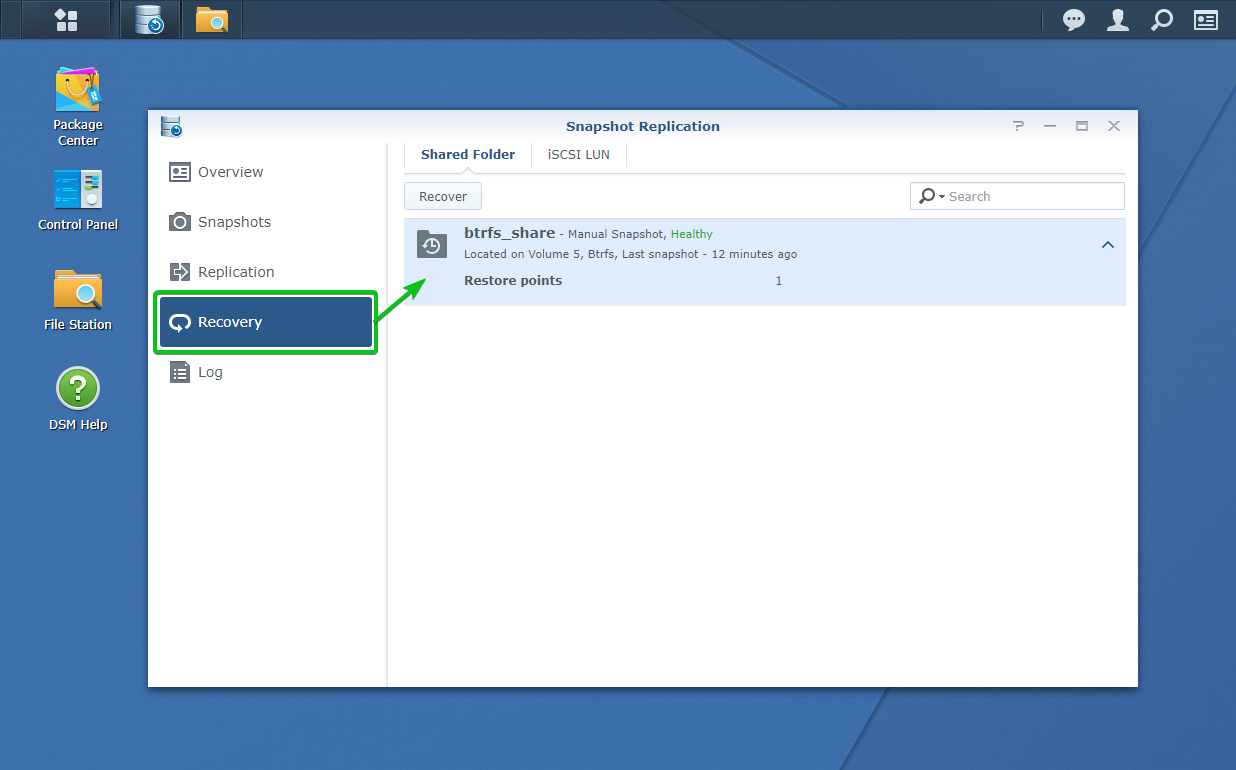
To recover a shared folder to its earlier state from a snapshot, navigate to the Recovery section of the Snapshot Replication app.
The shared folders that you have taken snapshots on should be listed here.
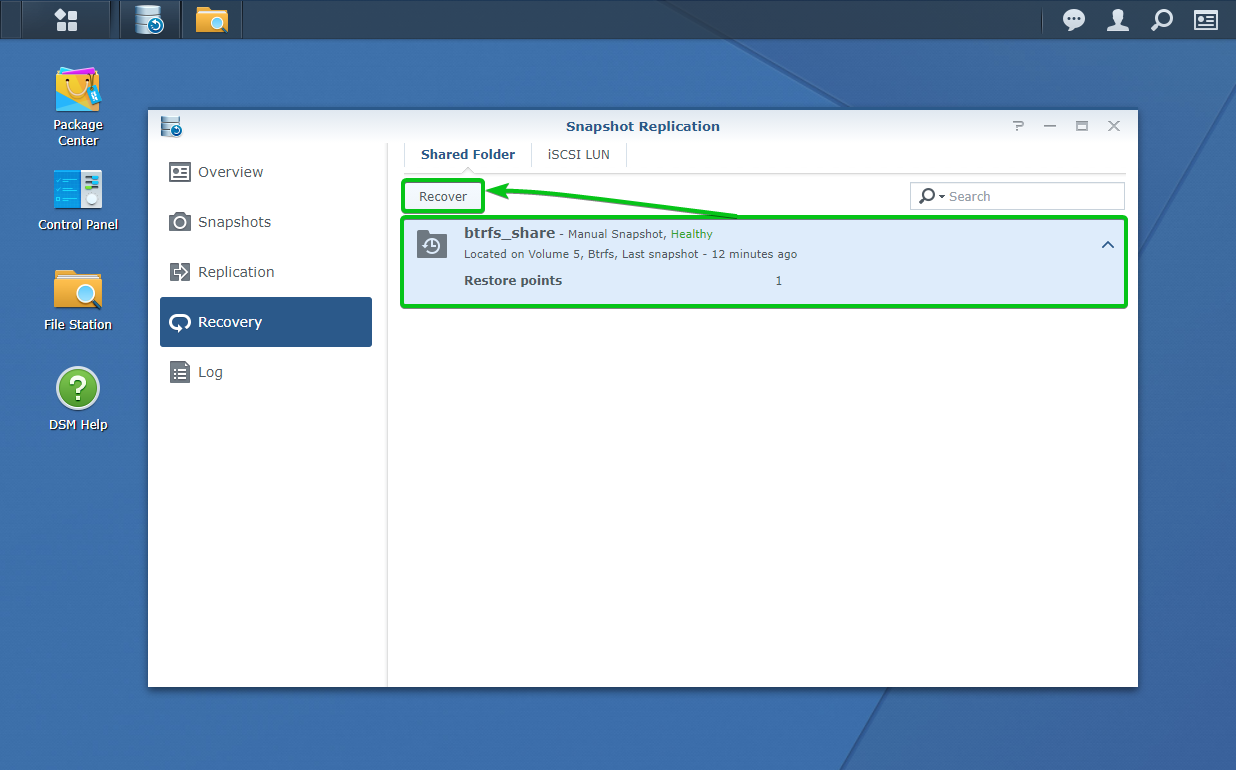
To recover the shared folder btrfs_share from a snapshot, select it and click on Recover, as marked in the screenshot below.
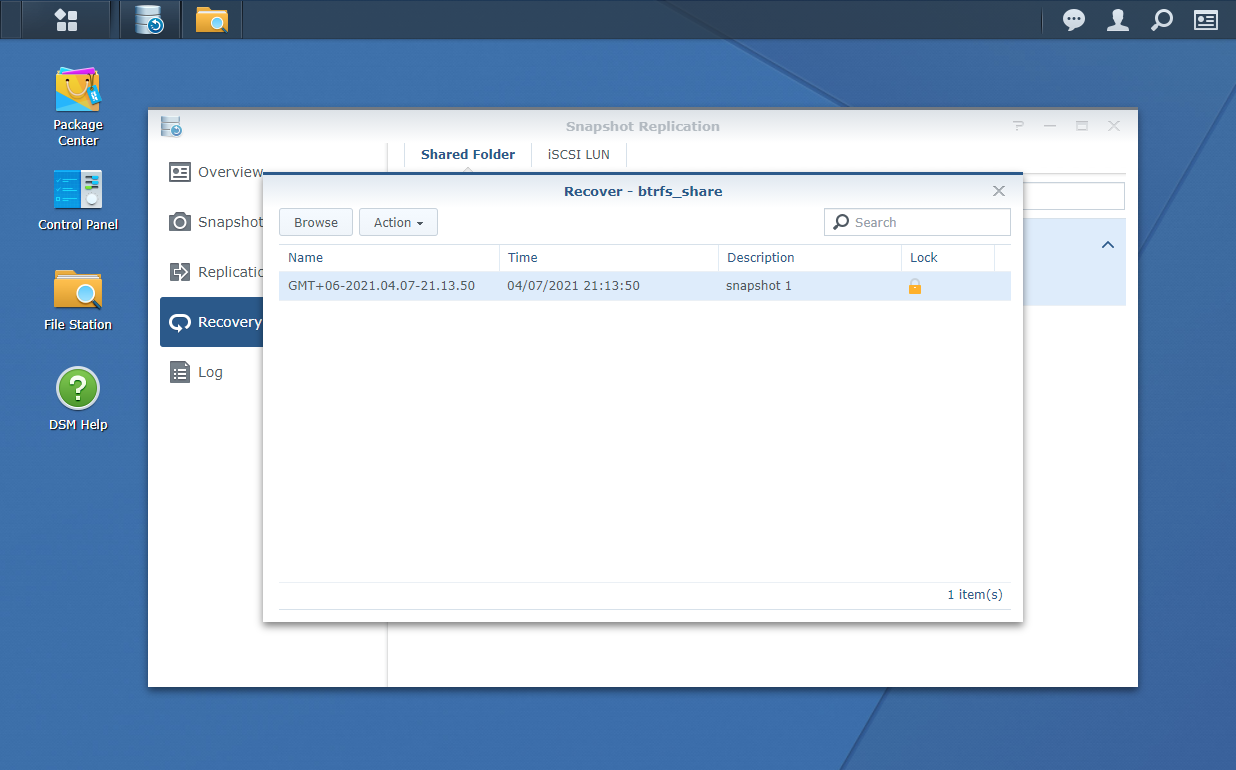
The available snapshots on the btrfs_share shared folder should be listed, as you can see in the screenshot below.
To recover the shared folder btrfs_share from a snapshot, select the snapshot and click on the Action drop-down menu.
Click on Restore to this snapshot, as shown in the screenshot below.
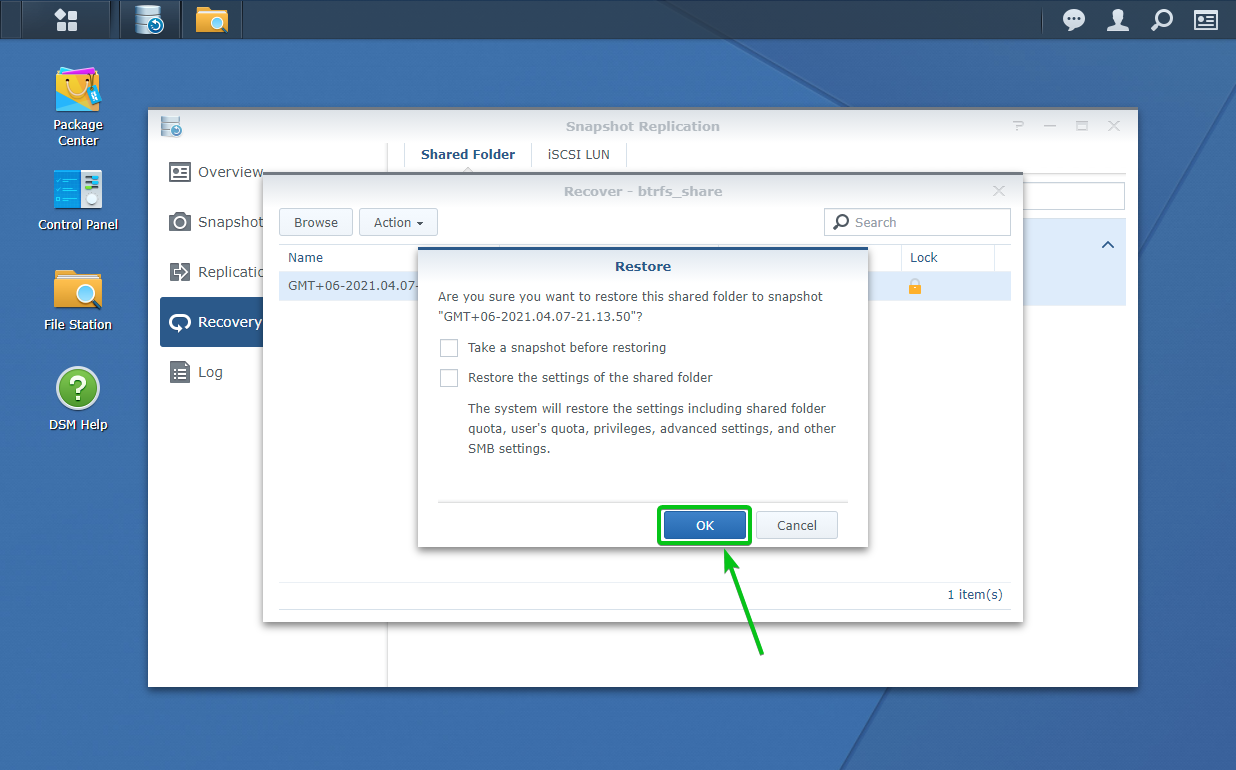
If you want to take a snapshot of the current state of the shared folder, then check Take a snapshot before restoring checkbox from the Restore window, as marked in the screenshot below.
If you don’t want to take a snapshot of the current state of the shared folder, then make sure to uncheck the Take a snapshot before restoring checkbox from the Restore window.
In this article, I will not take a snapshot of the current state of the shared folder. So, I will keep the Take a snapshot before restoring checkbox unchecked.
Once you’ve decided whether you want to take a snapshot of the current state of the shared folder before restoring a shared folder from a snapshot, click on OK.
The shared folder is being restored from a snapshot. It may take a few seconds to complete.
At this point, the shared folder btrfs_share should be restored from the snapshot.
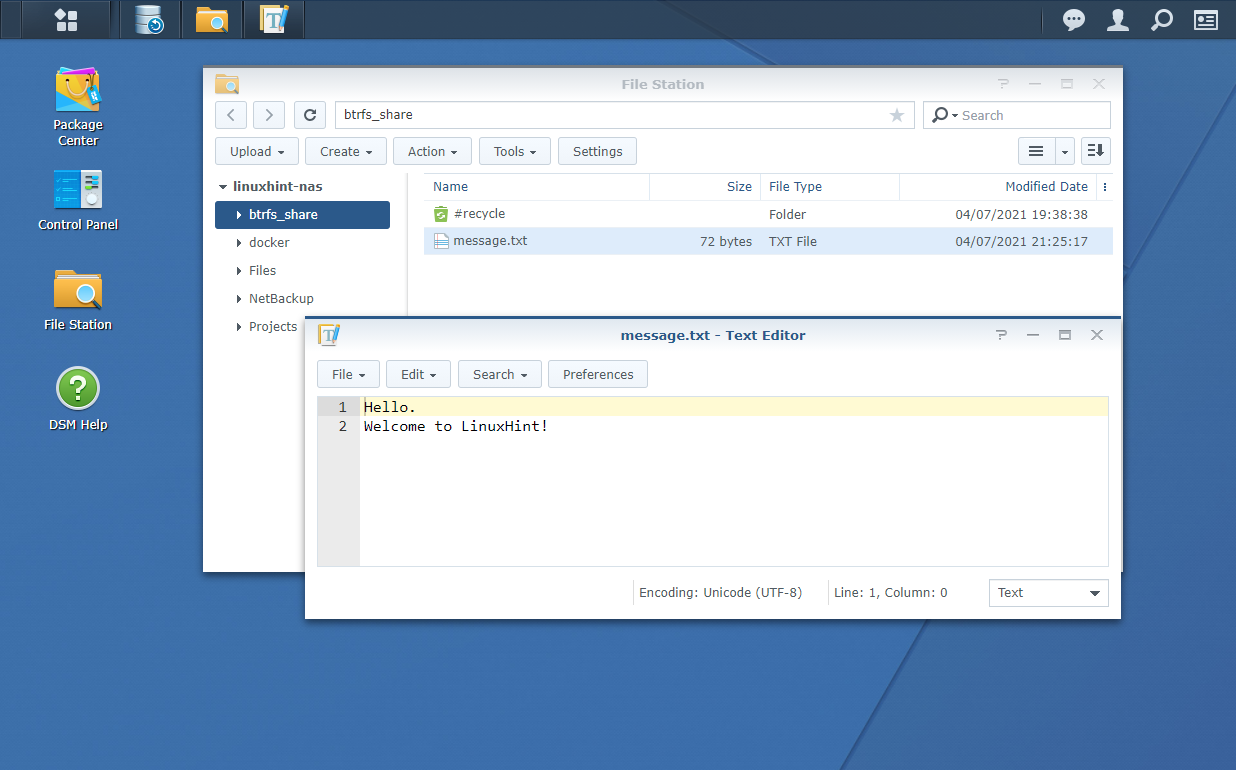
As you can see, the line I have added to the message.txt file is gone. So, the shared folder btrfs_share is restored from the snapshot just fine.
Managing Btrfs Snapshots:
In this section, I am going to show you how to remove and change the description of the snapshots you’ve taken on your shared folders.
To manage the snapshots you’ve taken on your shared folders, navigate to the Snapshots section of the Snapshot Replication app.
Then, select a shared folder and click on Snapshot > Snapshot List, as marked in the screenshot below to list all the snapshots you’ve taken on that shared folder.
As you can see, the snapshot I have taken on the btrfs_share shared folder is listed.
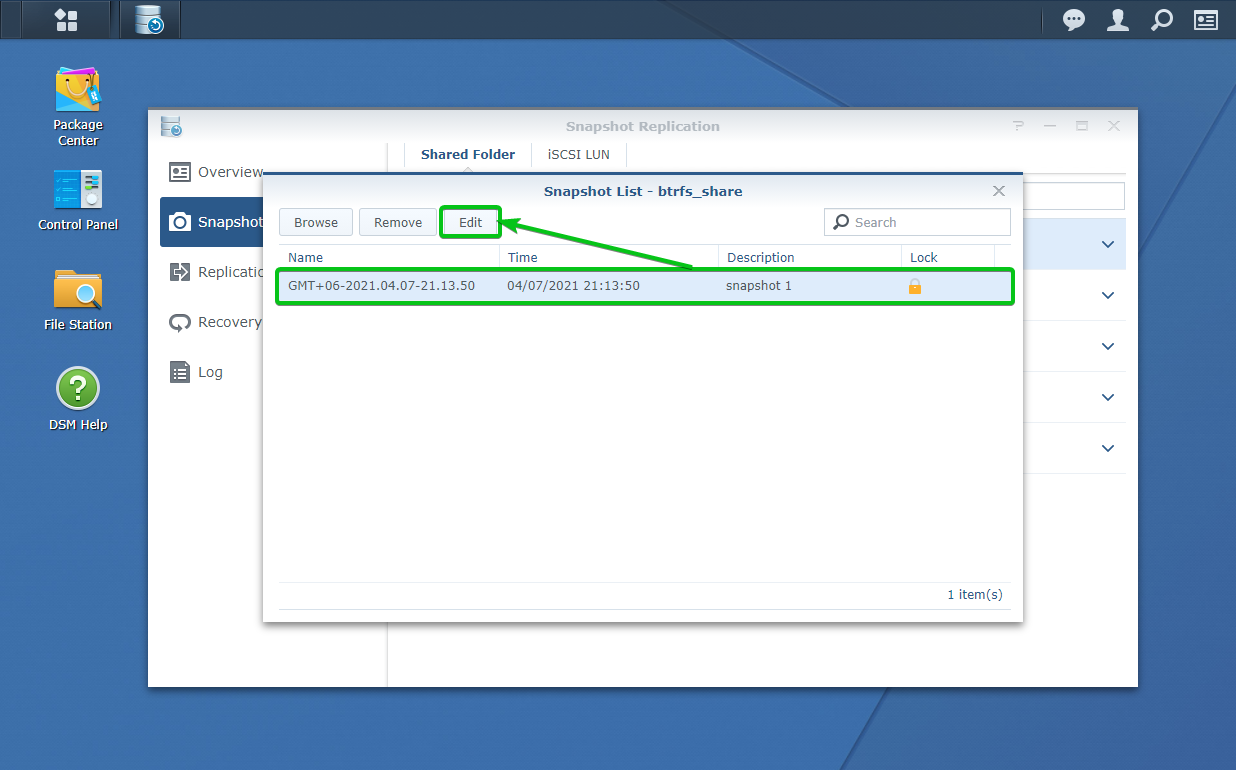
To edit the description of a snapshot you’ve already taken, select the snapshot and click on Edit, as marked in the screenshot below.
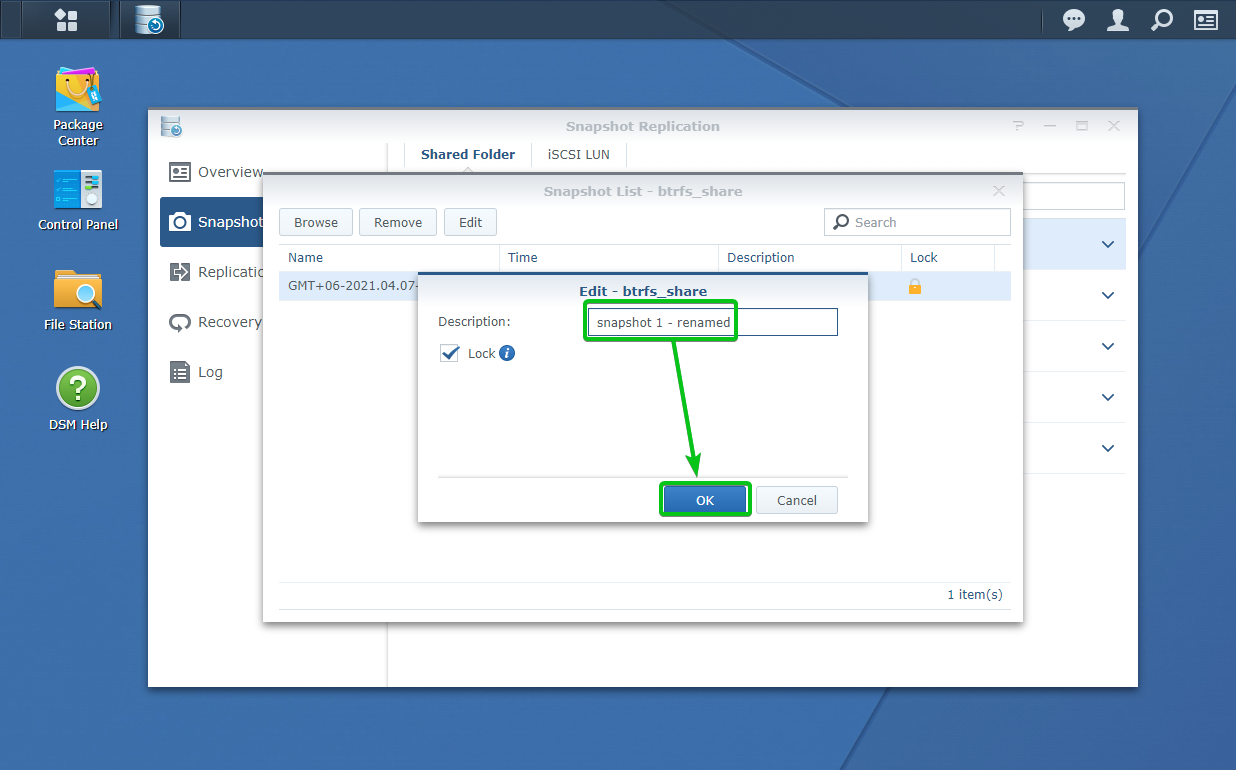
Type in the new description for the snapshot and click on OK, as marked in the screenshot below.
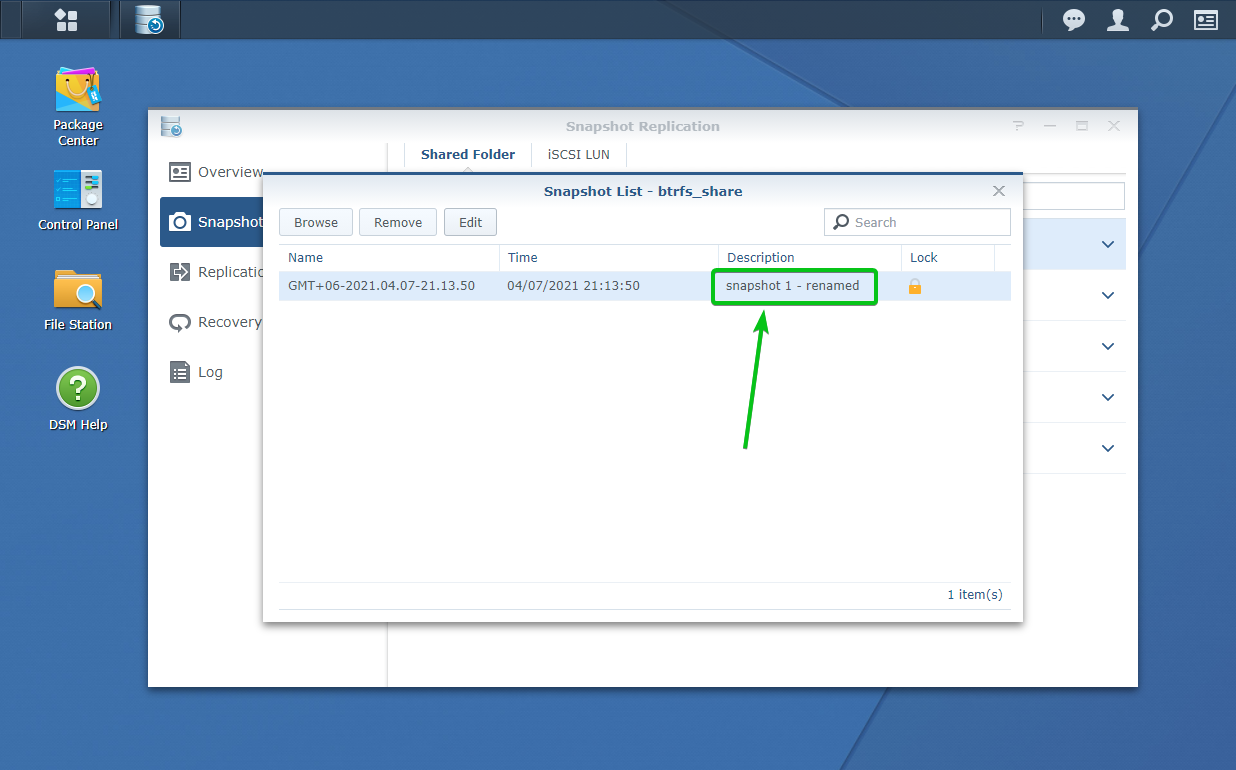
The description of the snapshot should be changed, as you can see in the screenshot below.
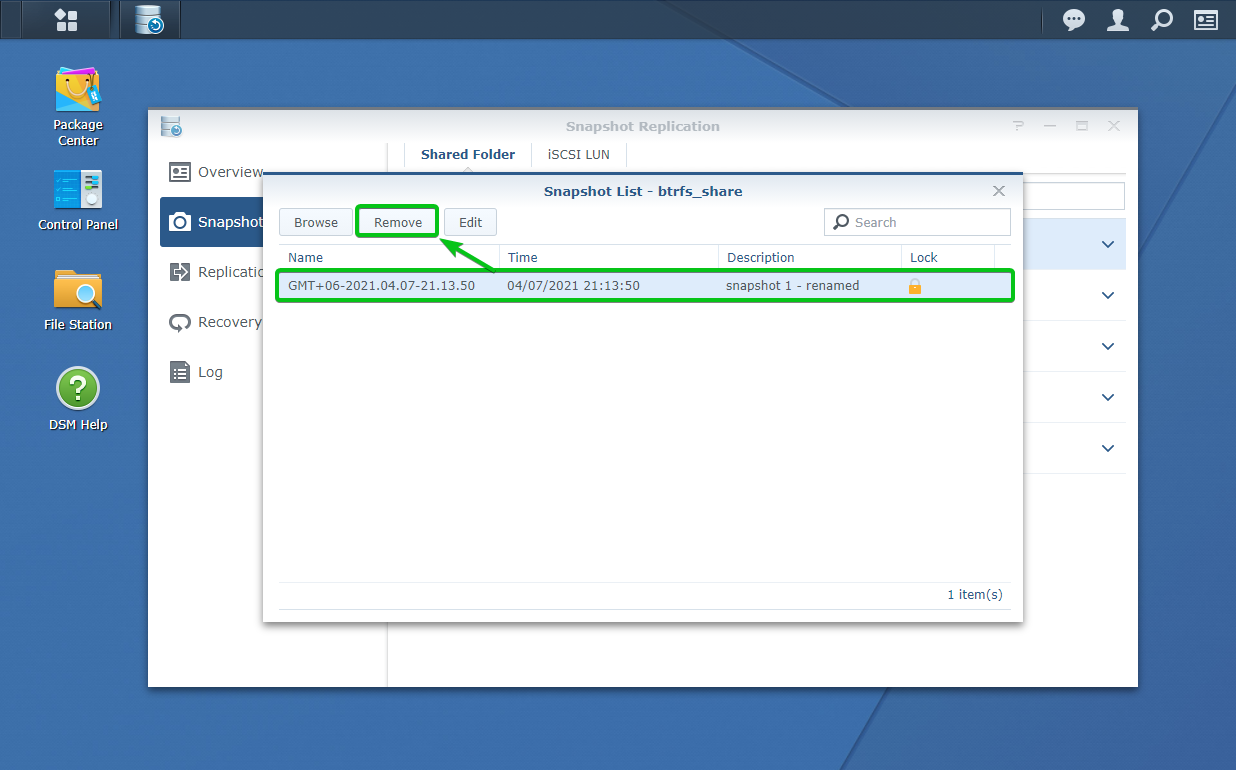
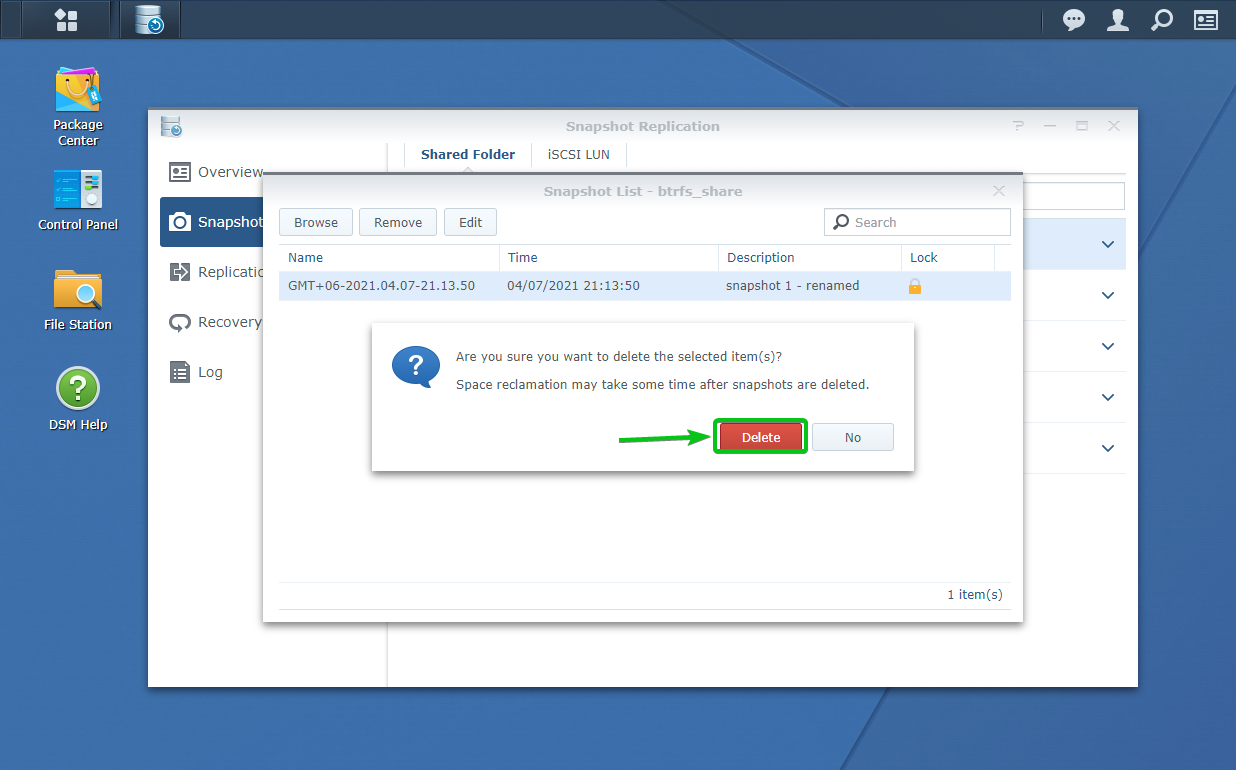
To remove a snapshot, select it and click on Remove, as marked in the screenshot below.
To confirm the removal operation, click on Delete, as marked in the screenshot below.
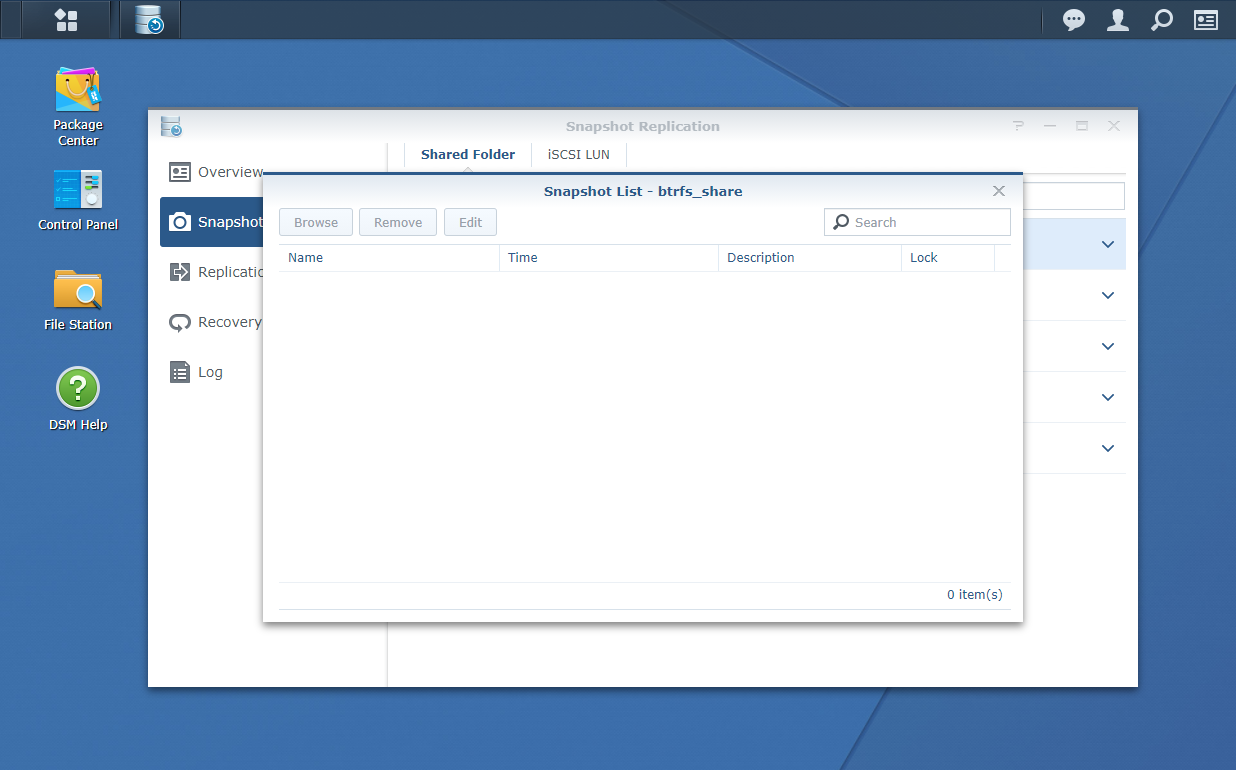
The snapshot should be removed, as you can see in the screenshot below.
Browsing Shared Folders Using Btrfs Snapshots:
You can browse an earlier state of your shared folders using their respective Btrfs snapshots. This feature of the Btrfs filesystem will let you browse older versions of the files of the shared folders using the Btrfs snapshots you’ve taken on these shared folders.
To browse shared folders using their respective Btrfs snapshots, you have to enable it.
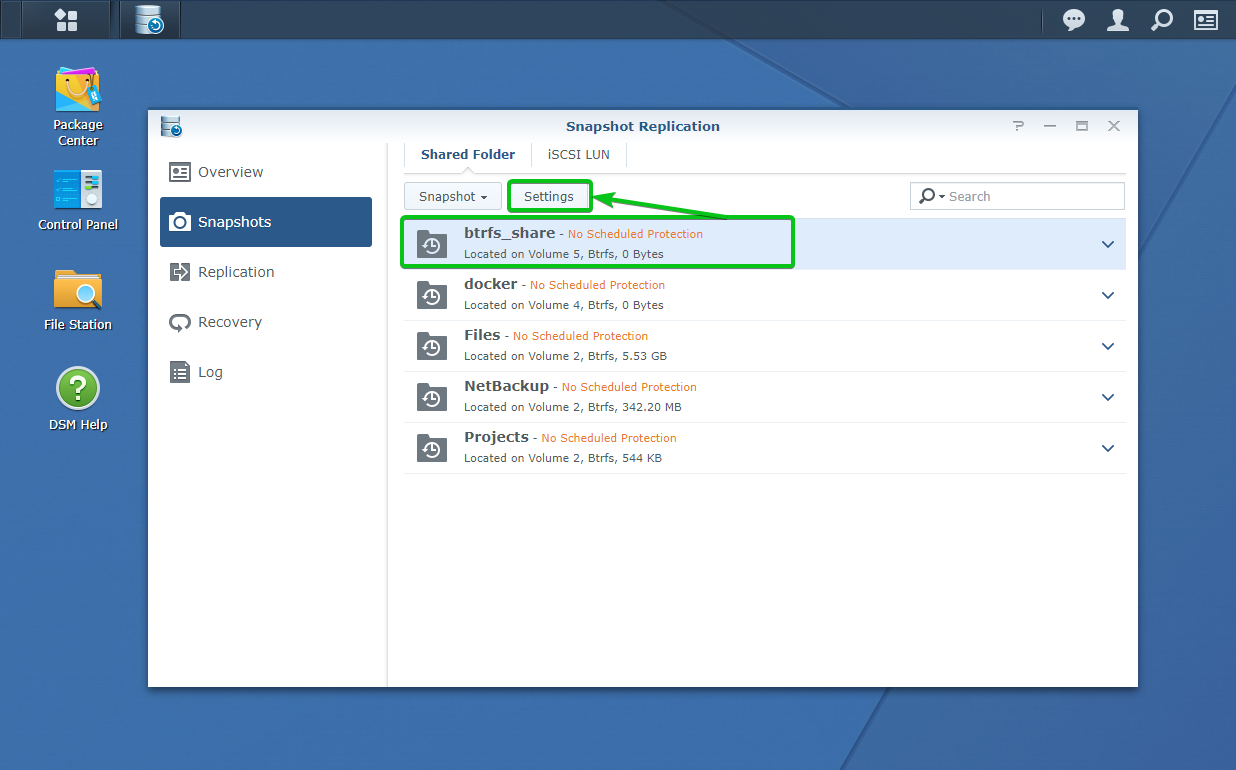
To enable this feature, select a shared folder (btrs_share let’s say) from the Snapshots section of the Snapshot Replication app and click on Settings, as marked in the screenshot below.
From the Settings window, navigate to the Advanced tab, check the Make snapshot visible checkbox, and click on OK.
The feature should be enabled for your selected shared folder (btrfs_share in my case).
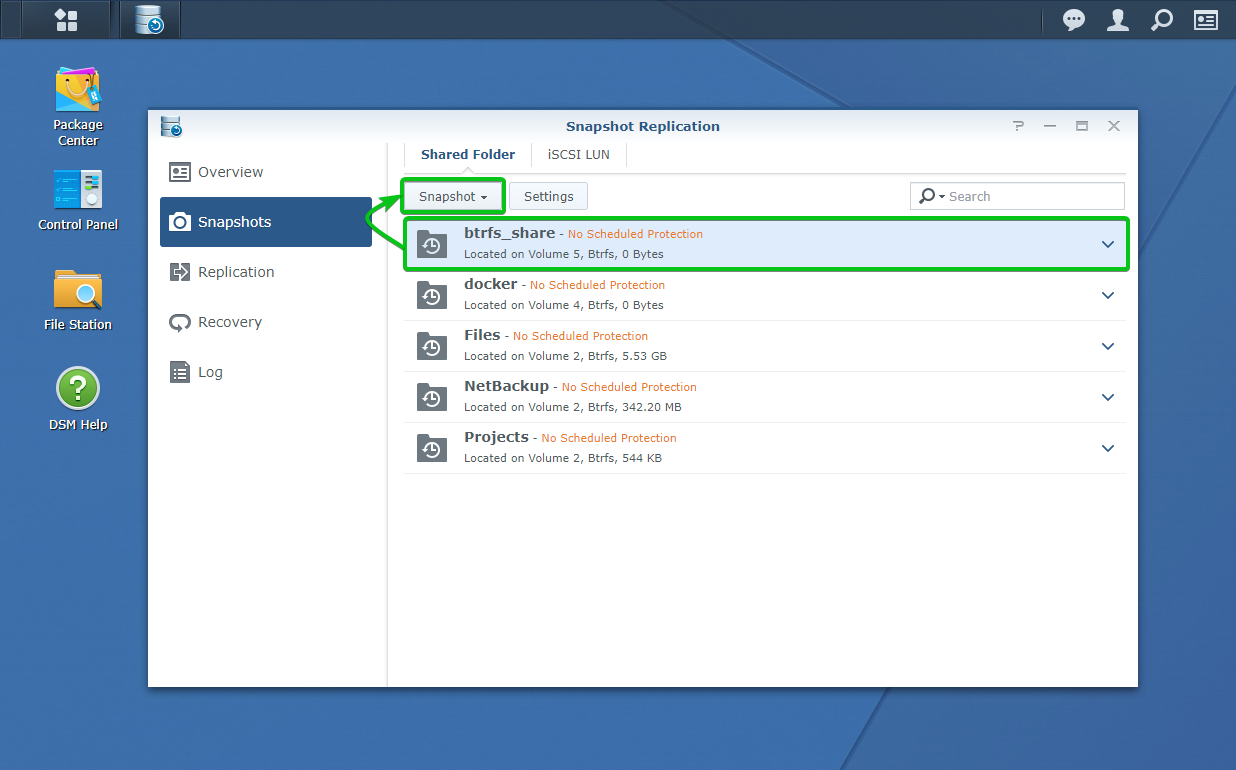
Now, select the shared folder for which you have enabled the snapshot to browse feature (btrfs_share in this case) and click on the Snapshots drop-down menu, as marked in the screenshot below.
Click on Snapshot List, as marked in the screenshot below.
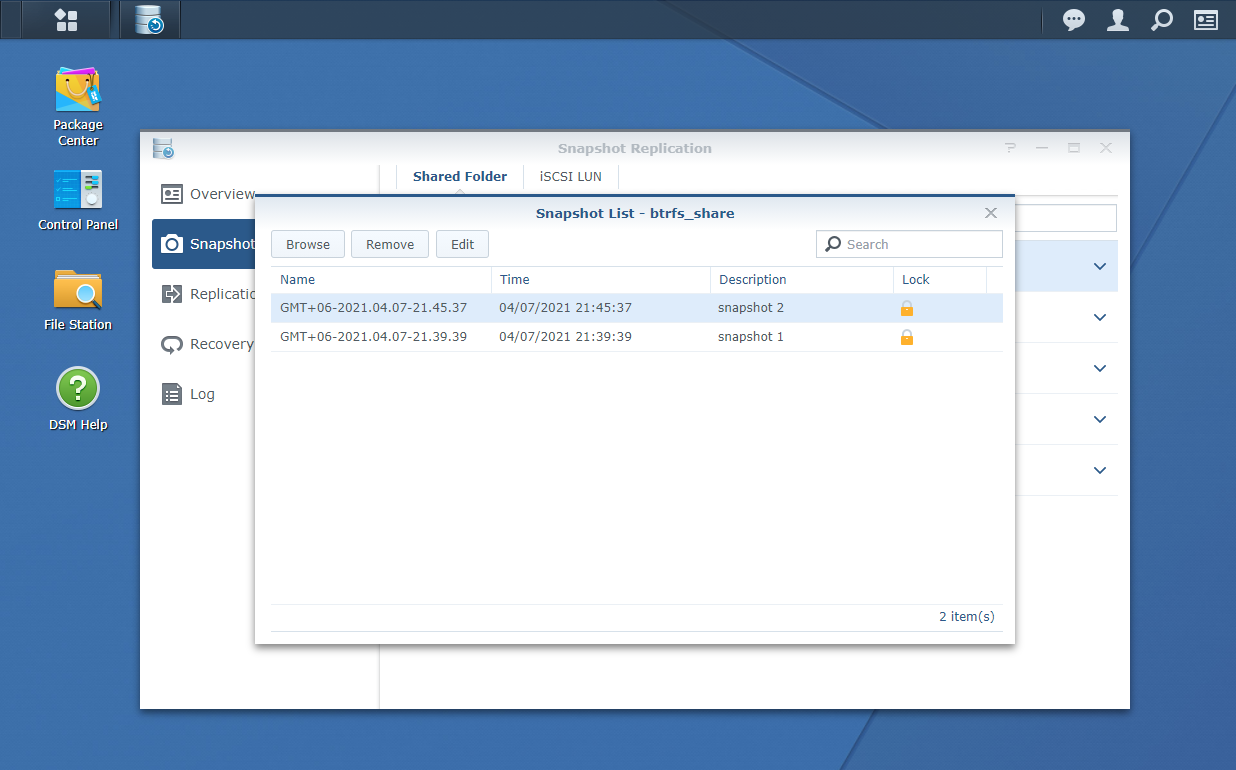
All the snapshots you have taken on the shared folder btrfs_share should be listed.
To demonstrate the snapshot browse feature, I have taken 2 snapshots: snapshot 1 and snapshot 2, as shown below. Each of the snapshots has a different version of the message.txt file.
To browse the contents of the snapshot 1 snapshot, select it from the list and click on Browse.
The File Station app should open the shared folder in the state at which you have taken the snapshot 1 snapshot.
You can see the contents of the message.txt file from the snapshot 1 snapshot.
The same process is done to browse the contents of the snapshot 2 snapshot, select it from the list and click on Browse.
The File Station app should open the shared folder in the state at which you have taken the snapshot 2 snapshot.
You can see the contents of the message.txt file from the snapshot 2 snapshot.
The contents of the message.txt file are different than it was in snapshot 1 snapshot. So, the snapshot browses feature is working fine.
Configuring Synology NAS to Take Automatic Snapshots of Shared Folders:
You can configure your Synology NAS to take snapshots of your shared folders automatically at a given interval using the Snapshot Replication app.
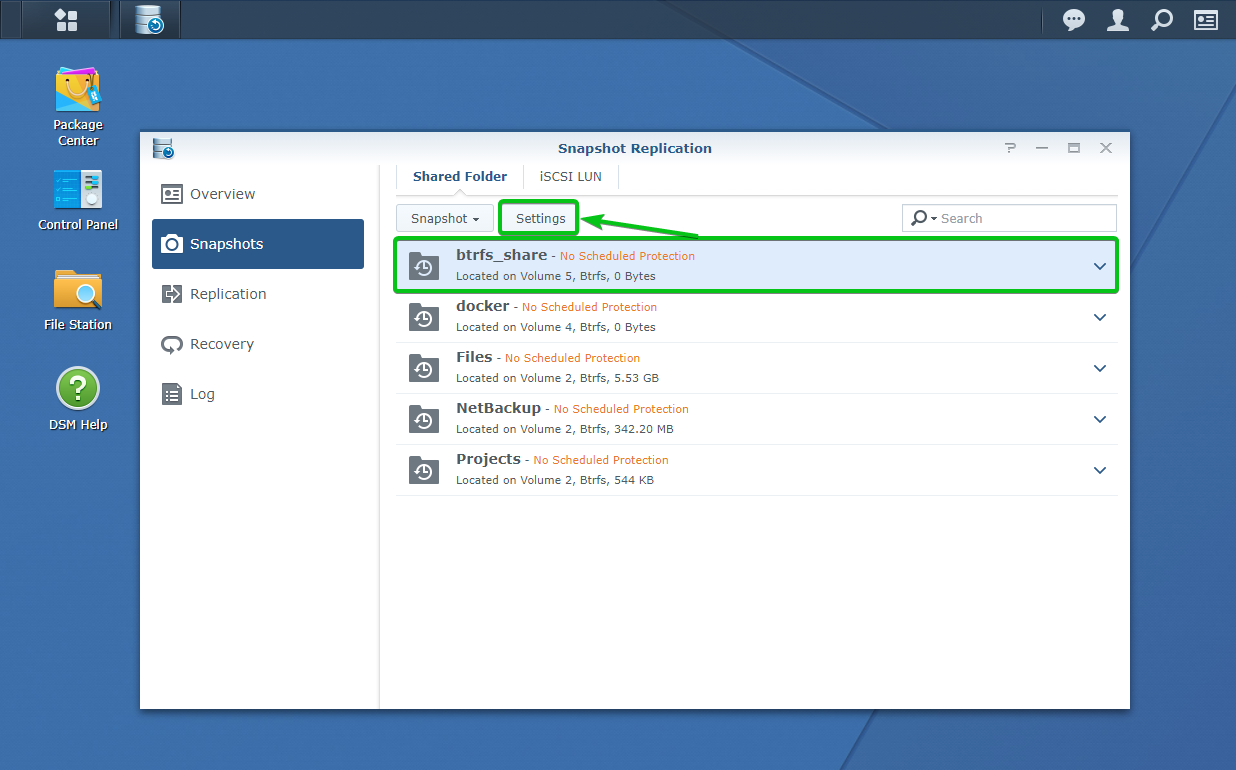
To configure your Synology NAS to take automatic snapshots of the shared folder btrfs_share (let’s say), select it from the Snapshots section of the Snapshot Replication app and click on Settings, as marked in the screenshot below.
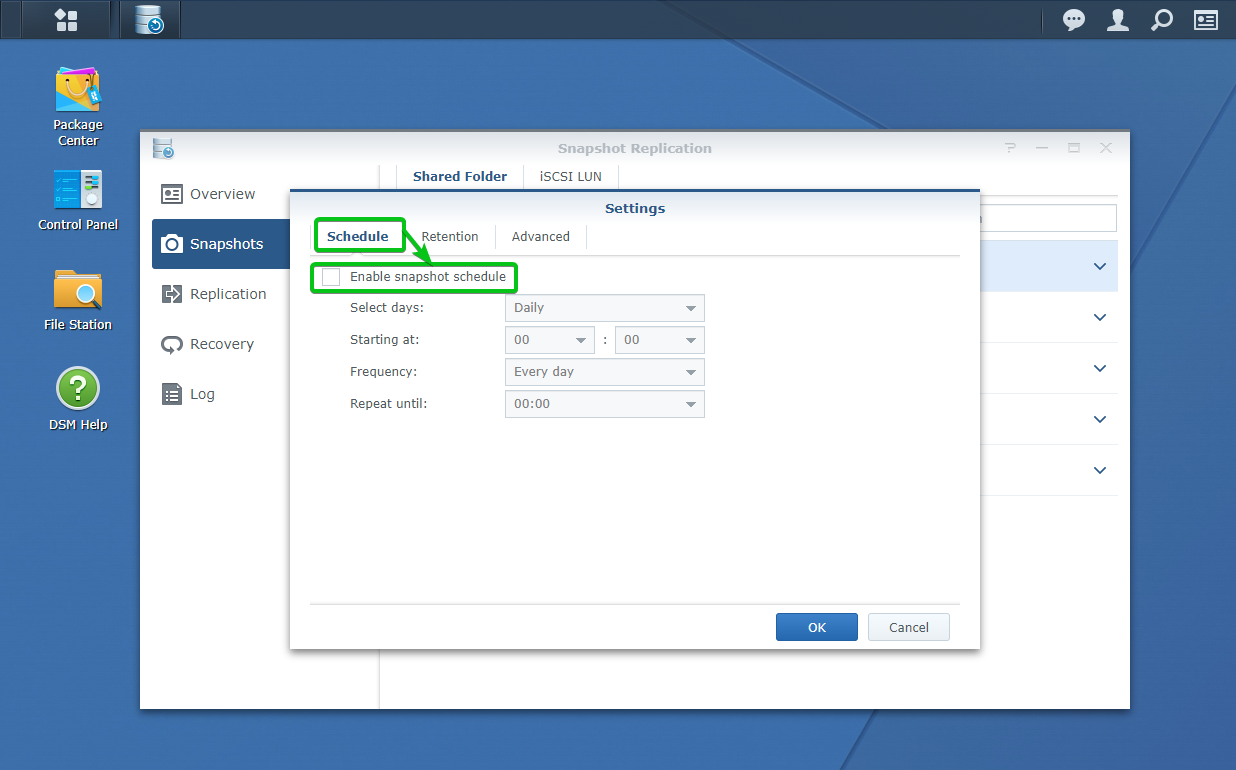
From the Schedule tab of the Settings window, check the Enable snapshot schedule checkbox, as marked in the screenshot below.
Once snapshot scheduling is enabled, you can configure the interval of the snapshot from the Schedule tab of the Settings window.
For example, you can configure whether you want to take a snapshot of the shared folder daily or on a specific day of the week. You can also configure the time of the day at which the snapshot will be taken. You can configure the frequency (whether you want to take a snapshot every day or after every desired hour or minutes interval) of the snapshot as well.
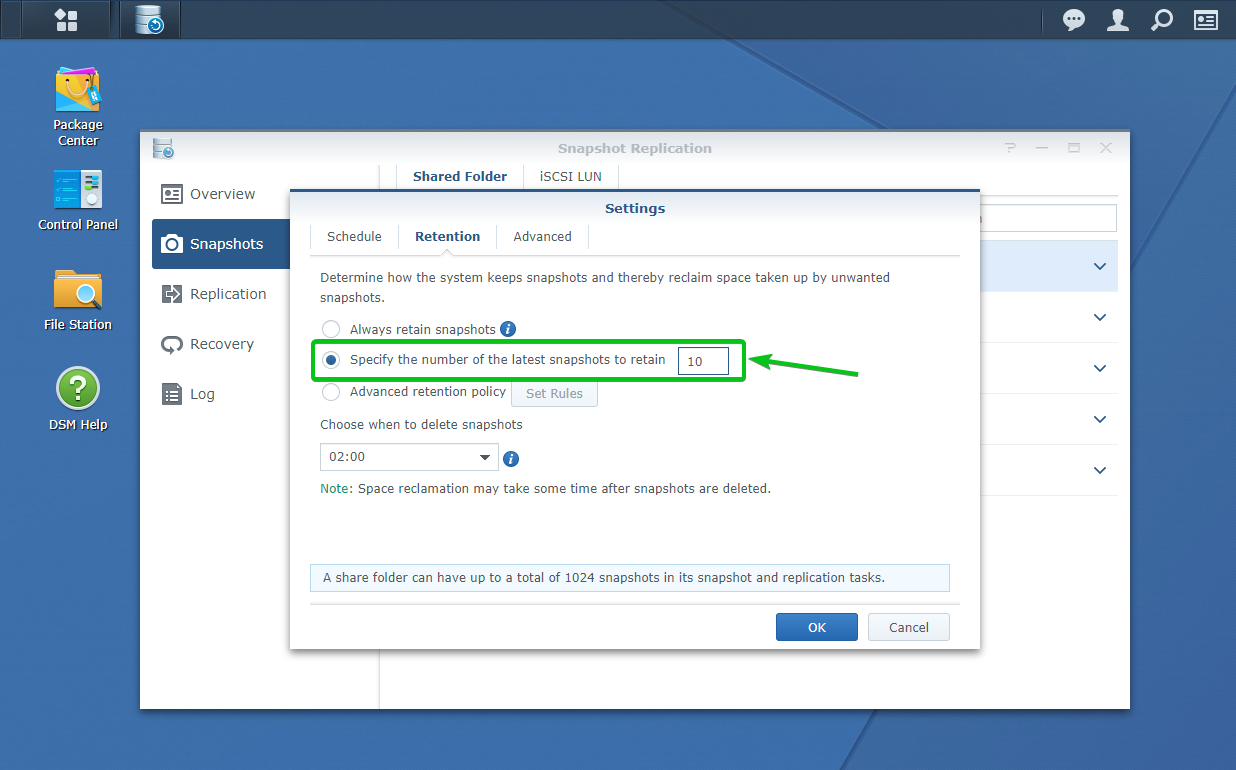
You can configure the retention policy of the snapshots (the number of snapshots you want to keep) from the Retention tab of the Settings window.
By default, all the snapshots that the Synology NAS will take are retained (kept).
To keep only a number of the latest snapshots and remove the older ones, select the Specify the number of latest snapshots to retain option and type in the number of snapshots you want to keep, as shown in the screenshot below.
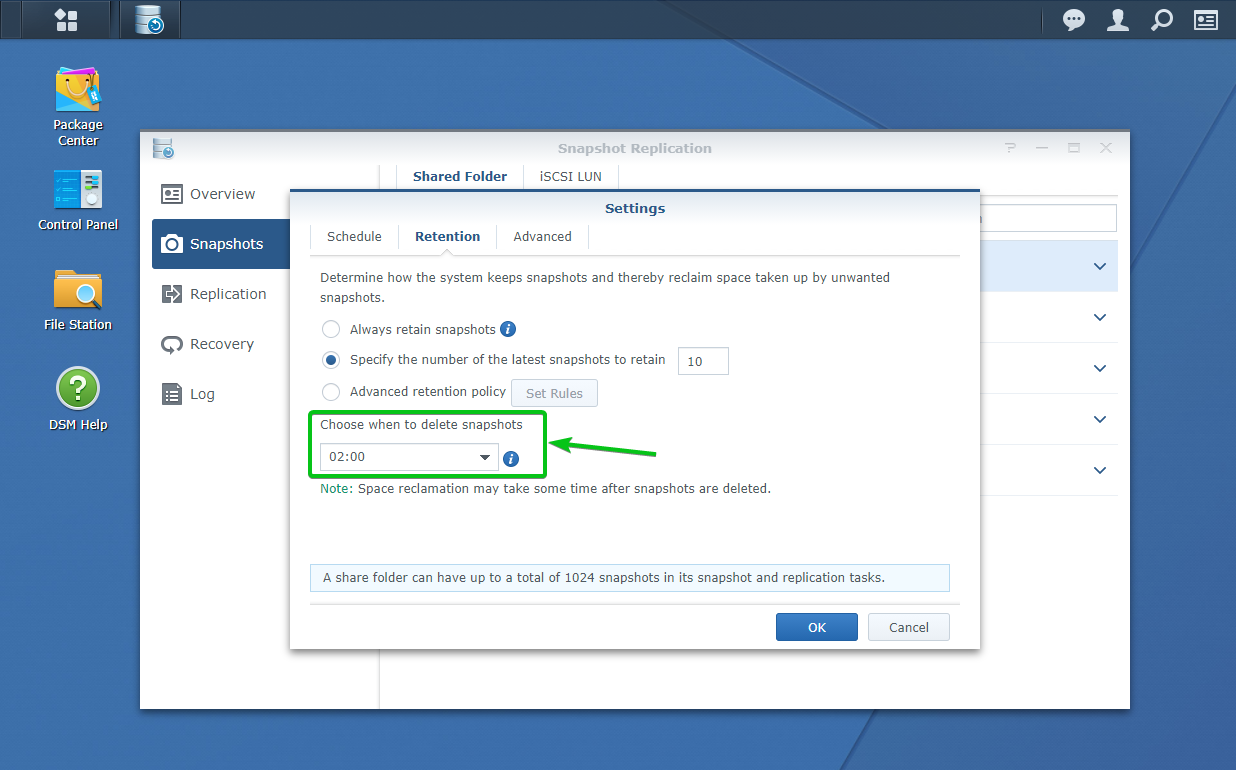
You can configure when the Synology NAS will remove older snapshots using the Choose when to delete snapshots drop-down menu.
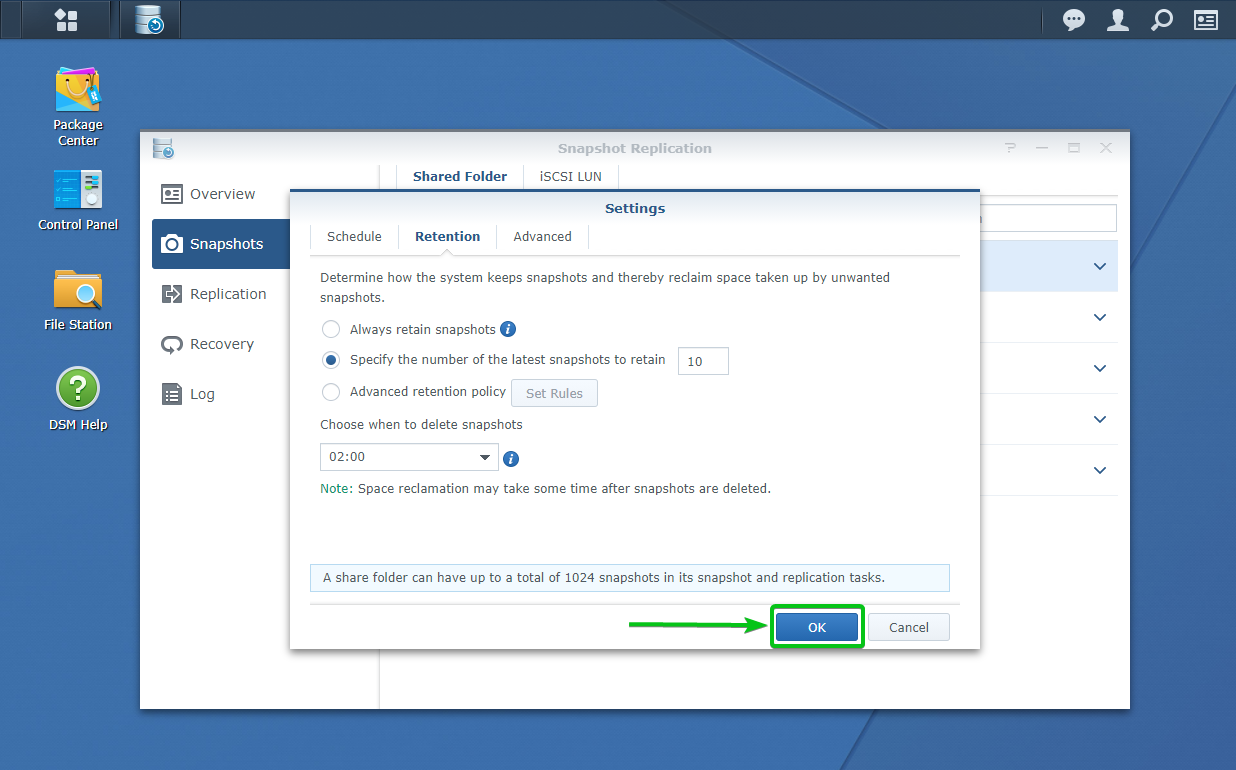
Once you’re done, click on OK.
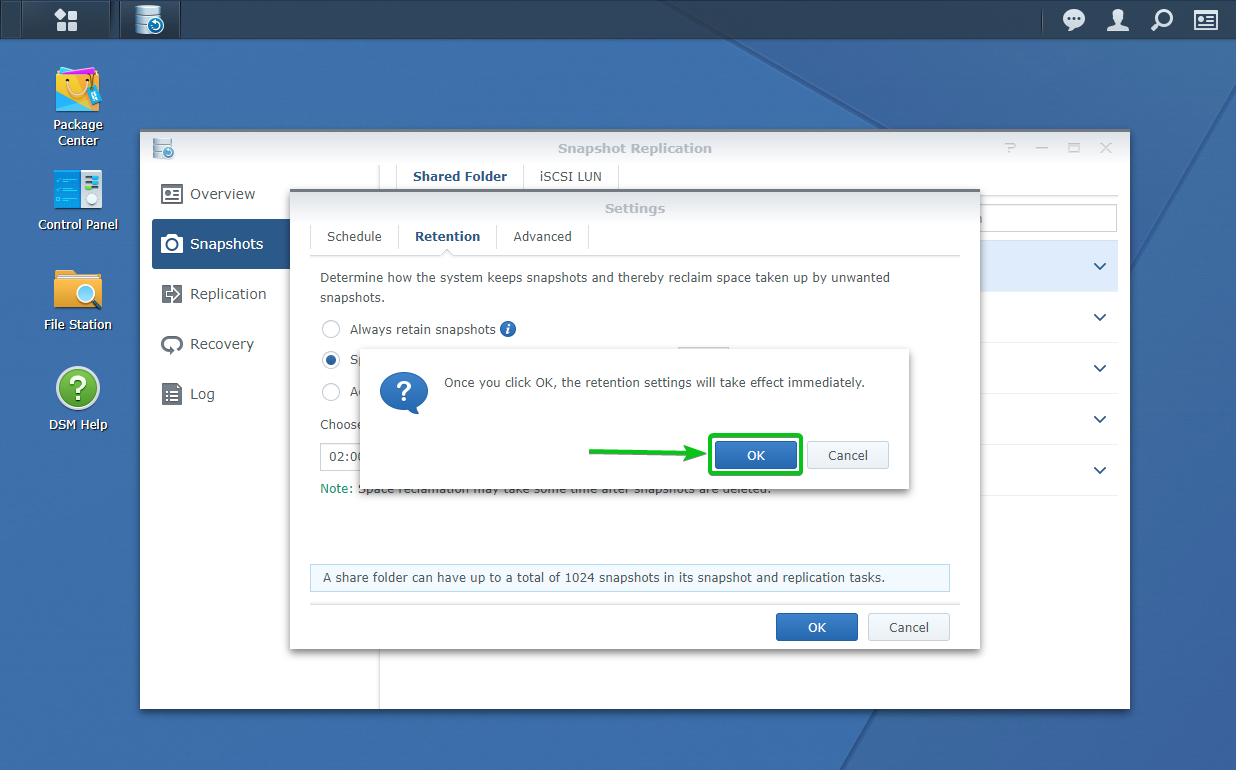
To confirm the snapshot schedule and retention policy, click on OK.
The shared folders you have configured to take automatic snapshots will show the Scheduled mark in the Snapshots section of the Snapshot Replication app, as you can see in the screenshot below. It means that the shared folder is configured to take snapshots automatically.
Conclusion:
In this article, I have shown you how to create a Btrfs volume and a shared folder on your Synology NAS. Also, I included the process of installing the Snapshot Replication app on your Synology NAS to manage Btrfs snapshots. I have also shown you how to take Btrfs snapshots of your shared folders and restore your shared folders to an earlier state from a Btrfs snapshot. Finally, I have shown you how to browse shared folders using Btrfs snapshots and configure the Synology NAS to take snapshots of your shared folders automatically.

