A container image is a file that contains an application with all its software components in binary data. Container images are independent executable software packages that make extremely specific expectations about their execution environment. Before linking to your application in a Pod, you usually generate a container image and publish it to a registry. Containerized Infrastructure relies heavily on Kubernetes (Docker) images. We currently only require Kubernetes to support Docker images. A Docker image is operating within each container in a pod.
The image parameter in the configuration file will have the same format as the Docker command while configuring a pod. The image name, which we aim to extract from the registry, is defined in the configuration file. If the pull policy among all containers in that pod is not explicitly provided when you first construct a Deployment, StatefulSet, Pod, and another object with a Pod template, it would be set to IfNotPresent by default. If an image already exists, this policy prevents the kubelet from pulling it. The result of the container’s imagePullPolicy has always been set when the object is created, and it is not modified if the image’s tag changes afterward. When OpenShift Container Platform generates containers, it checks the imagePullPolicy to see if the image should always be pulled before the container starts. Imagepullpolicy can take one of three values:
Always: It will always pull the relevant image.
IfNotPresent: If the image does not present in the node, the image will be pulled.
Never: As the name shows, it will never pull the image.
In this tutorial, we will try to update Kubernetes images and will set imagePullPolicy.
Pre-requisites
To update Kubernetes images and set its imagePullPolicy, make sure that you have any Linux distribution. In our illustration, we are using Ubuntu 20.04 LTS. Also, to run Kubernetes services, it is a compulsory requirement to have a minikube cluster installed and configured. You should have sudo right privileges as well.
Method to update Kubernetes images and setting imagePullPolicy
Initially, you have to launch the terminal window by utilizing either of these methods:
- Use shortcut key of “Ctrl+Alt+T.”
- Use the application search area of Ubuntu 20.04
By utilizing either of these two methods, you will easily launch the command line terminal. After launching, execute the following listed command to start the minikube cluster.
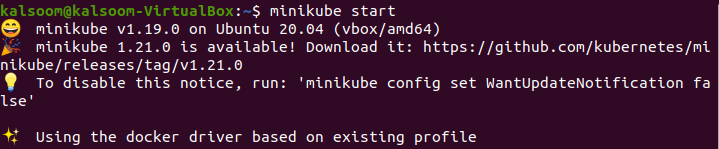
The execution of this command will take some time. During execution, you can check the version of minikube that is installed on your operating system. Also, the currently available version is shown. You can download it as well. During this whole process, don’t waste your time and generate a file in your home directory. As highlighted in the attached image, we have named it as images.yaml. But don’t ever forget to use the .yaml extension.
Open this file by double-tapping it and write the following appended code in the configuration file.
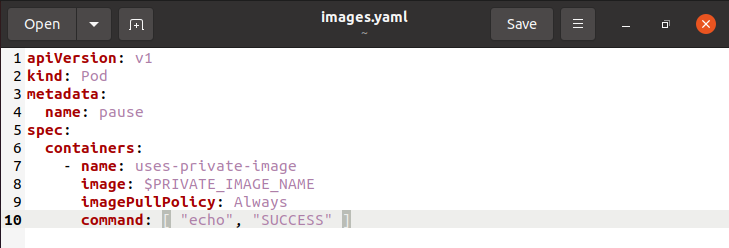
The description of this file is given below; you can alter it as well:
Name: pause This name is used to classify and authenticate the name of the container that will be constructed when the images have been pulled from the registry of Docker.
Name: user-private-image This is the name of the container we’re planning to create.
Image: $PRIVATE_IMAGE_NAME This is the image’s name that we’re seeking to find in the Docker or internal image registry. We will need to specify the full registry location and the picture name we’re seeking to pull.
imagePullPolicy: This image pull policy always specifies that the same name will be pulled every time we run this file to build the container. You can set it as per your need.
command: [“echo”, “SUCCESS”] It will display a message when we approach the container using this if everything goes well when we construct the container.
Now you have to run the below-cited command to create a container and pull an image.
![]()
From the output of this command, you can view that it has been created successfully.
Conclusion
In this tutorial, we have examined the basic concept of images in Kubernetes and different values of imagePullPolicy that can be utilized. I hope you can easily change the value of images in Kubernetes and set its image policy as per your working requirements.