Syntax
SET columnname1= value1, columnname2= value2
WHERE condition;
Description of syntax
In the query, first, we use the name of the table we want to alter. Then in the set command, the column names are written that are to be changed. These changes are followed by the condition. And these conditions are written in the where clause. The where clause is an optional clause because if you remove this clause, the changes will be applied to the whole table, including all rows and columns. Hence, to change the specified columns and rows, we use this where clause in the UPDATE statement.
Implementation of the Update command
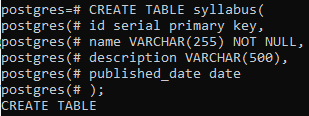
To implement the commands to update columns and more than one column, we need to have a relation in the PostgreSQL database, to which we need to alter the data. So we will create a table named syllabus that will contain all the syllabus information regarding id, name, and description of the syllabus with the date. All the data types of the columns are taken accordingly.
id serial PRIMARY KEY,
name VARCHAR(255) NOT NULL,
description VARCHAR(500),
published_date DATE );
After the table is created, we will insert data in it by using an INSERT statement.
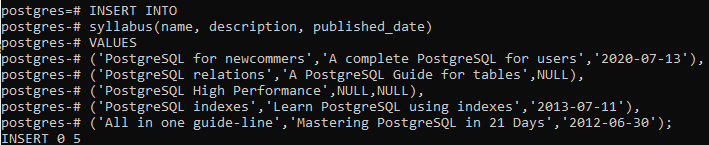
Each value is entered with the quotes. Using the commas can cause an error. We have not entered the ids of the table, as PostgreSQL generates the numeric values automatically according to the number of rows.

Every 5 rows of data contain a description of 4 syllabuses with the published date of 3 syllabuses. So we will fill these empty spaces in the columns of the relation. First, we will see a single column update. In the below command, we will add the published date to the row of id 3. So we will use an UPDATE command.

You will see that the notification is displayed to show that the query has updated one row. You can check the change in the table by using a select statement. The update statement contains two columns: one where you need to create change, and the second column is used to make references. In the above example, the id column is used to locate the specified row, whereas in all 4 rows, a particular column. i.e. Published_date is accessed, and the value is added at that place.

This query will update the table syllabus and set the date column with a new date to fill the space in the column. The ‘returning *’ is used to return the whole record of the row having that column that is updated. So in this way, a single column is updated and displays the changes we made.
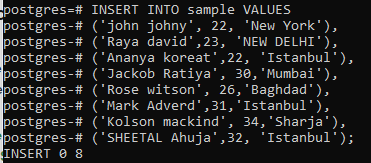
Now we will use the update command to create a change in the relationship in more than a single column. To elaborate on this concept, we will create another table named sample to contain the information of people living in different cities.
NAME VARCHAR(20),
AGE INT,
CITY VARCHAR (20));

Similarly, insert rows in the relation sample through an insert statement.
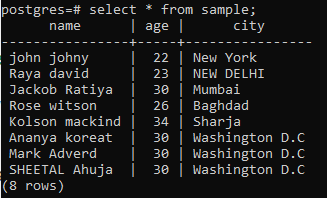
After that, view the data by using the select statement.

In the previous example, we have entered some limited data in the rows and columns to fill the space later with the help of the UPDATE command to alter the table. The columns that don’t have data were filled using the command. But now need to exchange or replace the already existing data in the sample relation. In this case, two columns alteration is involved. These two columns get altered by providing a reference to a third column. This column is mostly the id of the relation. But it is not compulsory. Anyways, moving towards the example, we have used here.

The query will work in such a way that first the column city will be accessed, and then it will be checked that the rows having the city name is Istanbul, the city is replaced with the ‘Washington D.C’. And the same row having the column age is also altered with 30.
You can see that all three rows have been changed, and all of them are written collectively at the end of the relation. Both the column’s age and city are updated.
Update columns via pgAdmin panel
When you open the admin panel, on providing the user password, the connection of the PostgreSQL database is established, and then you can alter the tables and schema or any other object. There are two ways in pgAdmin to use an UPDATE command. One is that we directly write commands as we do in the psql shell.
Here we will use the update command to apply the query on the table syllabus.

This will update a single column where the id is 3, and all the records will be returned and displayed by using the same command.
The second method is to expand the database, and then the schema, lead to the tables, navigate towards the table respectively, right-click on the sample table; a drop-down bar will be opened. A further drop-down will be seen in which all the possible query names are written, as we need to update to select the update script.
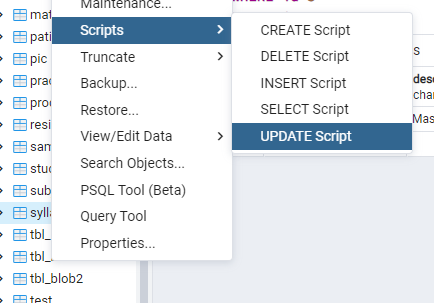
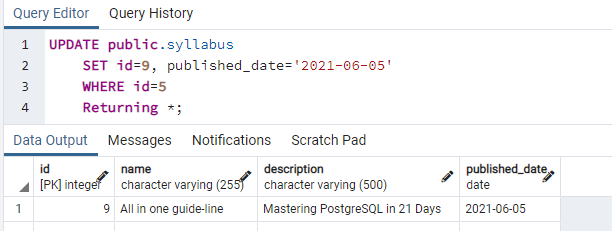
Now you will see that on selecting that option, a query editor is automatically filled with an update command. But you only need to identify the columns you want to use.

We will edit this command; the name and description are removed; only we will use the id and the date column.
Conclusion
This article refers to the use of an update command. An update query is used both via psql and through the pgAdmin panel by using the altered scripts. We have used examples for alteration in single as well as multiple columns. A single thing is kept in mind while using an update statement to specify a column where a clause must be applied.