Just like any other PC component, the power supply can develop issues or even fail completely which causes your computer to not turn on. If you suspect that your PC power supply is causing problems, you should test it by following the troubleshooting methods that are described in this article.
Why Is Your PSU Not Working?
Before we dive headfirst into the how-to of testing a PSU at home, let’s first go over some of the most common red flags that indicate a potentially malfunctioning PSU:
PC Doesn’t Start: This is the most obvious sign that something might be wrong with your PC’s power supply. You press the power button, and instead of fans whirring to life and lights illuminating, you’re met with silence and darkness.
Stability Issues: There’s no reason for a healthy PC to randomly shut down or restart. If that’s what’s happening to you, it’s possible that the power that is supplied by the PSU isn’t consistent enough. Stability issues typically occur under high load which you can emulate using various benchmarking apps.
Error Messages: Kernel panics and Blue Screens of Death (BSOD) can be caused by many different software and hardware issues; an unstable PSU is one of them.
Excessive Noise: If your PSU fan is spinning faster than a jet engine turbine and is making more noise than a toddler with a sugar rush, it’s possible that you’re dealing with overheating which can be an early sign of malfunction.
Burning Smell: The distinct smell of burning electronic components is a huge red flag that tells you one thing: shut down your computer immediately. If your computer isn’t currently running, don’t turn it on until you get down to the bottom of the problem.
Remember, these signs don’t conclusively point toward a malfunctioning PSU—they merely indicate a potential issue. Several of these symptoms can also be caused by problems with other components. Therefore, proper testing of your PSU is essential to determine if it’s the root cause of your PC woes.
How to Test Your PSU
Now that we covered the tell-tale signs of a malfunctioning PSU, it’s time to dive into PSU testing so that you can verify if the PSU is really to blame.
Step 1: Rule Out the Common Problems
First, we recommend you to rule out the common problems that could be causing trouble. This way, you won’t spend time on more complicated troubleshooting methods just to find out that the real issue was something quite silly.
Try a different electrical outlet: We tend to overlook the basics sometimes. Is your computer plugged into a surge protector or a direct wall outlet? Try switching it up. If you’re using a power strip or surge protector, remove it from the equation and plug your PC directly into the wall. Still no dice? Try a different outlet altogether.
Check your power cord: Take a good look at the power cord that is running from your outlet to your PSU. Does it look damaged? If you spot any fraying, burns, or if it’s just been chewed up by a pet, it’s time for a replacement. Even if it looks fine, try swapping it with a known good cord. Sometimes, the damage is internal and not visible from the outside.
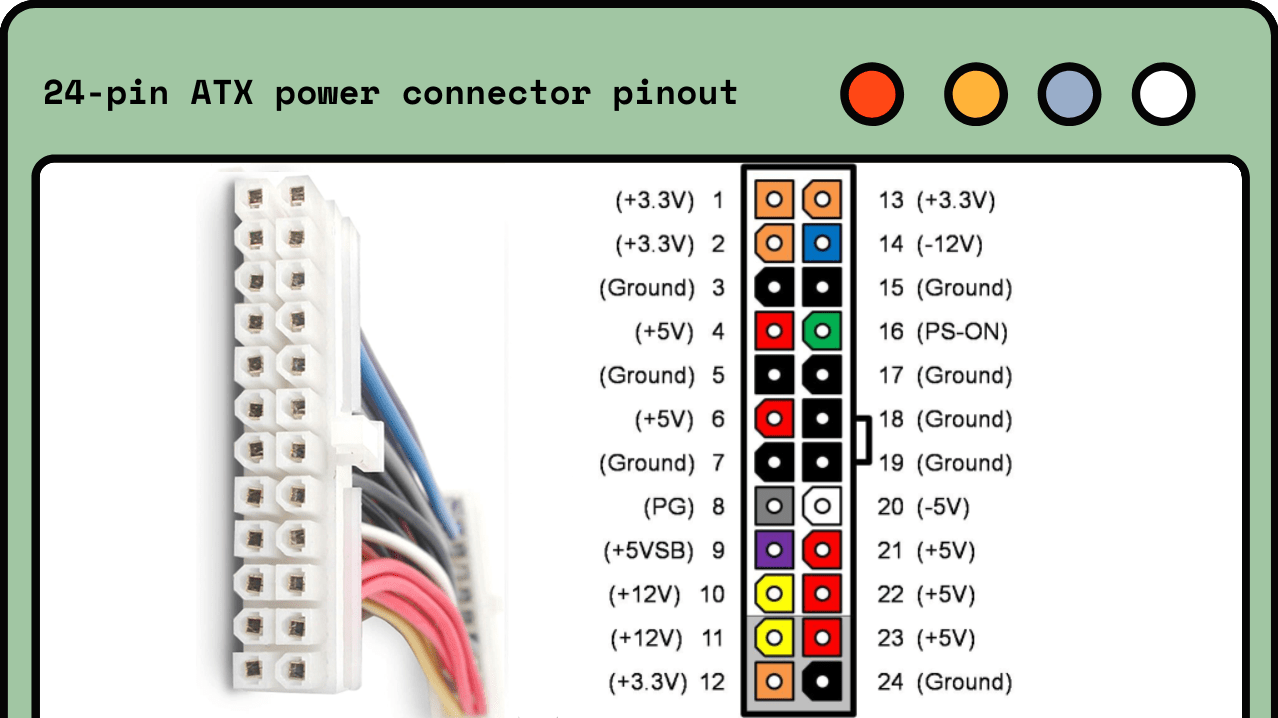
Make sure everything is connected well: Are all your components and power connectors properly seated? A loose RAM stick or GPU power cable can cause the same stability issues as a faulty power supply. Especially important is the main 24-pin ATX power connector which supplies electricity to the motherboard.
So, you checked these simple fixes, but your issues are still persisting. You need to perform a few simple PSU tests to determine if it’s working correctly.
Step 2: Perform a Basic PSU Jumper Test Using a Paperclip
An essential method to test your PSU at home is the “paperclip test”. With it, you can test if the PSU is able to turn on. While this method is straightforward, it requires careful execution.
Here’s how you do it:
- Disconnect your PSU from all PC components. This includes the motherboard, the GPU, storage devices, and everything else.
- Locate the main 24-pin ATX connector on your PSU. It should be the largest connector (see the previous picture for reference).
- Grab a paper clip and use it to connect the pin 16 with pin 17.
If the PSU fan starts to spin, your power supply is delivering some power. However, this doesn’t guarantee that it’s delivering the right amount of power. You need some tools to evaluate that.
Step 3: Test Your PSU with a PSU Tester
The easiest way to determine if your PSU can deliver the right amount of power is to use a PSU tester.
A good example of this tool is the Computer PC Power Supply Tester which comes equipped with an easy-to-read 1.8” LCD screen and multiple test connectors (20-pin ATX, 24-pin ATX, IDE(HDD), floppy 4-pin, PCI-e 6-pin/4-pin, EPS 8-pin, SATA). Plus, it’s smart enough to sound an alarm if your PSU’s test value goes beyond the normal range.
To use it, you just need to do the following:
- Unplug your PSU from all PC components.
- Connect the main 24-pin ATX connector from your PSU in to the corresponding slot on the tester.
- Connect your PSU to the power and check the voltages that are displayed on the tester’s display.
- Repeat the process for all other cables that come out of your PSU that you can connect to their matching slots on the tester.
Step 4: Use a Multimeter to Measure Individual Pins
As handy as PSU testers are, they’re not the most sensitive measuring devices in the world. If you’re really serious about getting to the bottom of your PSU’s performance, it might be time to break out the multimeter.
The Fluke-101 is an excellent beginner-friendly multimeter with a DC accuracy rating of 0.5% and a lightweight design that makes it great for home users who prefer the buy-it-for-life products over inferior alternatives.
Once you’re ready, here’s how you can use it to test your PSU with a multimeter:
- Just like the previous test, start by disconnecting your PSU from all PC components.
- Create a short circuit using a paperclip as described in Step 2.
- Take your multimeter and connect one probe (doesn’t matter which one) to any of the ground pins on the 24-pin ATX connector.
- Use the other probe to touch each of the other pins on the connector one by one.
- Check the voltages that are displayed on the multimeter’s display.
A healthy PSU should show the following voltage readers:
| Voltage Rail | Tolerance | Minimum Voltage | Maximum Voltage |
|---|---|---|---|
| +3.3V | ± 5% | +3.135 VDC | +3.465 VDC |
| +5V | ± 5% | +4.750 VDC | +5.250 VDC |
| +5VSB | ± 5% | +4.750 VDC | +5.250 VDC |
| -5V | ± 10% | -4.500 VDC | -5.500 VDC |
| +12V | ± 5% | +11.400 VDC | +12.600 VDC |
| -12V | ± 10% | -10.800 VDC | – 13.200 VDC |
Step 5: Decide If Your PSU Needs to Be Replaced
Finally, you need to decide if your PSU needs to be replaced:
Paperclip test failed: If your PSU didn’t pass the basic paperclip test (Step 2), meaning it couldn’t even start its fan, it’s safe to say that your PSU has bit the dust and you should get a new one.
Voltage readings are off: If the voltage that is provided by your PSU didn’t match up with the standard values (Step 4) by a significant margin, it’s also wide to replace the PSU.
All tests passed: Did your PSU pass every test with flying colors? It’s probably working as expected, and some other component is to blame for the issues that you’re experiencing.
Tip: When in doubt, consult with a professional. If your test results aren’t clear or you’re uncomfortable in deciding on your own, seek out a professional opinion.
Conclusion
We’ve taken a pretty deep dive into the world of PC power supplies and how you can test them at home. With the provided steps, you should now have a comprehensive understanding of how to troubleshoot and diagnose a potentially failing PSU. Don’t be disheartened if your PSU needs to be replaced; it’s just another step in the tech journey and there are many excellent PSUs to choose from.
FAQs
How many watts should my PSU have?
The wattage that your PSU should have depends on the total power requirements of your components. Generally, it’s recommended to select a power supply unit (PSU) with a wattage rating that is 1.5 to 2 times higher than your actual power requirements.
How long do PC power supplies last?
The lifespan of a PC power supply can vary greatly depending on its quality and usage. A good quality power supply from a reputable brand can easily last for 5 to 10 years or even longer, while a cheaper, lower-quality PSU might only last a few years.
Why do PSUs stop working?
PSUs can stop working due to a variety of reasons. One of the most common reasons is the gradual degradation and eventual failure of capacitors which are vital components in a PSU that store and release electricity.
Is it okay to reuse an old PSU cable?
If the cable isn’t damaged and has matching pins, you can safely reuse it with your new PSU.
Are premium PSUs worth the extra money?
In most cases, investing in a premium PSU is worth the extra money because it can last a long time and it protects other components in your computer from power surges and electrical noise.