When you start creating Jenkin pipelines using Declarative Jenkinsfile, it is effortless to make mistakes in your syntax definition.
It is, therefore, a good practice to check and verify your Jenkinsfiles before committing them to your repositories. This ensures you do not end up with many failed builds in your Jenkins server.
This tutorial will show various methods and techniques you can use to lint and verify your Jenkinsfile before running them on the server.
The Jenkinsfile
The Jenkinsfile is a powerful tool that allows you to specify the instructions for your builds in a simple and easy-to-understand syntax. There are two main methods of creating a Jenkinsfile:
-
- Using declarative syntax
- Using Groovy Scripts
This tutorial will focus on an article written in Declarative syntax, as it is much easier to understand and use.
The following shows the syntax of a simple declarative Jenkinsfile.
pipeline {
agent any
stages {
stage('Hello') {
steps {
script {
msg = "Now the string is different!!"
}
echo "${msg}"
}
}
}
}
We will not go over the file’s structure or what each block in the file above represents. Instead, you can check our Jenkins tutorial to explore the various Jenkins basics, such as the variable declaration, Jenkins stages, Jenkins stages, and more.
What is Linting, and Why is it Important?
Linting refers to the process of checking source code for potential problems or errors. In most cases, we usually perform code linting via a dedicated tool called a linter.
A code linter will take an input source code, analyze it, and ensure there are no potential errors in the file. It will also validate syntax and formatting issues defined in a given language.
Some common issues that linters can detect include syntax errors, formatting issues, and potential logical problems.
Here is where the problem lies when it comes to Jenkinsfiles. Once you edit a Jenkinsfile, you must commit the changes and push the changes to the repository.
However, Jenkins is configured to execute a build every time a change in the Jenkinsfile is detected. Hence, if you make any mistake in the file and commit without testing, Jenkins will attempt to build the project and fail due to the errors in the pipeline file.
You will often encounter such mistakes lead to slow simultaneous builds, or even a plethora of git commits to fix syntax errors.
To prevent such mistakes, it is good to use a linter to verify that everything is working out before committing.
How to Lint a Jenkinsfile
Let us now discuss how we can lint the Jenkinfile locally before committing.
Method 1 – Using the Jenkins Declarative Linter
The first method we can use to lint our Jenkinsfile before committing is using the command line.
Login into your Jenkins Dashboard – Manage Jenkins – Jenkins CLI and donwload the Jenkins CLI utility.
You will find the link to download the Jenkins CLI and how to run the command in the first section.
Once downloaded, navigate to the location of the jenkins-cli.jar file and run the command provided above.
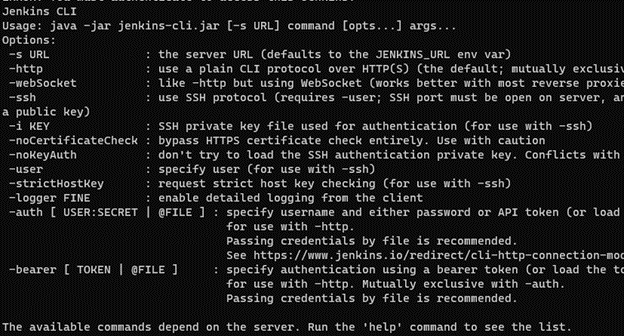
The command should list possible commands you can execute on the server as shown:
Setting up a Sample Jenkinsfile
The next step is to set up a sample Jenkinsfile that we need to lint and test for validity. For demonstration purposes, we will use a simple hello world script as provided below:
pipeline {
agent any
stages {
stage('Hello') {
steps {
script {
msg = "Now the string is different!!"
}
echo ${msg}
}
}
}
}
You can save the Jenkinsfile to any location on your filesystem.
Linting a Jenkinsfile from the Command Line
To lint a Jenkinsfile from the command line, we can use the command:
where the JENKINS_URL is the address to your Jenkins controller.
If your Jenkins server needs authentication, use the -auth option followed by the username and password as username:password.
An example syntax is shown below:
Let us demonstrate the output of the Linter when we pass the above Jenkinsfile.
Once we run the command above, the linter will analyze the Jenkinsfile and output any potential issues. Since our file has errors, the linter will tell us why and potential fixes as demonstrated below.
In this case, the linter tells us that we need to enclose the variable name on the echo block with quotation marks.
We can go ahead and fix our file.
pipeline {
agent any
stages {
stage('Hello') {
steps {
script {
msg = "Now the string is different!!"
}
echo "${msg}"
}
}
}
}
Once fixed, we can re-run our linter command:
Since we do not have any errors on our Jenkinsfile, the command will return a message as shown:
And we have successfully tested and verified our Jenkinsfile is ready for commit.
Method 2 – Adding the Jenkinsfile Linter to your Editor
The second common method of testing and verifying your Jenkinsfile is by adding the Jenkins Linter plugin to your Editor.
Jenkins provides linter for:
-
- Eclipse Editor
- VisualStudio Code
- NeoVIM
- Atom
- Sublime Text Editor
This section will demonstrate how to use the Jenkinsfile linter on Visual Studio Code.
In Visual Studio Code, press CTRL + SHIFT + K to open the extensions menu. Search for “Jenkins Pipeline Linter”.
Select the “Jenkins Pipeline Linter Connector” extension and click install.
Once installed, open your Jenkinsfile in Visual Studio Code and press CTRL + SHIFT + P to open the command palette.
Enter the command “Validate Jenkinsfile,” and press enter to execute.
This will prompt you for the Jenkins linter URL.
https://<JENKINS_SERVER_URL>/pipeline-model-converter/validate
Enter the link above as shown in the example below:
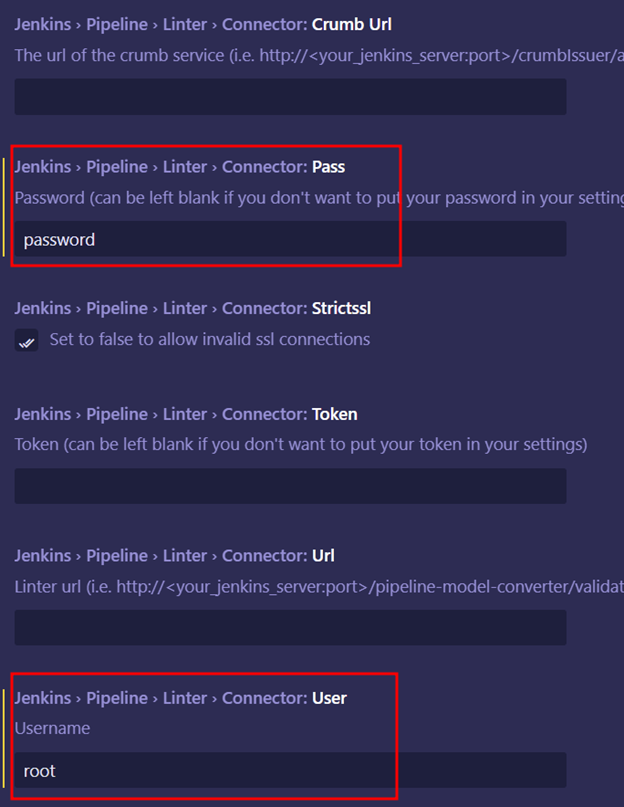
If your server requires authentication, open Visual Studio Code settings and search for “Jenkins”.
Set the Jenkins username and password.
Once you run the “Validate Jenkinsfile” command, the extension will analyze your Jenkinsfile and show potential issues.
Conclusion
You learned how to use the Jenkins CLI linter to test and verify your Jenkinsfile on your machine before committing them. You also learned how to add the Jenkins linter into Visual Studio Code to test your Jenkinsfile from your editor.


