
Jenkins has become one of the most popular automation servers which plays a significant role in CI/CD operations in the development cycle.
In Jenkins, there are various ways in which you can create a new Jenkins job. These methods include:
- Jenkins Web Interface – One way to create a job in Jenkins is to use the Jenkins web interface. This involves logging into Jenkins, clicking on the “New Item” link, and following the prompts to create a new job.
- Jenkinsfile – Another way to create a job in Jenkins is to use a Jenkinsfile. A Jenkinsfile is a text file that contains the definitions for one or more Jenkins jobs. It is typically checked into version control and can be used to automate the process of creating and configuring jobs.
- Jenkins API – You can also create jobs in Jenkins using the Jenkins API. The Jenkins API allows you to create and configure the jobs programmatically, as well as trigger the builds and retrieve the build results.
- Third-Party Tools – You can use various third-party tools and plugins to create and manage the Jenkins jobs. For example, the Jenkins Job DSL plugin allows you to create the jobs using a domain-specific language (DSL) which is written in Groovy.
- Copying an existing job – Finally, you can create a new job in Jenkins by copying an existing job. This can be useful if you want to create a new job which is similar to an existing one but with slight differences.
Despite all the methods of creating a Job in Jenkins, using Jenkensfile remains one of the most popular. This is because it provides an intuitive declarative syntax to define a collection of steps and stages. The file can also be integrated into a repository, allowing Jenkins to detect and run the build automatically.
Therefore, when working in a Jenkinsfile, you will encounter such instances where you need to use the environment variables.
What Are Environment Variables
Environment variables refer to a set of key-value pairs that can be accessed or set from a Jenkins job. Environment variables are helpful when you need to store information that is required in multiple projects or steps. This allows you to pass the values which are stored in the variables in various projects without repetition.
Jenkins exposes various environment variables as follows:
- Global variables – Jenkins provides a set of global variables available to all jobs and builds. These variables can be accessed using the env object in a Jenkinsfile or a script.
- Job-specific variables – We can also define the scoped environment variables for a given job. We can define these types of environment variables in the job configuration file. However, it is good to remember that these variables are only accessible on that job.
- Build variables – The third environment variable in Jenkins is the build variables. These variables can be set using the env block in a Jenkinsfile or by setting the environment variables in a script.
- Agent-specific variables – Finally, Jenkins allows us to define the variables which are specific to a given agent. We can define the agent variables in the agent configuration file. Similarly, these types of variables are scoped to that agent only.
View the Environment Variables in Jenkins
To view the available environment variables on your Jenkins controller, navigate to the following URL:
Example:
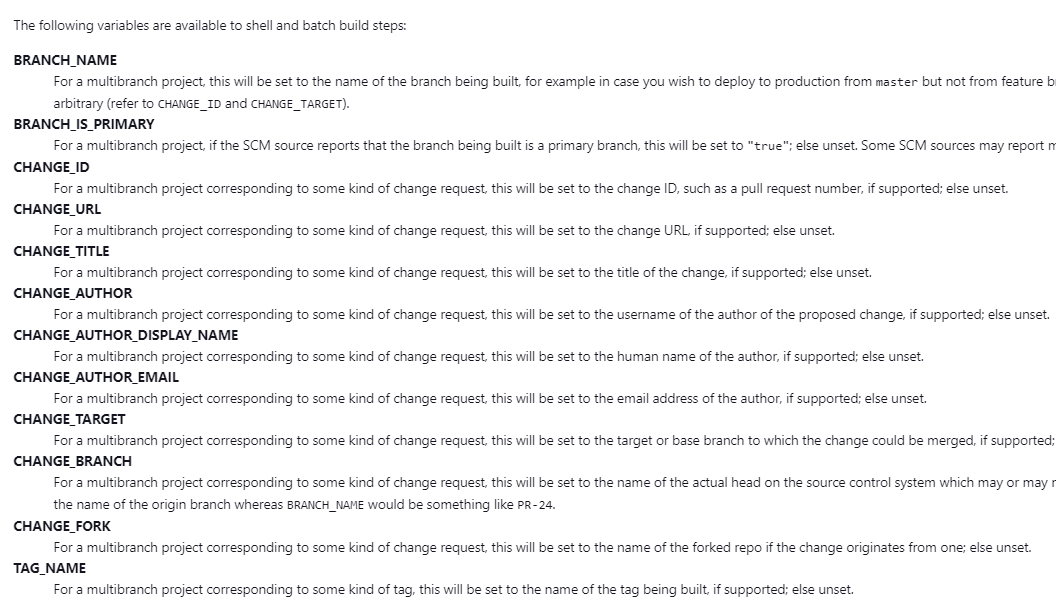
An example output is as follows:
Access the Environment Variables in Jenkins
As mentioned, Jenkins exposes the environment variables using the env object name. Therefore, we can use this object to access the values of various environment variables in Jenkins.
Take the following example pipeline:
agent any
stages {
stage('Env Vars') {
steps {
echo "Job: ${env.BUILD_ID} running on ${env.JENKINS_URL}"
}
}
}
}
The previous example uses the env object to get the build number and server address. Therefore, running the previous pipeline should return the following output:
We can also access the Jenkins environment variables using the variable short name. For example, we can get the build number as $BUILD_NUMBER:
agent any
stages {
stage('Env Vars') {
steps {
echo "Job: $BUILD_ID running on $JENKINS_URL"
}
}
}
}
Resulting output:
Declare the Job-Specific Environment Variables in Jenkins
You can define the job-specific environment variables in the Jenkisfile using an environment block.
The syntax is as follows:
[variable name] = "[value]"
}
An example output is as follows:
agent any
environment {
CC = 'gcc'
}
…
The previous example should create a local environment called CC with the value of GCC.
Conclusion
You learned about the various variables in Jenkins and how to create and access the global and local environment variables in Jenkins.