In this tutorial, we will learn how we can use the Jenkins stash steps in a pipeline to copy or move files from a Jenkins controller to another host.
When working in Jenkins, you may encounter a scenario where a job produces specific files and directories. However, since the produced files and located on the agent on which the job was run, we need to figure out a way of transferring the files to a different host.
What is Stash in Jenkins?
The stash step in Jenkins allows us to save files and directories for late use on any node or workspace connected to the controller. By default, Jenkins will discard the stashed files once the pipeline has been completed.
It is good to remember that stashed files are not available in other pipelines or jobs within a Jenkins controller. If you wish to transfer files between jobs or pipelines, use the archiveArtifacts module instead.
Another thing to keep in mind about the stash step in Jenkins is that it is best reserved for small files. This is because stashed files are available in archived, compressed tar format, which can be resource intensive for files above 100MB. For large files, consider using an External Workspace Manager Plugin.
Jenkins Stash Syntax
The following shows the syntax of the Jenkins stash step. The step accepts the following parameters:
- name: String – This is a string type that defines the name of the stash. This should be a simple identifier that references the target job, although not required.
- allowEmpty: Boolean – The allowEmpty is a Boolean option that defines if the stash should be created even if no files are available. By default, this option is set to false and Jenkins will return an error if no files are available for stashing.
- exclude: String – This optional parameter allows you to define the set of files and directories you wish to exclude from the stash. Use a comma-separated list to specify the files you want to exclude. To select a pattern, use the Ant pattern list.
- includes: String – similar to the exclude pattern but it defines the files to include in the stash.
- useDefaultExcludes: Boolean – this Boolean parameter allow you to use the default excludes from Ant. By default, the value is set to true.
Example Demonstration
We will use a Jenkins controller connected with Debian 11 and Debian 10 agents to demonstrate how we can use the stash step in Jenkins.
We will then use a Jenkinsfile as shown below:
agent none
stages {
stage('Start') {
agent { label 'debian11' }
steps {
sh '''
touch sample.sh
mkdir -p dir
touch dir/sample_nested.sh
touch dir/sample_nested2.sh
'''
stash(name: 'sampleStash')
}
}
stage('Verify files') {
agent { label 'debian10' }
steps {
unstash 'sampleStash'
sh 'tree'
}
}
}
}
The above example pipeline starts by creating sample files for demonstration purposes. We then use the stash step to create a sampleStash with all the generated files. Finally, we unstash the files on the target agent using the unstash step.
Once we run the pipeline, we should get an output as shown:
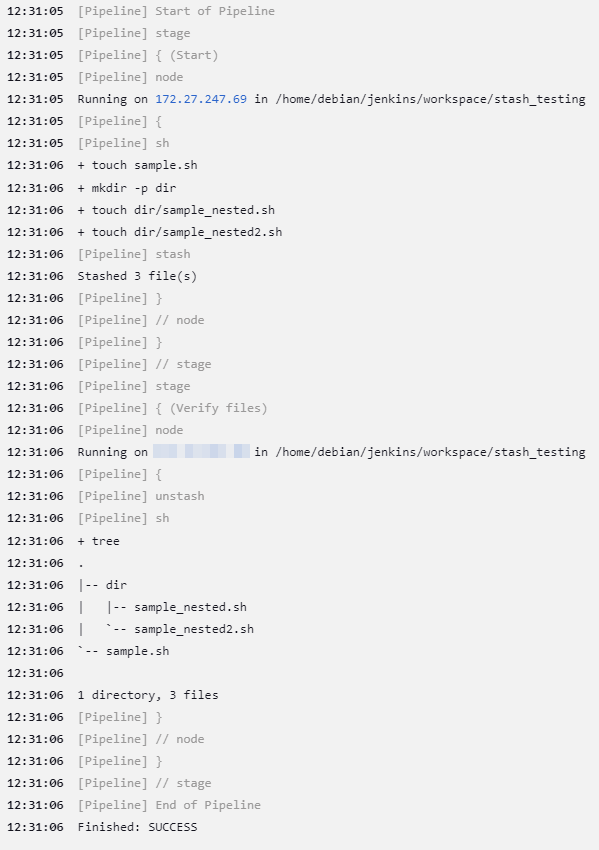
From the output above, we can see the files have been stashed and unstashed on the debian11 node and unstashed on the debian 10 node.
Conclusion
In this article, you learned the basics of working with stash and unstash steps in Jenkins.