SSL provides a secure and encrypted communication channel between the client and the server. SSL traffic is served on port 443. This guide will discuss how to set up SSL on the Lighttpd server.
We have tested the instructions in this tutorial on a Debian 11 system and a self-signed certificate.
Step 1 – Install Lighttpd Server
To install the Lighttpd server, update your system and use the APT package manager as shown in the commands below:
sudo apt-get install lighttpd -y
Once the installation is complete, start the webserver as:
sudo service lighttpd status

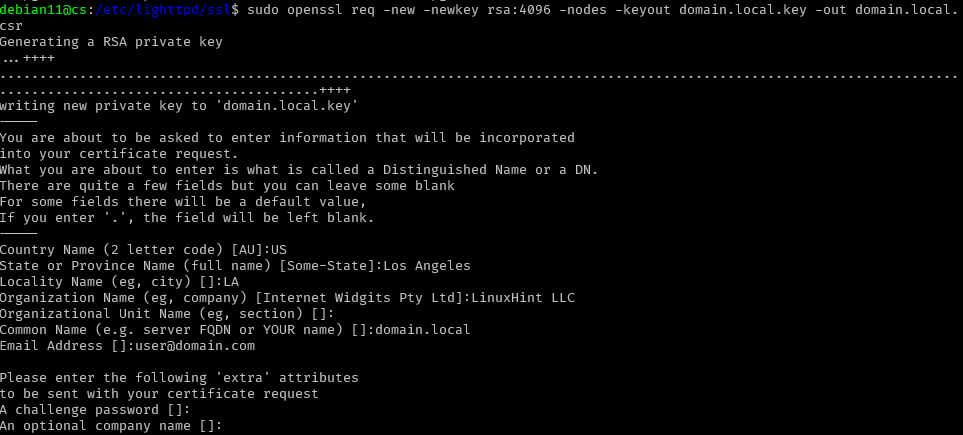
Step 2 – Create Certificate Signing Request
A certificate signing request, or CSR for short, is a signing message that is used by the Certificate Authority to generate your SSL certificate. It contains information such as the common name, organization, location, and more.
Start by creating a directory where to store the CSR and key.
Navigate into the directory created.
The next step is to create a CSR and the public key. In this tutorial, we will use the OpenSSL package.
csr
Note: Replace domain.local.key and domain.local with the target domains.
The above command should prompt you to provide information for the CSR as shown in the example:
Step 3 – Create an SSL certificate from CA
Once you have the CSR and the key generated, as shown in the examples above, creating an SSL certificate is next.
You can order a certificate from providers such as DigiCert, GoDaddy or generate a self-signed one with OpenSSL.
Enter the command as shown below to generate a self-signed certificate.
in.local.crt
The command above should generate a certificate using the information from the CSR and KEY generated in the previous step.

The next step is to create a file combining the contents of the key and certificate as shown in the command below:
Step 4 – Setup Lighttpd SSL
The next step is to configure Lighttpd for the SSL protocol. We will do this by editing the configuration file.
Enter the configuration as shown below to set up SSL support.
ssl.engine = "enable"
ssl.pemfile = "/etc/lighttpd/ssl/domain.local.pem"
server.name = "domain.local"
server.document-root = "/var/www/html/"
}
Next, verify the configuration file and restart the Lighttpd server to apply the changes.
If the command returns “Syntax OK”, proceed to restart the Lighttpd service as:
Conclusion
This article discussed setting up the SSL certificate on your Lighttpd web server using simple steps. It is good to remember that the procedure may vary slightly depending on the distribution where the server is installed.