Physical or Streaming Replication
The most commonly used replication solution is Write-Ahead Log (WAL) Shipping or streaming replication. The standby database server or replication slave is configured to make the connection with the primary/master server. The WAL records are streamed to the standby server before filling the WAL file. The data is transmitted to the standby server in an asynchronous mode by default. That means the data is transmitted to the standby server after committing the transaction in the primary server. This may cause data loss because if the master server crashes without committing any transaction, then that transaction will not be replicated to the standby server.
The Architecture of Physical Replication
A background process that is called WAL sender starts on the master machine after setting up the configurations of physical replication. It accepts a request from the standby and streams the WAL records to the standby continuously. Another background process that is called the WAL receiver starts on the slave machine that receives and applies the changes of the main database to the database of the slave machine. The physical replication can be defined by the following diagram.
Physical Replication Features
The entire data of a single cluster is copied by the physical replication process, where the cluster is the set of databases managed by the PostgreSQL database. The source machine is called the primary server, and the destination machine is called the standby server. Some important features of physical replication have been mentioned below.
WAL Files
The ordered series of WAL records are generated by the PostgreSQL server. These records will be transported to another machine by using physical replication, and the modification will be done in the local database. The WAL records are divided into equally sized files that are called WAL segments. These files are created on the pg_wal directory, and old WAL files are removed when they are not needed anymore.
Hot, Cold, and warm standby
The hot standby server is used to store the up-to-date data and allow the clients to execute the read-only transaction. The cold standby server is not up and running normally, and it starts when a failure occurs. The warm standby server works similar to the hot standby server, except that it can’t make the connection with the client.
Recovery Mode
Warm and hot standby servers run in recovery mode, and Postgres will import and apply WAL files generated by a primary server in the recovery mode.
Advantages of Physical or Streaming Replication
- It can be used to keep the backup of the database and helps to retrieve the data when the primary server crashes.
- It is better to use read-only operations.
- It guarantees that a copy of the last operation of the primary server will be saved.
- One or more standby servers can be connected with the primary server, and the log information streams from the primary server to all connected standby servers. If one of the standby servers is disconnected or delayed for any reason, then the streaming will be continued for another standby server.
- If the primary server is disconnected or shut down for any reason, then it will wait to send the updated data to the standby server before powering off.
Disadvantages of Physical or Streaming Replication
- It replicates data asynchronously by default. That means WAL files that are not copied to the standby server may be removed when any changes are done in the primary server. It is better to set a higher value into the wal_keep_segments to prevent data loss.
- It does not support replication between different PostgreSQL servers.
- The data is not more secure in this replication because the sensitive data can be extracted without user authentication.
- It does not truncate the command.
- It does not support foreign tables, view, and partition root tables.
- It does not support large object replication.
- It does not support database schema and DDL commands.
Physical Replication Setup
The steps of implementing logical replication in the PostgreSQL database have been shown in this part of this tutorial.
Pre-requisites
Setup the master and replica nodes
You can set the master and the replica nodes in two ways. One way is to use two separate computers where Ubuntu operating system is installed, and another way is to use two virtual machines that are installed on the same computer. The testing process of the physical replication process will be easier if you use two separate computers for the master node and replica node because a specific IP address can be assigned easily for each computer. But if you use two virtual machines on the same computer, then the static IP address will require to be set for each virtual machine and make sure both virtual machines can communicate with each other through the static IP address. I have used two virtual machines to test the physical replication process in this tutorial. The hostname of the master node has been set to fahmida-master, and the hostname of the replica node has been set to fahmida-slave here.
Install PostgreSQL on both master and replica nodes
You have to install the latest version of the PostgreSQL database server on two machines before starting the steps of this tutorial. PostgreSQL version 14 has been used in this tutorial. Run the following commands to check the installed version of the PostgreSQL in the master node.
Run the following command to become a root user.
Run the following commands to log in as Postgres users with superuser privileges and make a connection with the PostgreSQL database.
$ psql
The output shows that PostgreSQL version 14.4 has been installed on Ubuntu version 22.04.1.
You have to install the same PostgreSQL version in the replica node because the logical replication can’t be set up between different versions of the PostgreSQL server.
Primary Node Configuration
The necessary configurations for the primary node have been shown in this part of the tutorial. The following tasks will be completed in the primary node.
- Modify the postgresql.conf file to set up the IP address and WAL level.
- Create a role user with that password to make a connection with the primary node from the replica node.
- Modify pg_hba.conf file to add network connection information
Modify the postgresql.conf file
You have to set up the IP address of the primary node in the PostgreSQL configuration file named postgresql.conf that is located on the location, /etc/postgresql/14/main/postgresql.conf. Log in as the root user in the primary node and run the following command to edit the file.
Find out the listen_addresses variable in the file, remove the hash (#) from the beginning of the variable to uncomment the line. You can set an asterisk (*) or the IP address of the primary node for this variable. If you set asterisk (*), then the primary server will listen to all IP addresses. It will listen to the specific IP address if the IP address of the primary server is set to this variable. In this tutorial, the IP address of the primary server that has been set to this variable is 192.168.10.5.
Next, find out the wal_level variable to set the replication type. Here, the value of the variable will be a replica.
Run the following command to restart the PostgreSQL server after modifying the postgresql.conf file.
***Note: After setting up the configuration, if you face a problem starting the PostgreSQL server, then run the following commands for the PostgreSQL version 14.
$ sudo -i -u postgres
# /usr/lib/postgresql/14/bin/pg_ctl restart -D /var/lib/postgresql/14/main
You will be able to connect with the PostgreSQL server after executing the above command successfully.
Create role/user for replication
A role/user with specific permission is required for the replication. Run the following SQL command to create a role with the user for the replication.
The following output will appear if the role is created successfully.
Modify the pg_hba.conf file
You have to set up the IP address of the secondary node in the PostgreSQL configuration file named pg_hba.conf that is located on the location, /etc/postgresql/14/main/pg_hba.conf. Log in as the root user in the primary node and run the following command to edit the file.
Add the following information at the end of this file.
The IP of the slave server is set to “192.168.10.10” here. According to the previous steps, the following line has been added to the file.
Restart the PostgreSQL server
Run the following command to restart the PostgreSQL server as a root user.
Replica Node Configuration
The necessary tasks will be done for the replica node where the copy of the main database will be stored. The existing database content of the replica node will be removed to keep back up the database of the primary node and make the PostgreSQL server of the replica node read-only.
Stop the PostgreSQL server on the replica node
Run the following command after logging in as a root user to stop the PostgreSQL server.
Remove the existing content of the replica node
Run the following command to remove existing database content from the PostgreSQL server of the replica node. It is necessary for replication purposes. The replica node will be worked in a read-only mode after executing the following command
Testing the Physical Replication Process
You have to create a database with one or more tables in the primary node to test whether the physical replication is working properly or not. Here, the existing database named postgres of the primary server has been used for testing purposes. If you want, you can create the table by creating a new database. The following tasks will be done in this part of the tutorial.
- Add a new table in the selected database of the primary node.
- Add a record to the table.
- Store the copy of the database of the primary node to the replica node.
- Create a table in the primary server
Login to the PostgreSQL database of the primary node and run the following SQL statement to create an employees table in the existing database postgres. If you want, you can create a new database and create the table by selecting the new database. I didn’t create any new database here. So, the table will be created on the default database. The employees’ table will contain 5 fields. These are id, name, address, email, and phone.
id serial PRIMARY KEY,
name VARCHAR(15) NOT NULL,
address TEXT NOT NULL,
email VARCHAR(30),
phone CHAR(14) NOT NULL );
Run the following SQL statement to insert a record into the table.
VALUES ('Farheen Hasan', '12/A, Dhanmondi, Dhaka.', '[email protected]', '+8801826783423');
Run the following SQL statement to read the content of the employees' table.
# Select * from employees;
If the table is created and a record is inserted in the table successfully, then the following output will appear after executing the select query. One record was inserted into the table that is shown in the output.
Copy the database to a replica server
Login to the PostgreSQL database of the replica server and run the following SQL statement to create a copy of the postgres database of the primary server into the replica server. After executing the statement, it will ask for the password of the user that was created in the previous step. If the authentication is done successfully, then the replication will be started.
The following output shows that the replication is done successfully, and 34962 KB has been copied.
Run the following command after completing the replication as the root user to restart the PostgreSQL server in the replica node.
Now, login to the PostgreSQL server on the replica node and run the following SQL statement to check whether the employees’ table has been copied to the replica node or not.
The following output shows the content of the employees’ table of the replica node is the same as the content of the employees’ table of the primary node.
You can add one or more records or update records or delete records in the employees’ table of the primary node or add one or more tables in the selected database of the primary node and check the database of the replica node to verify that the updated content of the primary database is replicated properly in the database of the replica node or not.
Insert new records in the primary node:
Now, run the following INSERT command to add three more records in the employees’ table of the postgres database that is located in the primary node.
VALUES ('Abir Hossain', '10, Jigatola, Dhaka.', '[email protected]', '+8801888564345'),
('Nila Chowdhury', '67/B, Mirpur, Dhaka.', '[email protected]', '+8801799453123'),
('Mizanur Rahman', '8/C, Malibag, Dhaka.', '[email protected]', '+8801957864564');
Run the following command to check the current content of the employees' table in the primary node.
# Select * from employees;
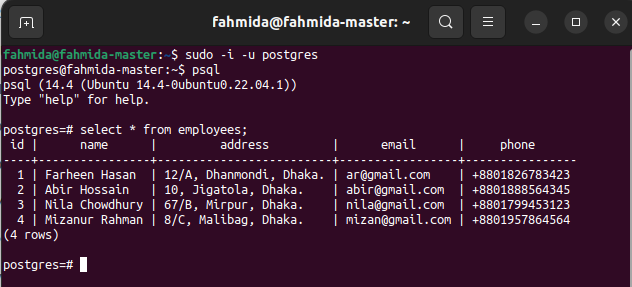
The following output shows that three new records have been inserted properly into the table.
Check the replica node after insertion:
Now, you have to check whether the employees table of the replica node has been updated or not. Login to the PostgreSQL server of the replica node and run the following command to check the content of the employees’ table.
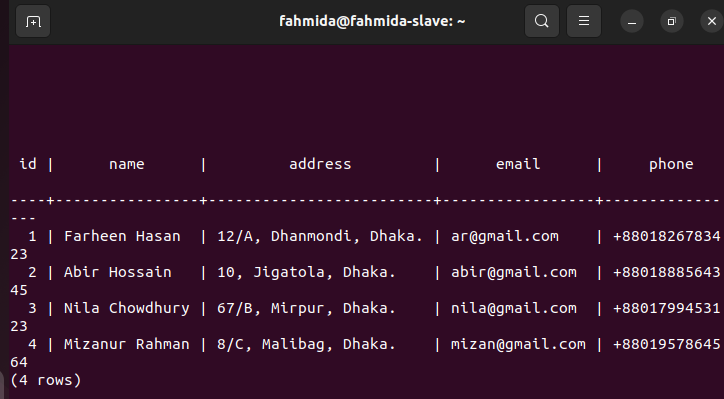
The following output shows that three new records have been inserted in the employees’ table of the replica node that was inserted in the primary node of the employees’ table. So, the changes in the main database have been replicated properly in the replica node.
Update record in the primary node:
Run the following UPDATE command that will update the value of the phone field where the value of the name field is “Nila Chowdhury”. There is only one record in the employees’ table that matches the condition of the UPDATE query.
Run the following command to check the current content of the employees’ table in the primary node.
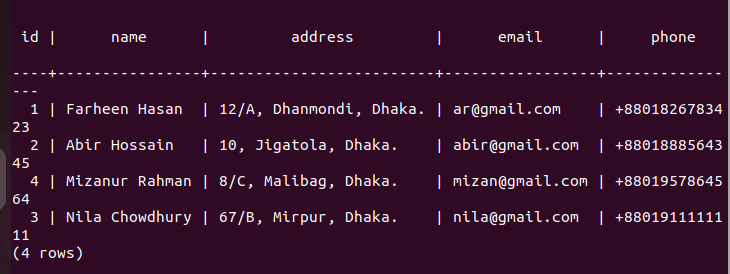
The following output shows that the phone field value of the particular record has been updated after executing the UPDATE query.
Check the replica node after the update:
Now, you have to check whether the employees table of the replica node has been updated or not. Login to the PostgreSQL server of the replica node and run the following command to check the content of the employees’ table.
The following output shows that one record has been updated in the employees’ table of the replica node, which was updated in the primary node of the employees’ table. So, the changes in the main database have been replicated properly in the replica node.
Delete record in the primary node:
Run the following DELETE command that will delete a record from the employees’ table of the primary node where the value of the email field is “[email protected]”. There is only one record in the employees’ table that matches the condition of the DELETE query.
Run the following command to check the current content of the employees’ table in the primary node.
The following output shows that one record has been deleted after executing the DELETE query.
Check the replica node after deleting the record:
Now, you have to check whether the employees table of the replica node has been deleted or not. Login to the PostgreSQL server of the replica node and run the following command to check the content of the employees’ table.
The following output shows that one record has been deleted in the employees’ table of the replica node, which was deleted in the primary node of the employees’ table. So, the changes in the main database have been replicated properly in the replica node.
Conclusion
The purpose of physical replication for keeping the backup of the database, the architecture of the physical replication, the advantages and disadvantages of the physical replication, and the steps of implementing physical replication in the PostgreSQL database have been explained in this tutorial with examples. I hope the concept of physical replication will be cleared for the users, and the users will be able to use this feature in their PostgreSQL database after reading this tutorial.


