Today’s post teaches how to set up connection pooling in PostgreSQL using the Pgtool. We will detail the general guidelines to comfortably set up and use connection pooling in PostgreSQL with Pgpool.
How to Setup Connection Pooling in PostgreSQL with Pgpool
Pgpool is a middleware that acts as a database proxy, connecting Postgres clients to the servers. While Pgpool offers numerous benefits, our focus is on connection pooling, which is essential in reducing overhead connection costs by managing pools efficiently.
To set up connection pooling in PostgreSQL, we need to install it on our system and proceed with the setup steps. Take a look!
1. Installing Pgpool
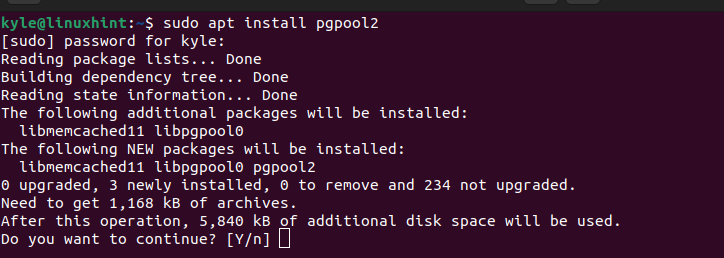
How you install Pgpool depends on the distro you are using. Here, we are working with Ubuntu, and we will use the “apt” option to install it.
Run the below command.
Accept the installation by pressing ‘y’ on your keyboard when prompted.
After we’ve installed Pgpool, the next step is to edit its configuration file according to your connection pooling requirements and environment.
2. Configuring Pgpool for Connection Pooling
Our focus is on the pgpool.conf file. When you open the config file, there are different elements to edit depending on your requirements.
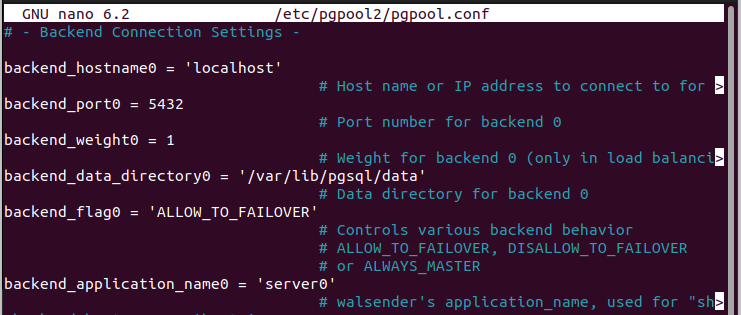
Let’s use the nano file editor to access the config file.
First, scroll down to the “pgpool connection settings” section. Here, we must define the IP addresses that pgpool should consider for connections. Any IP defined as the listen_addresses will be listened to, and its connection allowed.
Again, you must specify the port to establish the connection.
For instance, if we want to listen for all IP addresses and accept their connections via port 5432, we would edit our configuration file to read as shown below.
Secondly, scroll down to the “backend connection settings” section. You must specify the hostname, your server and the backend port to use for connection. You can also specify what weight to set for the defined backend.
For instance, let’s assume we have our backend_hostname0 as linuxhint.com and want all connections made via 5432 with our weight as 1. We would edit the file as follows.
Thirdly, navigate to “concurrent session and pool size.” Here, we must specify the number of initial child processes as the num_init_children and the max_pool, the maximum number of connections your pool should have.
We can use the default settings or change the values to align with your requirements.
Keep scrolling down to get the load-balancing mode. By default, it is turned off. However, it’s best to change that and set it to on to enable load balancing.
For the master/slave mode, it is set to off by default. Change that and activate it by setting it to on.
3. Configure Authentication
After modifying the Pgpool configuration file, the next step is to define client access. To do that, you must configure the pool_hba.conf file to specify how you clients will be allowed to access. You must define the authentication type, the IP addresses and other parameters.
Open the pool_hba.conf file.
Scroll down to the connections sections and specify the type, database, address, and connection type. Here’s an example of allowing localhost connections with the authentication type md5.
4. Start Pgpool
Once you’ve made all the configurations, restart Pgpool to start the connection pooling.
You can now update the connection strings for your application to point to backend_hostname0, which you defined, and connect via the specified port. With that, you will have managed to connect through Pgpool, and connection pooling via your PostgreSQL servers will have been attained.
Conclusion
Connection pooling is handy in reducing overhead connection costs in your database applications. To setup connection pooling for PostgreSQL, you can use Pgpool. This post has gone through the steps you should follow to achieve that. All the best!


