What Is Node Affinity in Kubernetes?
Node affinity is a scheduler that assigns the nodes to specific pods. Kubernetes pods make use of node affinity. A pod’s ability to declare an affinity for a particular group of nodes that it might be placed on is known as node affinity. In node affinity, we perform two types of scheduling – soft and hard scheduling. Through node affinity, we will ensure that the different pods that we are using are hosted on specific nodes in the Kubernetes cluster. In the pod, each node is labeled with a unique value.
Prerequisites:
In our system, the Linux or Ubuntu operating system must be installed. If Windows is already installed, install a virtual machine and run the latest version of Ubuntu in your system. Kubernetes must be installed in the system after installation. You must be familiar with Kubernetes commands and the kubectl command-line tool.
Read the prerequisites carefully. After fulfilling these requirements, run the commands in the kubectl command line that are mentioned in the following examples. Let’s break down the tutorials into steps, each with a brief explanation.
Step 1: Run the Kubernetes
In the first step, we run the Kubernetes in the terminal. The command is is as follows:
Here, minikube provides us with a local environment in which we perform the different operations on clusters.
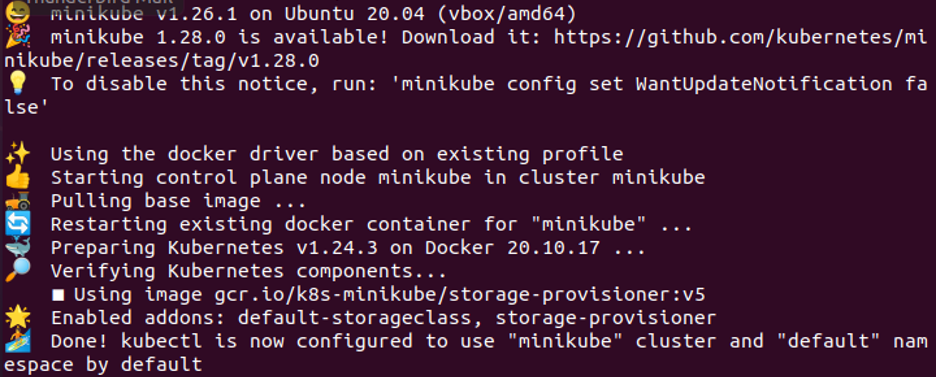
So, after running the command, minikube starts and the node space is reserved.
Step 2: Fetch the Existing Node in Kubernetes
In this step, the labeled nodes that currently exist in the system are displayed. To get the labeled nodes, we use a specific command.
Run the following command in the system and display the results:

In the previous screenshot, we saw that this command returns different parameters like name, status, roles, age, version, and labels. The name parameters are to display the container’s name, the status parameter is to return the container’s state, the roles parameter is to return who controlls the container, the age parameter is to return how long this pod is created, the version parameter is to return a version of this pod, and the labels parameter is to return the specific node value for this pod.
Step 3: Define the Kubernetes Node Affinity
In this step, we define the node affinity for the minikube container. Node affinity is dependent on the label. Here, we assign the labels using the command. The command for defining the node affinity is as follows:
![]()
We attach a label to the minikube node whose disc type is SSD. We get the list of labeled nodes after node labelling. This means that we get the list of the node affinity. Here, we run the same command again that we used earlier to show the list of the labeled nodes.

Step 4: Define the Node Affinity Pod Configuration File or Node Affinity in the YAML File
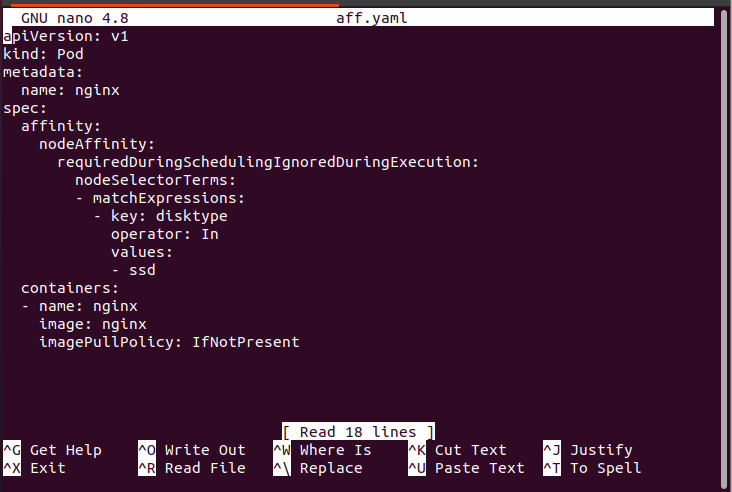
In this step, we define the node affinity in a YAML file. In a Minikube container, we run the following commands to create the YAML file:
In Linux, nano is used for file creation.
After the command execution, the following attached screenshot appears. This is a configuration file that contains an information about containers and clusters. As seen in the following screenshot, affinity is specified. In node affinity, it gives us a “requireDuringSchedulingIgnoreDuringExecution” value. That means that hard scheduling is performed on this pod and the pod requires this scheduling at any cost. In hard node affinity, a pod that is created is named Nginx. We define this pod disk type as scheduled on that node disk type whose attached label is SSD. Always remember that when “requireDuringSchedulingIgnoreDuringException” is displayed, the hard scheduling of node affinity is performed.
In this way, we define the pod with different types of node affinity.
Step 5: Check If the Pod Is Scheduled in the Label Node
In this step, we determine whether or not a pod is scheduled in a labelled node. For this purpose, we run the following command:
The pod is created successfully.
Step 6: Enlist All Pods in Kubernetes
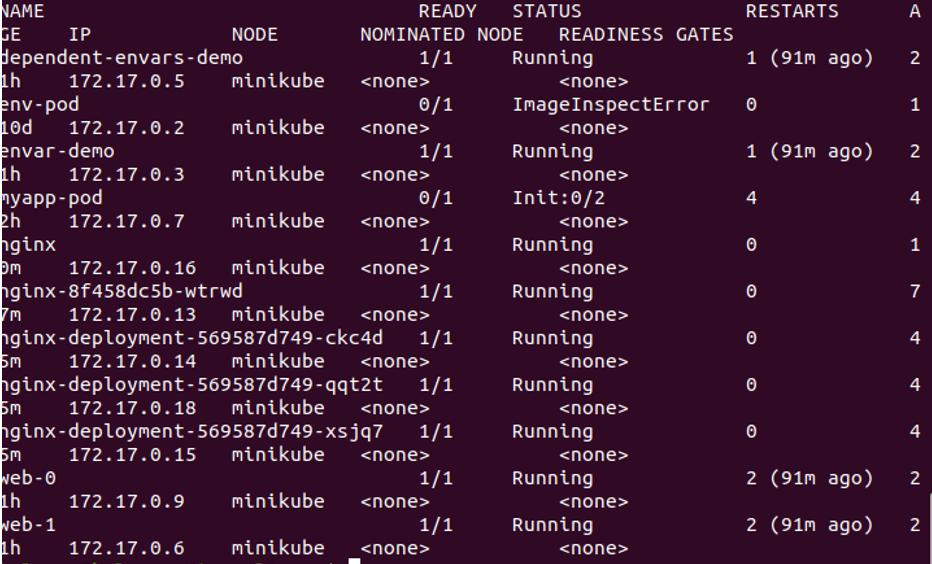
After that, we check the list of running or pending pods in our Kubernetes. We run the following command which is shown in the screenshot:
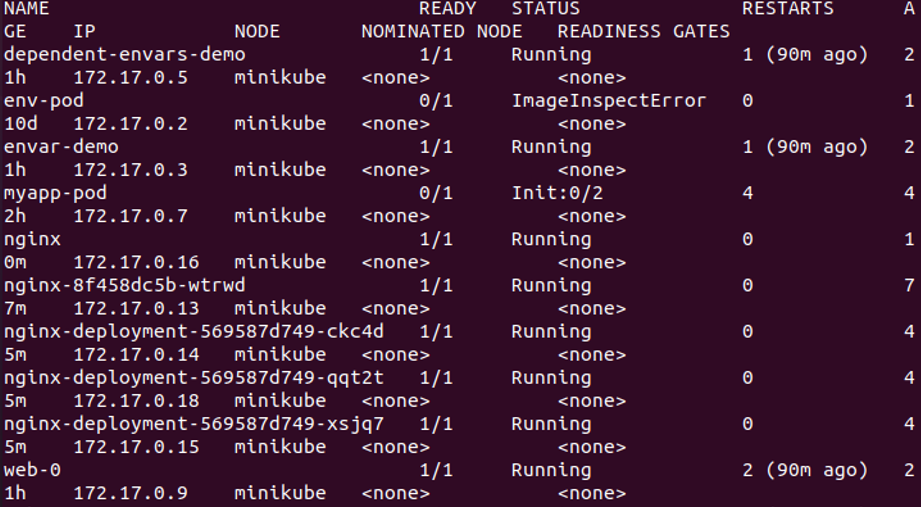
In the previously-attached screenshot, we notice that all the pods are in running status. Along with this, we get all pod’s detail through this command.
Step 7: Create the Pod to Define the Node Affinity in Kubernetes
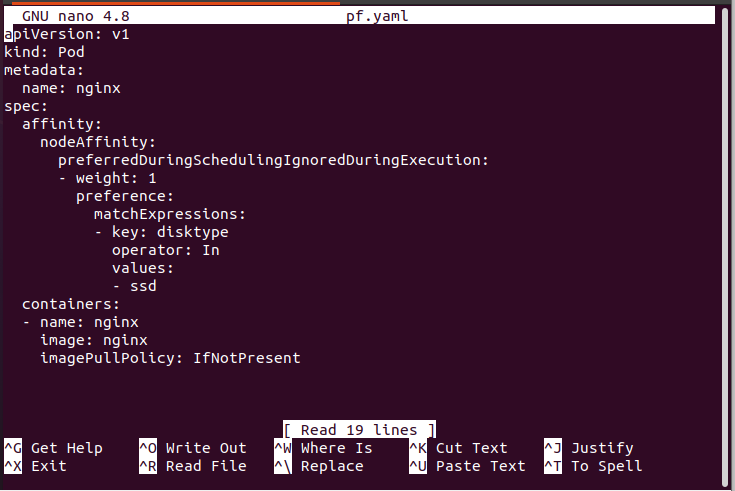
In this step, we run the command again for node affinity definition. We create a YAML file with the “pf.yaml” name. The command is as follows:
Step 8: Check the Node Affinity Type
In this step, we will see which type of node affinity is defined in this YAML file. The name of the pod is Nginx. Its specification is affinity, as shown in the following screenshot. In node affinity, “preferrredDuringSchedulingIgnoreDuringException” is used. When the preferred word is used, it means that the node affinity type is soft. Soft node affinity means that if the schedule prefers the node and the labels match the given match expression, it’s fine. Otherwise, ignore and schedule the pod.
Step 9: Check If the Pod is Scheduled to Label the Node
In this step, we check if all the pods that we created are scheduled with label nodes. For this reason, we run the following command to create the pod as a YAML file:
The pod is created successfully.
Step 10: Enlist All Pods in Kubernetes
Here, we run the command to see if all pods are scheduled with labeled nodes. We run the following command in the terminal:
The same process is repeated for soft node affinity as we discussed previously for hard node affinity. All the nodes are in running status, which means that all pods are scheduled with label nodes.
Conclusion
Node Affinity is a scheduler for pods on label nodes. Node Affinity includes a set of rules in both hard and soft form. This is what we learned in detail. We assume that you learned a lot from this tutorial. You can practice it for your improvement.