Table of Contents
1. hat Is a HostPort in Kubernetes?
2. Prerequisite:
3. Pod Configuration
4. Container Configuration
5. Conclusion
What Is a HostPort in Kubernetes?
Kubernetes is a widely popular deployment software. Let us suppose you developed an awesome application and wants it to run successfully on other devices. This is the time for Kubernetes to shine. After the app development, running it on Kubernetes is important before running it on different devices. Before further details, let us briefly overview the basic Kubernetes terminologies. For starters, if you are already familiar with the Kubernetes software, you must have come across the term pods. A pod is nothing but the smallest deployable unit in Kubernetes.
There is also the term node. A node is where the pods are present. It can be physical, virtual, or hybrid. Each node has to carry out a relevant process. A group of nodes is collectively called a cluster. Enough beating about the bush; you are now familiar with the basic terms which are related to Kubernetes. Let us now talk about what a hostPort is. A hostPort is the feature through which you can release the pod to the external environment. HostPort, as the name indicates, is on the host’s machine directly or via a switch.
Prerequisite:
We need to consider a few things before the hostPort creation. Before going into the detailed steps of setting up a hostPort, we must ensure that our system is compatible with all the standard requirements. The following are some vital tools that you need to set up a hostPort:
⦁ Ubuntu 20.04 or any other latest version to have a Linux/Unix environment to work
⦁ Kubernetes cluster
⦁ Kubectl CLI to use the Kubectl commands, cluster communication, and manage the development environment.
⦁ Minikube or any other Kubernetes playground to create the clusters
If you have not installed any of the tools, your first step is to install them as soon as possible. Once you are done with the prerequisite installation, we can proceed to the details of the hostPort setup in Kubernetes.
There are multiple approaches to setting the hostPort. If you have a perfectly running app that is ready to be released, it is time to connect it to a network. Kubernetes has an interesting design aspect. It operates under the assumption that all pods are linked. That means that the inter-pod communication is really simple. No matter what host they come in contact with, communication has no impact. The way that Kubernetes works is that it automatically assigns each pod with a private IP address. The user does not need to link or map the container pods to the hostPorts. All containers have quick and easy access to all the local host ports and other pods within a cluster.
Pod Configuration
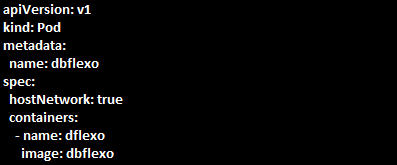
Kubernetes pods are configured via host network settings. The host network setting is exclusive to the Kubernetes pods. If you wish to directly connect the applications that are running in a pod with all network interfaces of the host machine, you need to configure your pod with hostnetwork: true. Ultimately, such applications on configured pods are easily accessible to the host machine’s network interfaces. The following image shows how a pod can be configured. This is done so that all the network interfaces of the host machine can respond to the applications of the pod.
We created a pod that uses host networking as shown in the following:
Initiate the pod with the following command:
You can see that the “create” command is used here for pod creation.
To check the dbflexo application, type the following URL:
Remember that it is compulsory to rename the hostname in the previous URL. Just replace it with the hostname of that Kubernetes node where the application is supposed to run. You can also choose the node’s IP address to do so. If you let the hostname as it is, there is a high chance that your application will not run successfully. Note that the desired response of Influx DB must be somewhat like HTTP 204 No Content. This is a clear-cut success status response and an indication that the request has been executed.
The next important thing to consider is the IP addresses of the pods within a node change recurrently. This is because every time the pod is restarted, Kubernetes assigns it a different IP address. That is why multiple applications cannot run on the same node regardless of sharing the same port.
Please note that it is not advisable to specify a hostPort for a pod unless you really must. The number of locations where a pod can be scheduled is limited when it is bound to a hostPort since each hostIP, hostPort, and protocol combination must be distinct.
Container Configuration
Just like we configure the pods with host network settings, we can configure the containers using the hostPort settings. To connect the container with the host machine, we need to set the hostPort. You can do so by defining two things – Host IP and hostPort. The general way to define a hostPort is like this: <hostIP>:<hostPort>. In this expression, host IP means the IP address of the Kubernetes pod where the application is timed to run. At the same time, the hostPort corresponds to the user’s request.
Conclusion
We learned how to expose our application using the Kubernetes software. Following this guide, you can easily set up the hostPort and use your applications on other devices. Thanks to Kubernetes, exposing the apps to the other devices can be easily done without hassle. We hope that you grasped the basic idea on how the hostPort can be set up. Additionally, you learned some common mishaps that you might encounter and how to deal with them immediately.