Ansible has different kinds of modules available, each with its own uses as per need. The most common ones are the Command and Shell modules.
While the Command module is beneficial for tasks that cater to Ad-Hoc commands, the Shell module is used for more complicated commands. The Shell module is also used to execute commands that include symbols like ?, <, >, |, etc. in their statements. Despite it all, there are tasks where you’d require using a different module altogether.
One example of such a task is HTTP and HTTPS management. Having a separate module for their management can prove to be very useful. Fortunately, Ansible provides you with just that.
Introducing the Ansible URI Module
The Ansible URI module is responsible for managing all HTTP and HTTPS-related services. It also supports mechanisms for authentication of HTTP.
The module is known as ansible.builtin.uri and comes preinstalled with the Ansible core. Learning how to use the URI module could do wonders for you if you’re working on tasks related to server management.
This guide is meant to help you learn about the Ansible URI module. We will cover the basics of the module, along with some necessary parameters and options. We will demonstrate the use of some of these parameters with the help of examples.
That being said, let’s begin.
Prerequisites of the Ansible URI Module
To ensure that the Ansible URI module runs flawlessly on your system, make sure you have the following:
- A system that has Ansible. The preferred OS for Ansible would be any Linux distribution. You can also run Ansible on macOS.
- A couple of hosts. In case you’re testing your servers, we recommend using virtual machines. Software like Oracle VirtualBox, Vagrant, and VMware Workstations will do the trick.
We’d also recommend that you have some basic know-how of how to execute commands in the Terminal to ensure that you know what you’re doing.
Now that you’ve learned about the prerequisites of the Ansible URI module, you can move on to learn about the parameters.
Parameters of the Ansible URI Module
The URI module has many parameters available for execution. A list of important parameters is given below.
Starting from the “url:” parameter, this parameter is used to pass on a URL to the URI module. An example of this parameter is given below.
uri:
url: <name of the website in http://www.example.com format>
The above code takes the URL as a string in the “url:” parameter and returns a status code if it’s successful.
Another commonly used parameter is “status_code”. This parameter returns a code that gives information about the success of the given HTTP request.
Some other useful parameters include:
- “group” Specifies file-group.
- “headers” Adds customizable HTTP headers
- “attributes” Governs the attributes of a filesystem object
- “owner” Assigns a user as the owner of the filesystem object.
- “use_proxy” Decides whether a proxy should be used. “Yes” by default.
- “method” Decides the method of the HTTP request.
Aside from these, there are many other parameters that are available with the Ansible URI module. If you’d like to learn about them in detail, these parameters are available in the official Ansible Documentation.
The next section of this guide will cover some examples of the ways you can use the URI module.
Checking Whether a Word Is Present in the Page Contents
The following block of code represents how you can use the Ansible URI module to search for keywords on a webpage.
uri:
url: http://www.example.com
return_content: yes
register: this
failed_when: "'Linux' not in this.content"

Now, run this playbook by executing the following command in the Linux terminal.
![]()
On running the code for a given URL, it will search the webpage for the keyword Linux. If it doesn’t find the word on the webpage, it will return status 200.
The next example covers using the Ansible URI module for problems that require logging into a webpage.
Using the Ansible URI Module for Logging into Webpages
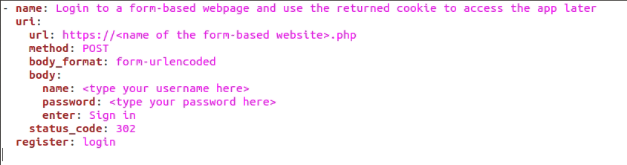
The Ansible URI module can be used to manage the content of web pages that require logging in. The following examples will be for form-based web pages.
uri:
url: https://<name of the form-based website>.php
method: POST
body_format: form-urlencoded
body:
name: <type your username here>
password: <type your password here>
enter: Sign in
status_code: 302
register: login
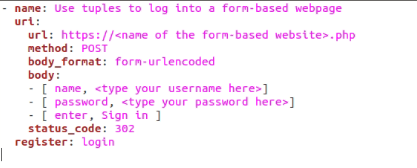
The next example demonstrates how you can use tuples to login to a form-based webpage with the help of the Ansible URI module.
uri:
url: https://<name of the form-based website>.php
method: POST
body_format: form-urlencoded
body:
- [ name, <type your username here>]
- [ password, <type your password here>]
- [ enter, Sign in ]
status_code: 302
register: login
Aside from these, many other examples are available in the official Ansible URI Module Documentation. We recommend that you check them out to get a better understanding of how to use the Ansible URI module.
Conclusion
We hope this guide helped you learn about the Ansible URI module. We covered the basics of the module, along with the parameters and some examples of how to use the URI module. With this, we hope you have a pleasant experience working with the URI module.