
After reading this tutorial, you will know how to configure the Linux server and client to send logs remotely. You also will learn how to open necessary ports in your system using UFW (Uncomplicated Firewall).
This brief tutorial is optimized for users looking for a fast knowledge source and a fast implementation.
All instructions described in this document include screenshots easing inexperienced users to follow them.
Advantages of Sending Linux Logs to a Remote Server
The main reason to implement remote logging is the same, because a dedicated /var partition is recommended: a matter of space, but not only. By sending logs to a remote storage device, you can guarantee access to them even before a system crash and keep a large historical database of bugs. This implementation also allows us to centralize reports for more than one device.
Getting Started With Linux Remote Logging
The program used to send logs remotely in this tutorial is rsyslog, which is included by default in many Linux distributions, including Debian and Ubuntu Linux.
To check if rsyslog is installed in your system and its status, execute the command shown in the following screenshot:
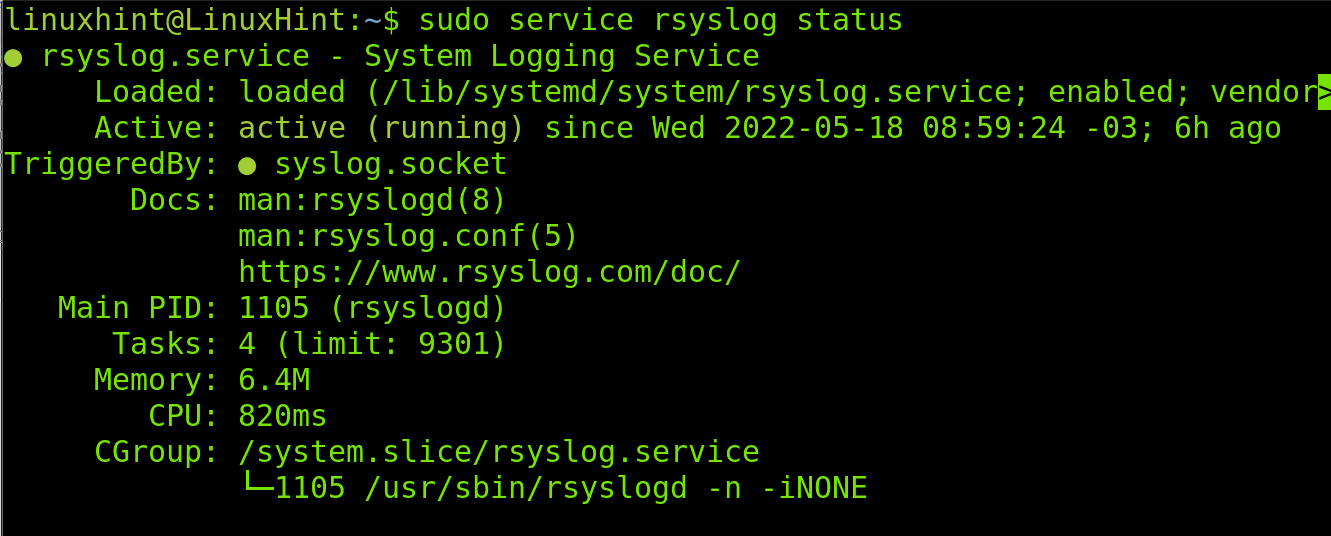
As you can see, the status is active on the following screenshot.
Note: If rsyslog isn’t installed in your system, you can use your packages manager to get it. (E.g., sudo apt install rsyslog)
If rsyslog isn’t active, you can start it by running the following command:

You also can start rsyslog by running the following command:
Note: For additional information on managing Debian/Ubuntu services, read Stop, start, and restart services on Debian.

The rsyslog tool requires configuration in both the sending (Client) and receiving (Server) devices. The next section of this tutorial explains how to configure the server side. Here are the instructions to configure the client.
How To Send Linux Logs to a Remote Server: The Server Side
We must configure both the server and client to send logs remotely. This section will provide instructions for the server-side configuration to continue configuring the client.
The rsyslog configuration file is /etc/rsyslog.conf. You can edit this file using any text editor like nano or vi.
For this tutorial, I’m using nano. Open the file, as shown in the following screenshot:

When sending logs remotely, both local and remote devices will write the same file. Thus, it would make reading it an uncomfortable task. To avoid this and get logs separately, add the following code to the /etc/rsyslog file, as shown in the following image:
*.* ?RemoteLogs
& ~

Scroll down the file and uncomment the following lines by removing the number sign (#) at the beginning of each line:
input(type="imudp" port="514")
Also, uncomment the following:
input(type=”imtcp” port=”514”)
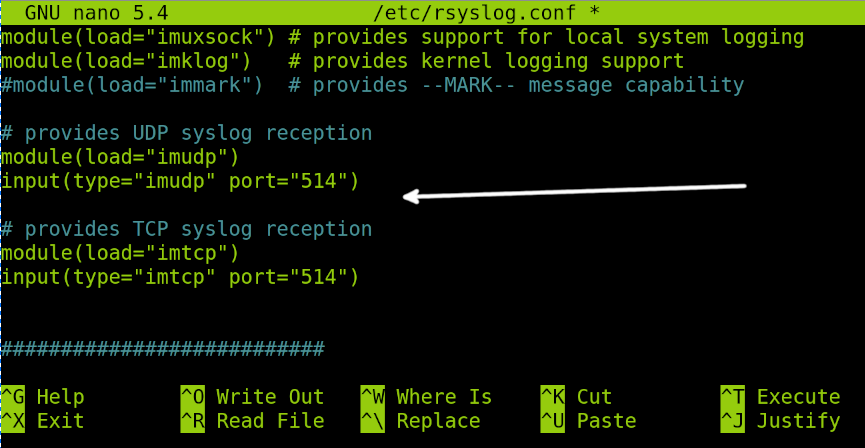
The four lines must be as shown in the previous screenshot to allow logging through both TCP and UDP protocols.
Once you finish editing the file, press Ctrl+X and then Y to save changes if you use nano.
After editing and saving the /etc/rsyslog.conf file, we need to update the firewall rules to allow traffic through the port 514 defined by default in the configuration file.
To edit the firewall rules in this tutorial, I use UFW (Uncomplicated Firewall).
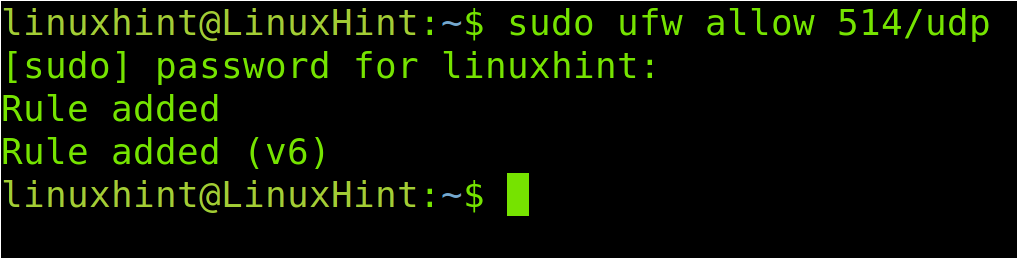
To open the port 514 for the TCP protocol, run the command shown in the following image:

To finish, open the UDP port 514 by running the following command:
Now, your server configuration is ready to get remote logs. Restart the rsyslog service by running the following command:

Once the server is ready, let’s continue with the client configuration.
How To Send Linux Logs to a Remote Server: The Client Side
This tutorial section explains how to configure the Linux client to send logs to the remote server. The following steps described must be done on the client device.
On the client, the configuration file we need to edit is /etc/rsyslog.conf.
Run the command shown in the following image on the client device:

Within this file, we need to add a line with the following syntax:
In my case, the server IP is 192.168.0.103. Therefore, I will add the following line, as you can see in the following screenshot:
Note: Use only an at symbol (@) if using only the UDP protocol.

After editing the file, press Ctrl+X and then Y to save changes.
Now, restart rsyslog to apply changes by executing the command, as shown below:

We are done with the client configuration and ready to read the remote logs in the server.
Reading Linux Logs on the Server
After following the previous steps, both systems are ready to send and receive logs.
Linux logs are stored under the /var/log directory. When using rsyslog by default, local and remote logs are written in the same log file, which is uncomfortable to read. But, when we edited the server /etc/rsyslog.conf file on the server, we instructed rsyslog to store logs in different directories and files.
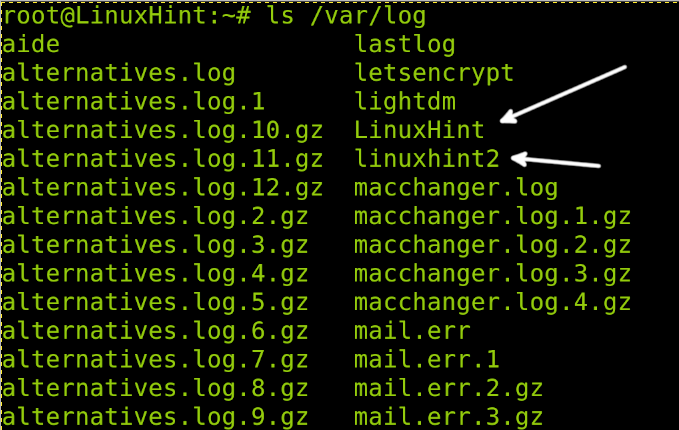
According to our configuration, remote logs will be stored in a directory with the name of the remote host under /var/log. In my case, the remote host is named linuxhint2; therefore, to see remote logs, I need to see the files under /var/log/linuxhint2, where linuxhint2 is the remote hostname, you need to replace it with your client hostname.
As you can see in the following screenshot, under /var/log, there are two directories for each device: local (LinuxHint) and remote (linuxhint2) devices.
Therefore, to see the log inside the remote directory, I run the following command, where you need to replace linuxhint2 with your remote hostname:

As you can see in the previous image, there is a file named RemoteLog.log, the file name we defined when we edited the server /etc/rsyslog.conf file.
To read the log, you can use the less command in the following example:

As you can see, remote logging works properly.

Now, remote logging is ready.
Read the man page to learn more about rsyslog and its additional features, including security, multi-threading, MySQL, Oracle, PostgreSQL, and other DB integration, message filtering, output configuration, and more at https://linux.die.net/man/5/rsyslog.conf.
Rsyslog Alternatives
The market offers additional alternatives to rsyslog with additional features, some of which are listed below:
- NXLog: NXLog is a rsyslog alternative that supports GNU/Linux and Windows operating systems. It is open-source and offers both community and enterprise editions. It has additional features to collect information on malicious behavior. It also supports filtering event logs and log forwarding.
- syslog-ng: syslog-ng OSE is another alternative to rsyslog, which supports Linux, Microsoft Windows, FreeBSD, Mac OS X, SOLARIS, AIX, etc. Like NXLog, it offers both enterprise and community editions.
- LogZilla: This is another logging option, free for home users and labs but paid for commercial users. According to its website, it can reduce resource costs and automatically trigger actionable insights based on the collected data.
There are many more alternatives you can explore, yet Rsyslog remains the most popular among Linux and Unix users.
Conclusion
As you can see, configuring and implementing remote Linux logging is an easy process any Linux user can do independently of their knowledge level. Remote logging is a great solution for problems, such as full disk due to a large number of logs, as indicated in this article. It is an excellent possibility for production servers to guarantee access to critical information before incidents. Rsyslog is open-source and free, and it is the most remote logging software supported by the Linux community. This tutorial focused on Linux, but rsyslog features a Windows Agent allowing sysadmins and users to share logs between Microsoft Windows and Linux operating systems.
Thank you for reading this tutorial and we hope it was useful for you. Keep reading LinuxHint for more professional tutorials.