Before starting you’ll need to learn the following concepts:
Subjects: processes or users.
Objects: files or filesystems.
Type Enforcement: on SELinux all subjects and objects have a type identifier ending with _t. “Type enforcement is the notion that, in a mandatory access control system, access is governed through clearance based on a subject-access-object set of rules.
In SELinux, type enforcement is implemented based on the labels of the subjects and objects. SELinux by itself does not have rules that say /bin/bash can execute /bin/ls. Instead, it has rules similar to “Processes with the label user_t can execute regular files labeled bin_t.” (source https://wiki.gentoo.org/wiki/SELinux/Type_enforcement)
Discretionary Access Control (DAC): DAC is the ownership and permission system we use in Linux to manage access to objects like files or directories. The Discretionary Access Control has nothing to do with SELinux and is a different security layer. For additional information on DAC visit Linux Permissions Explained.
Mandatory Access Control (MAC): is a type of access control which restricts subjects access interaction with objects. Contrary to DAC with MAC users can’t change policies.
Subjects and objects have a security context (security attributes) monitored by SELinux and administered according to security policies made by rules to be enforced.
Role Based Access Control (RBAC): is a type of access control based on roles, it can be combined with both MAC and DAC. RBAC policies make management of many users within an organization simple in contrast to DAC which can derive in individual permission assignments, it makes auditing, configuration and policy updates easier.
Enforcing mode: SELinux restricts subjects access to objects based on policies.
Permissive mode: SELinux only logs illegitimate activity.
SELinux features include (Wikipedia list):
- Clean separation of policy from enforcement
- Well-defined policy interfaces
- Support for applications querying the policy and enforcing access control (for example, crond running jobs in the correct context)
- Independence of specific policies and policy languages
- Independence of specific security-label formats and contents
- Individual labels and controls for kernel objects and services
- Support for policy changes
- Separate measures for protecting system integrity (domain-type) and data confidentiality (multilevel security)
- Flexible policy
- Controls over process initialization and inheritance, and program execution
- Controls over file systems, directories, files, and open file descriptors
- Controls over sockets, messages, and network interfaces
- Controls over the use of “capabilities”
- Cached information on access-decisions via the Access Vector Cache (AVC)
- Default-deny policy (anything not explicitly specified in the policy is disallowed).
Source: https://en.wikipedia.org/wiki/Security-Enhanced_Linux#Features
Note: users are different on SELinux and passwd.
Setting up SELinux on Debian 10 Buster
In my case SELinux was disabled on Debian 10 Buster. Keeping SELinux enabled is one of the basic steps to keep a Linux device safe. To know the status of SELinux in your device run the command:

I found SELinux was disabled, to enable it you need to install some packages before, after an apt update, run the command:

If requested press Y to continue the installation process. Run apt update after finishing the installation.
To enable SELinux run the following command:
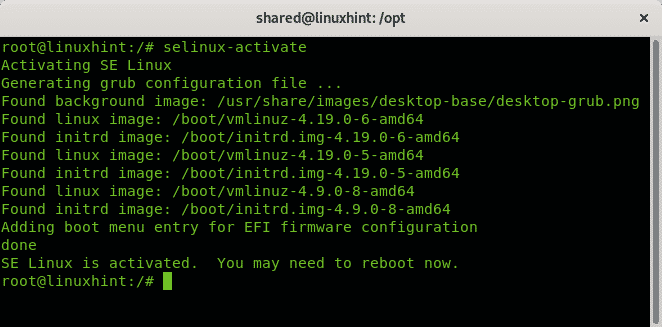
As you can see SELinux was properly activated. To apply all changes you must reboot your system as instructed.
The command getenforce can be used to learn the SELinux status, if its under permissive or enforcing mode:

The permissive mode could be replaced by setting the parameter 1 (permissive is 0). You can also check the mode on the configuration file using the command less:
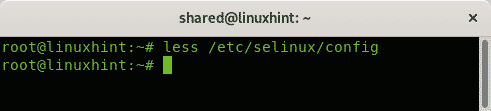
Output:

As you can see the configuration files show the permissive mode. Press Q to quit.
To see a file or process security context you can use the flag -Z:
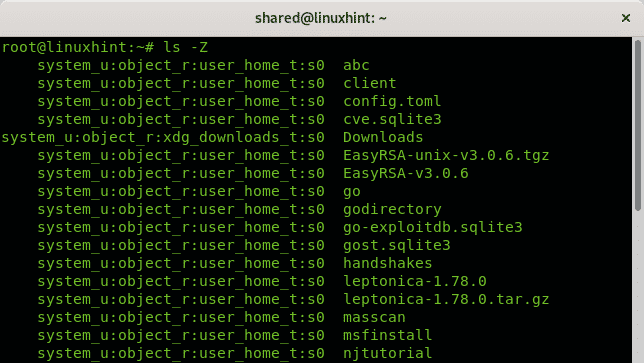
The label format is user:role:type:level.
semanage – SELinux Policy Management tool
semanage is the SELinux Policy Management tool. It allows to manage booleans (which allow to modify process on the run), user roles and levels, network interfaces, policy modules and more. Semanage allows to configure SELinux policies without the need to compile sources. Semanage allows the link between the OS and SELinux users and certain objects security contexts.
For additional information on semanage visit the man page at: https://linux.die.net/man/8/semanage
Conclusion and notes
SELinux is an additional way to administer access from processes to system resources such as files, partitions, directories, etc. It allows to manage massive privileges according to role, level or type. Having it enabled is a must as security measure and when using it is important to remember its security layer and to reboot the system after enabling or disabling it (disabling isn’t recommended at all except for specific tests). Sometimes a file access is blocked despite the system or OS permissions are granted because SELinux is forbidding it.
I hope you found this article on SELinux useful as introduction this security solution, keep following LinuxHint for more tips and updates on Linux and networking.