Setup the Select Dropdown Development Environment
Before we start to work on the select dropdown method, make sure to install and configure the following:
- Install Java and configure the Java path
- Install IDE (Eclipse, IntelliJ IDEA)
- Create a new Java project
- Download and configure the Selenium jars
- Configure the Lets JDK version library in Eclipse
- Download and configure the browser driver
- Download and configure WebDriverManager
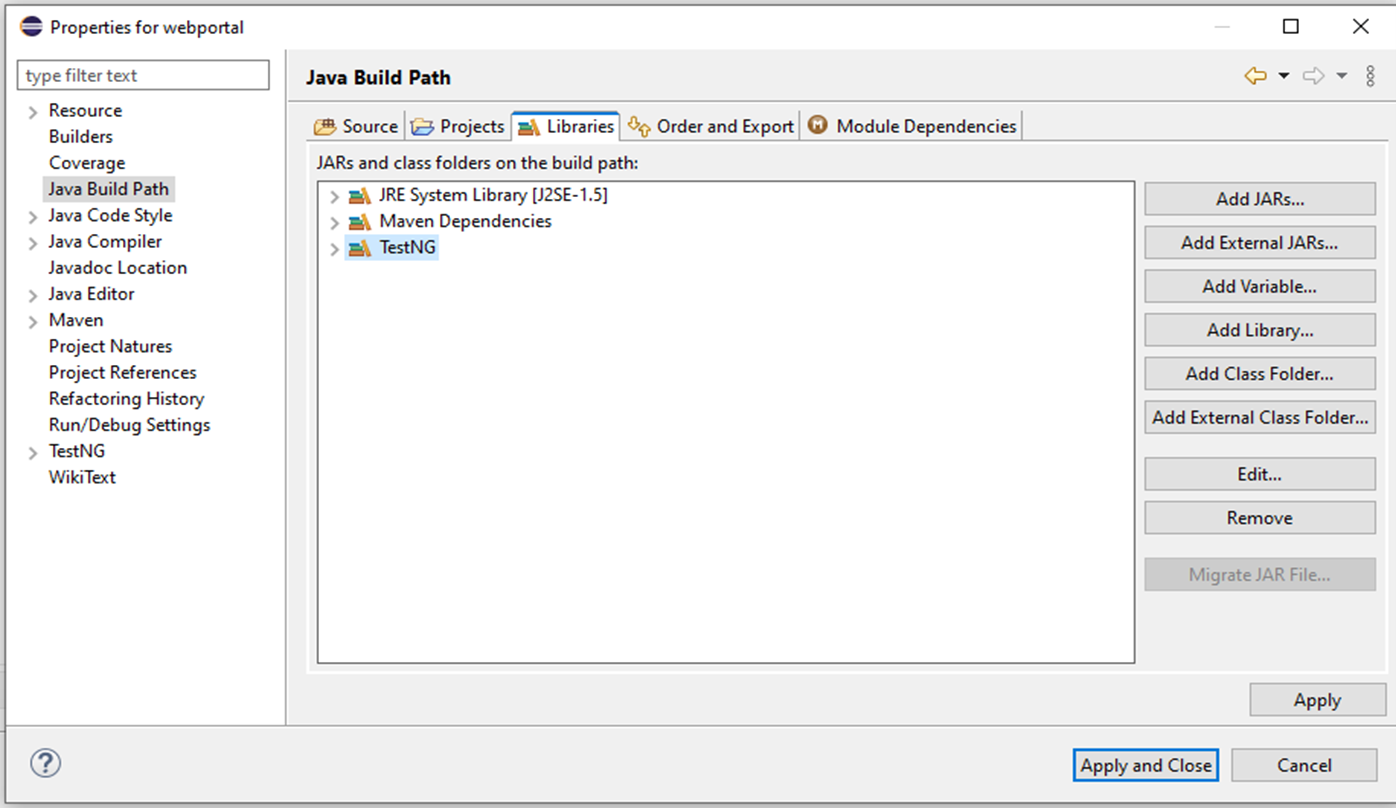
Add the External Jars of Selenium
To perform this step, download the Selenium jars files, TestNG jars, and maven dependencies first from google. Then, go to the project => build and configure the option>Java Build Path>libraries to add those downloaded external jars as shown in the following figure:
Setup the Dependencies in Java Eclipse
We must include the basic dependencies like TestNG and Selenium in the pom.xml file before we can begin developing the Maven code.
Follow the necessary steps to configure the dependencies:
- Within the same project, we receive the Pom.xml file.
- We must enter a dependence code for each tool in the Pom.xml file before downloading the TestNG and Selenium dependency jar.
- Enter the “Maven repositories” in the Google search bar, click the link that appears, and search for TestNG and/or Selenium dependencies to acquire the dependency code.
<dependencies>
<!--https://mvnrepository.com/artifact/org.seleniumhq.selenium/selenium-java-->
<dependency>
<groupId>org.seleniumhq.selenium</groupId>
<artifactId>selenium-java</artifactId>
<version>4.7.2</version>
</dependency>
<!-- https://mvnrepository.com/artifact/org.seleniumhq.selenium/selenium-chrome-driver-->
<dependency>
<groupId>org.seleniumhq.selenium</groupId>
<artifactId>selenium-chrome-driver</artifactId>
<version>4.7.2</version>
</dependency>
<dependency>
<groupId>io.github.bonigarcia</groupId>
<artifactId>webdrivermanager</artifactId>
<version>5.3.1</version>
<scope>test</scope>
</dependency>
</dependencies>
</project>
How to Select the Dropdown in Selenium
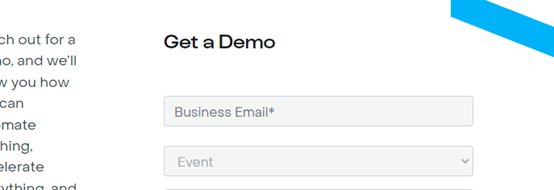
In this tutorial, we will help you understand how to handle the Select dropdown class. To perform this task, we go to the “sugar crm” site and go to the “Get a demo page” at https://www.sugarcrm.com/au/request-demo/. Notice the “how did you hear about us?” dropdown box there.

The method to select and handle a value from a dropdown in Selenium is as follows:
Step 1: Browse the Website
Consider the example site which is located at https://www.sugarcrm.com/au/request-demo/. The figure is as shown in the following:
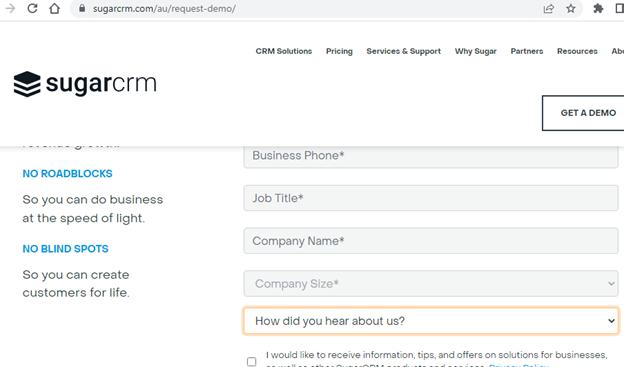
We target the dropdown list “Get a demo page” and select the option automatically as illustrated in the previous figure.
Step 2: Configure the WebDiverManager
WebDriverManager is a library that allows automating the management of the binary drives (chromedriver, getkodriver, etc. which are required by selenium web driver) help in compatibility with the different versions of brewers. It is not required to download the latest version and configure them.
The following script is used to configure the WebDriverManager:
Step 3: Setup the WebDriver
In this step, set up the browser driver through the following script where the Chrome browser is used:
ChromeDriver driver = new ChromeDriver();
Step 4: Launch the Browser
In this step, the Chrome browser opens the given website URL. In this example, use the https://www.sugarcrm.com/au/request-demo/ site.
Use the following script method:
Step 5: Select the WebElement
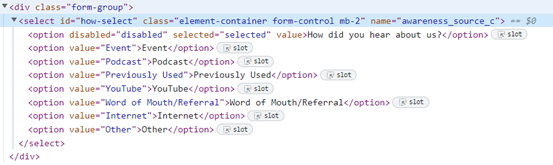
Through the previous code script, the browser opens the site automatically. We inspect the webpage and find the window as shown in the following figure:
Step 6: Select the Locator of the SELECT Class
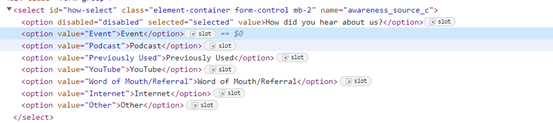
In this step, we go to the <select></select> tag and provide a locator of the select web element to identify the element on the webpage. Locators are identified such as name, id, and class. In the following figure, it can be noticed that there are some locators such as id, class, and name. So, for this example, we pick up the “name” as a webelement identifier. The name of the select is “awareness_source_c”.
![]()
Example code:
In the previous code, “By” is a class where we use the By.name() method to find the web element.
Step 7: Add the WebElemet Object
A Selenium WebElement is essentially an HTML element on a webpage. HTML components are used in HTML documents. Both a start tag and an end tag are part of every HTML element. Between the tags is the content.
- Nearly all DOM elements on a web page are subject to the WebElement Selenium WebDriver methods.
- The WebElement interface, in which the Selenium uses to communicate with both visible and invisible web page elements, serves as Selenium’s representation of each WebElement.
Here is the syntax:
Example code:
Step 8: Create the Object of the SELECT Class
The HTML SELECT tag is implemented in Selenium by the Select class. The select and deselect capabilities are provided to the helper methods by a select tag. Select is a typical class, thus the term “New” creates its object and indicates where the web element should be located.
In this step, we learn to use a SELECT method that provides a helper method to select and deselect the option.
The syntax is given as follows:
Example code:
Create a “select” object of a SELECT class. And import SELECT from the Selenium library.
Step 9: SELECT Class Methods
The following are the approaches to a dropdown list that are most frequently used:
1. selectByVisibleText
This technique is used to choose an option from a dropdown menu or several selection boxes. It accepts a String parameter, one of the values for the Select element, and gives back nothing.
The following is the syntax:
objVariable.selectByVisibleText(text)
Example code:
2. selectByIndex
This method is comparable to “selectByVisibleText”. But here, the user must supply the option’s index number rather than the text. It requires an integer parameter, the Select element’s index value, and returns nothing.
The syntax is attached as follows:
Example code:
select.selectByIndex(2);
3. selectByValue
This method is comparable to “selectByVisibleText”. But here, the user must supply the option’s index number rather than the text. It requires an integer parameter, the Select element’s index value, and returns nothing.
The following is the syntax:
objVariable.selectByValue(text)
Example code:
Here is the complete code:
public static void main(String[] args) {
//setup of webdriver manager
WebDriverManager.chromedriver().setup();
ChromeDriver driver = new ChromeDriver();
//launch site
driver.get("https://www.sugarcrm.com/au/request-demo/");
driver.manage().window().minimize();
//find element locator by name
WebElement ddrown = driver.findElement(By.name("awareness_source_c"));
//select dropdown
Select select = new Select(ddrown);
//select methods
//select by index
select.selectByIndex(2);
//select by text
select.selectByValue("Event");
//select by visible
select.selectByVisibleText("Event");
}
}
As in the previous code, we noticed that the SELECT class uses the By.name() method to find the <select> tag on the webpage. We implement three methods and find the following “event” option:
Output:
We can see that the code is successfully executed and the “how did you hear about us?” in the drop down box is selected by three different methods.
Conclusion
This article guides the SELECT class usage and tests three different methods to select the option from the dropdown list. The Select class in Selenium is very helpful when it comes to testing that choice in websites because the dropdown lists are a prevalent element on most websites. For this, we installed the Java JDK and Eclipse along with the Selenium jar libraries for “automate control tool software” in the system. Using the Java language, we write the code to set the browser driver, launch the browser driver, and use the SELECT method to select the options from the dropdown list automatically. In the end, we demonstrated the results on the browser which shows that the “Event” option is selected. Finally, we closed the browser.