In 2007, SIFT was available for download and was hard coded, so whenever an update arrived, users had to download the newer version. With further innovation in 2014, SIFT became available as a robust package on Ubuntu, and can now be downloaded as a workstation. Later, in 2017, a version of SIFT came to market allowing greater functionality and providing users the ability to leverage data from other sources. This newer version contains more than 200 tools from third parties, and contains a package manager requiring users to type only one command to install a package. This version is more stable, more efficient, and provides better functionality in terms of memory analysis. SIFT is scriptable, meaning that users can combine certain commands to make it work according to their needs.
SIFT can run on any system running on Ubuntu or Windows OS. SIFT supports various evidence formats, including AFF, E01, and raw format (DD). Memory forensics images are also compatible with SIFT. For file systems, SIFT supports ext2, ext3 for linux, HFS for Mac and FAT, V-FAT, MS-DOS, and NTFS for Windows.
Installation
For the workstation to work smoothly, you must have good RAM, good CPU, and a vast hard drive space (15GB is recommended). There are two ways to install SIFT:
-
VMware/VirtualBox
To install SIFT workstation as a virtual machine on VMware or VirtualBox, download the .ova format file from the following page:
https://digital-forensics.sans.org/community/downloads
Then, import the file in VirtualBox by clicking the Import option. After installation has completed, use the following credentials to log in:
Login = sansforensics
Password = forensics
-
Ubuntu
To install SIFT workstation on your Ubuntu system, first go to the following page:
https://github.com/teamdfir/sift-cli/releases/tag/v1.8.5
At this page, install the following two files:
sift-cli-linux.sha256.asc
Then, import the PGP key using the following command:
--recv-keys 22598A94
Validate the signature using the following command:
Validate the sha256 signature using the following command:
(an error message about formatted lines in the above case can be ignored)
Move the file to the location /usr/local/bin/sift and give it the proper permissions using the following command:
Finally, run the following command to complete installation:
After the installation is complete, enter the following credentials:
Login = sansforensics
Password = forensics
Another way to run SIFT is to simply boot the ISO in a bootable drive and run it as a complete operating system.
Tools
The SIFT workstation is equipped with numerous tools used for in-depth forensics and incident response examination. These tools include the following:
-
Autopsy (file system analysis tool)
Autopsy is a tool utilized by the military, law enforcement, and other agencies when there is a forensic need. Autopsy is basically a GUI for the very famous Sleuthkit. Sleuthkit takes only command line instructions. On the other hand, autopsy makes the same process easy and user-friendly. On typing the following:
A screen, as follows, will appear :
===============================================
Autopsy Forensic Browser
http://www.sleuthkit.org/autopsy/
ver 2.24
===============================================
Evidence Locker: /var/lib/autopsy
Start Time: Wed Jun 17 00:42:46 2020
Remote Host: localhost
Local Port: 9999
Open an HTML browser on the remote host and paste this URL in it:
http://localhost:9999/autopsy
On navigating to http://localhost:9999/autopsy on any web browser, you will see the page below:
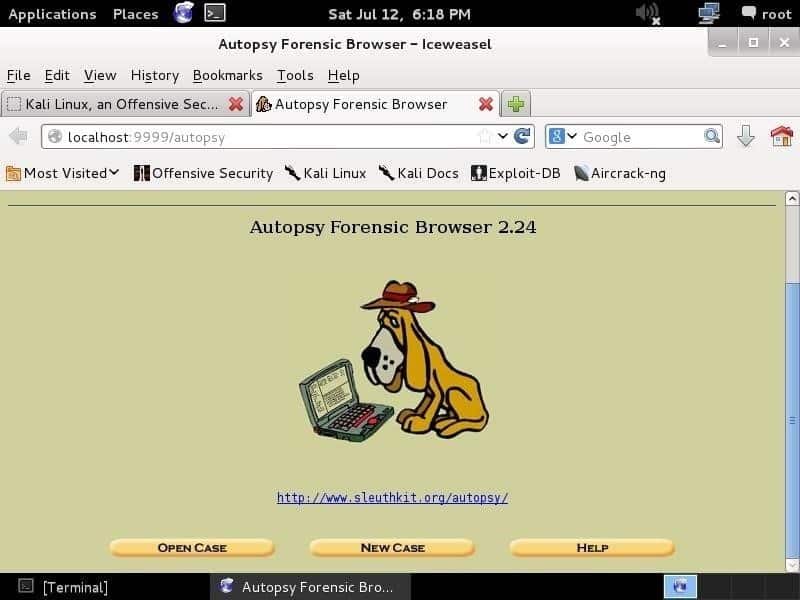
The first thing you have to do is to create a case, give it a case number, and write the investigators’ names to organize the information and evidence. After inputting the information and hitting the Next button, you will the page shown below:
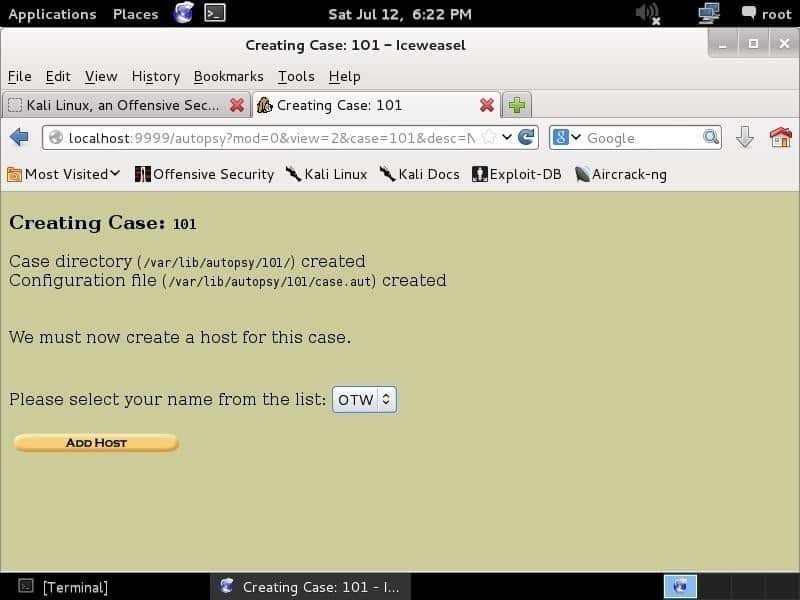
This screen shows what you wrote as the case number and case information. This information is stored in the library /var/lib/autopsy/<caseNumber>.
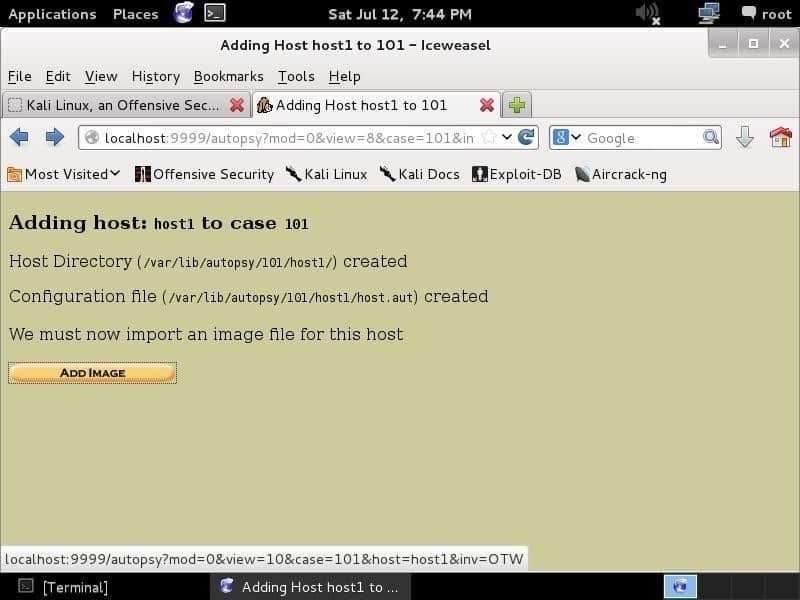
On clicking Add host, you will see the following screen, where you can add the host information, such as name, time zone, and host description..

Clicking Next will take you to a page requiring you to provide an image. E01 (Expert Witness Format), AFF (Advanced Forensics Format), DD (Raw Format), and memory forensics images are compatible. You will provide an image, and let the Autopsy do its work.
-
foremost (file carving tool)
If you want to recover files that were lost due to their internal data structures, headers and footers, foremost can be used. This tool takes input in different image formats, such as those generated using dd, encase, etc. Explore this tool’s options using the following command:
-d - turn on indirect block detection (for UNIX file-systems)
-i - specify input file (default is stdin)
-a - Write all headers, perform no error detection (corrupted files)ash
-w - Only write the audit file, do not write any detected files to the disk
-o - set output directory (defaults to output)
-c - set configuration file to use (defaults to foremost.conf)
-q - enables quick mode.
-
binWalk
To manage binary libraries, binWalk is used. This tool is a major asset to those who know how to use it. binWalk is considered the best tool available for reverse engineering and extracting firmware images. binWalk is easy to use and contains enormous capabilities Take a look at binwalk’s Help page for more information using the following command:
Usage: binwalk [OPTIONS] [FILE1] [FILE2] [FILE3] ...
Signature Scan Options:
-B, --signature Scan target file(s) for common file signatures
-R, --raw=<str> Scan target file(s) for the specified sequence of bytes
-A, --opcodes Scan target file(s) for common executable opcode signatures
-m, --magic=<file> Specify a custom magic file to use
-b, --dumb Disable smart signature keywords
-I, --invalid Show results marked as invalid
-x, --exclude=<str> Exclude results that match <str>
-y, --include=<str> Only show results that match <str>
Extraction Options:
-e, --extract Automatically extract known file types
-D, --dd=<type:ext:cmd> Extract <type> signatures, give the files an
extension of <ext>, and execute <cmd>
-M, --matryoshka Recursively scan extracted files
-d, --depth=<int> Limit matryoshka recursion depth (default: 8 levels deep)
-C, --directory=<str> Extract files/folders to a custom directory
-j, --size=<int> Limit the size of each extracted file
-n, --count=<int> Limit the number of extracted files
-r, --rm Delete carved files after extraction
-z, --carve Carve data from files, but don't execute extraction utilities
Entropy Analysis Options:
-E, --entropy Calculate file entropy
-F, --fast Use faster, but less detailed, entropy analysis
-J, --save Save plot as a PNG
-Q, --nlegend Omit the legend from the entropy plot graph
-N, --nplot Do not generate an entropy plot graph
-H, --high=<float> Set the rising edge entropy trigger threshold (default: 0.95)
-L, --low=<float> Set the falling edge entropy trigger threshold (default: 0.85)
Binary Diffing Options:
-W, --hexdump Perform a hexdump / diff of a file or files
-G, --green Only show lines containing bytes that are the same among all files
-i, --red Only show lines containing bytes that are different among all files
-U, --blue Only show lines containing bytes that are different among some files
-w, --terse Diff all files, but only display a hex dump of the first file
Raw Compression Options:
-X, --deflate Scan for raw deflate compression streams
-Z, --lzma Scan for raw LZMA compression streams
-P, --partial Perform a superficial, but faster, scan
-S, --stop Stop after the first result
General Options:
-l, --length=<int> Number of bytes to scan
-o, --offset=<int> Start scan at this file offset
-O, --base=<int> Add a base address to all printed offsets
-K, --block=<int> Set file block size
-g, --swap=<int> Reverse every n bytes before scanning
-f, --log=<file> Log results to file
-c, --csv Log results to file in CSV format
-t, --term Format output to fit the terminal window
-q, --quiet Suppress output to stdout
-v, --verbose Enable verbose output
-h, --help Show help output
-a, --finclude=<str> Only scan files whose names match this regex
-p, --fexclude=<str> Do not scan files whose names match this regex
-s, --status=<int> Enable the status server on the specified port
-
Volatility (memory analysis tool)
Volatility is a popular memory analysis forensic tool used to inspect volatile memory dumps and to help users to retrieve important data stored in RAM at the time of incident. This may include files that are modified or processes that are run. In some cases, browser history can also be found using Volatility.
If you have a memory dump and want to know its operating system, use the following command:
The output of this command will give a profile. When using other commands, you must give this profile as a perimeter.
To obtain the correct KDBG address, use the kdbgscan command, which scans for KDBG headers, marks connected to Volatility profiles, and applies once-overs to verify that everything is okay to lessen bogus positives. The verbosity of the yield and the number of once-overs that can be performed depends on whether Volatility can discover a DTB. So, on the off chance that you know the right profile, or if you have a profile recommendation from imageinfo, be sure to use the correct profile. We can use the profile with the following command:
-f <memoryDumpLocation>
To scan Kernel Processor Control Region (KPCR) structures, use kpcrscan. If it is a multiprocessor system, each processor has its own kernel processor scan region.
Enter the following command to use kpcrscan:
-f <memoryDumpLocation>
To scan for malwares and rootkits, psscan is used. This tool scans for hidden processes linked to rootkits.
We can use this tool by entering the following command:
-f <memoryDumpLocation>
Take a look at the man page for this tool with the help command:
Options:
-h, --help list all available options and their default values.
Default values may be set in the configuration file
(/etc/volatilityrc)
--conf-file=/home/usman/.volatilityrc
User based configuration file
-d, --debug Debug volatility
--plugins=PLUGINS Additional plugin directories to use (colon separated)
--info Print information about all registered objects
--cache-directory=/home/usman/.cache/volatility
Directory where cache files are stored
--cache Use caching
--tz=TZ Sets the (Olson) timezone for displaying timestamps
using pytz (if installed) or tzset
-f FILENAME, --filename=FILENAME
Filename to use when opening an image
--profile=WinXPSP2x86
Name of the profile to load (use --info to see a list of supported profiles)
-l LOCATION, --location=LOCATION
A URN location from which to load an address space
-w, --write Enable write support
--dtb=DTB DTB Address
--shift=SHIFT Mac KASLR shift address
--output=text Output in this format (support is module specific, see
the Module Output Options below)
--output-file=OUTPUT_FILE
Write output in this file
-v, --verbose Verbose information
--physical_shift=PHYSICAL_SHIFT
Linux kernel physical shift address
--virtual_shift=VIRTUAL_SHIFT
Linux kernel virtual shift address
-g KDBG, --kdbg=KDBG Specify a KDBG virtual address (Note: for 64-bit
Windows 8 and above this is the address of
KdCopyDataBlock)
--force Force utilization of suspect profile
--cookie=COOKIE Specify the address of nt!ObHeaderCookie (valid for
Windows 10 only)
-k KPCR, --kpcr=KPCR Specify a specific KPCR address
Supported Plugin Commands:
amcache Print AmCache information
apihooks Detect API hooks in process and kernel memory
atoms Print session and window station atom tables
atomscan Pool scanner for atom tables
auditpol Prints out the Audit Policies from HKLM\SECURITY\Policy\PolAdtEv
bigpools Dump the big page pools using BigPagePoolScanner
bioskbd Reads the keyboard buffer from Real Mode memory
cachedump Dumps cached domain hashes from memory
callbacks Print system-wide notification routines
clipboard Extract the contents of the windows clipboard
cmdline Display process command-line arguments
cmdscan Extract command history by scanning for _COMMAND_HISTORY
connections Print list of open connections [Windows XP and 2003 Only]
connscan Pool scanner for tcp connections
consoles Extract command history by scanning for _CONSOLE_INFORMATION
crashinfo Dump crash-dump information
deskscan Poolscaner for tagDESKTOP (desktops)
devicetree Show device tree
dlldump Dump DLLs from a process address space
dlllist Print list of loaded dlls for each process
driverirp Driver IRP hook detection
drivermodule Associate driver objects to kernel modules
driverscan Pool scanner for driver objects
dumpcerts Dump RSA private and public SSL keys
dumpfiles Extract memory mapped and cached files
dumpregistry Dumps registry files out to disk
gditimers Print installed GDI timers and callbacks
gdt Display Global Descriptor Table
getservicesids Get the names of services in the Registry and return Calculated SID
getsids Print the SIDs owning each process
handles Print list of open handles for each process
hashdump Dumps passwords hashes (LM/NTLM) from memory
hibinfo Dump hibernation file information
lsadump Dump (decrypted) LSA secrets from the registry
machoinfo Dump Mach-O file format information
memmap Print the memory map
messagehooks List desktop and thread window message hooks
mftparser Scans for and parses potential MFT entries
moddump Dump a kernel driver to an executable file sample
modscan Pool scanner for kernel modules
modules Print list of loaded modules
multiscan Scan for various objects at once
mutantscan Pool scanner for mutex objects
notepad List currently displayed notepad text
objtypescan Scan for Windows object type objects
patcher Patches memory based on page scans
poolpeek Configurable pool scanner plugin
-
Hashdeep or md5deep (hashing tools)
It is rarely possible for two files to have the same md5 hash, but it is impossible for a file to be modified with its md5 hash remaining the same. This includes the integrity of the files or the evidence. With a duplicate of the drive, anybody can scrutinize its trustworthiness and would think for a second that the drive was put there deliberately. To gain proof that the drive under consideration is the original, you can use hashing, which will give a hash to a drive. If even a single piece of information is changed, the hash will change, and you will be able to know whether the drive is unique or a duplicate. To assure the integrity of the drive and that nobody can question it, you can copy the disk to generate a MD5 hash of the drive. You can use md5sum for one or two files, but when it comes to multiple files in multiple directories, md5deep is the best available option for generating hashes. This tool also has the option to compare multiple hashes at once.
Take a look at the md5deep man page:
$ md5deep [OPTION]... [FILES]...
See the man page or README.txt file or use -hh for the full list of options
-p <size> - piecewise mode. Files are broken into blocks for hashing
-r - recursive mode. All subdirectories are traversed
-e - show estimated time remaining for each file
-s - silent mode. Suppress all error messages
-z - display file size before hash
-m <file> - enables matching mode. See README/man page
-x <file> - enables negative matching mode. See README/man page
-M and -X are the same as -m and -x but also print hashes of each file
-w - displays which known file generated a match
-n - displays known hashes that did not match any input files
-a and -A add a single hash to the positive or negative matching set
-b - prints only the bare name of files; all path information is omitted
-l - print relative paths for filenames
-t - print GMT timestamp (ctime)
-i/I <size> - only process files smaller/larger than SIZE
-v - display version number and exit
-d - output in DFXML; -u - Escape Unicode; -W FILE - write to FILE.
-j <num> - use num threads (default 4)
-Z - triage mode; -h - help; -hh - full help
-
ExifTool
There are many tools available for tagging and viewing images one-by-one, but in the case that you have many images to analyze (in the thousands of images), ExifTool is the go-to choice. ExifTool is an open-source tool used for viewing, changing, manipulating, and extracting an image’s metadata with just a few commands. Metadata provides additional information about an item; for an image, its metadata will be its resolution, when it was taken or created, and the camera or program used for creating the picture. Exiftool can be used to not only modify and manipulate the metadata of an image file, but it can also write additional information to any file’s metadata. To examine the metadata of a picture in raw format, use the following command:
This command will allow you to create data, such as modifying date, time, and other information not listed in the general properties of a file.
Suppose you require naming hundreds of files and folders using metadata to create date and time. To do so, you must use the following command:
<extension of images e.g jpg,cr2> <path to file>
CreateDate: sort by the file’s creation date and time
-d: set the format
-r: recursive (use the following command on every file in the given path)
-extension: extension of files to be modified (jpeg, png, etc.)
-path to file: location of folder or subfolder
Take a look at the ExifTool man page:
ubuntu@ubuntu:~$ exif --help
-v, --version Display software version
-i, --ids Show IDs instead of tag names
-t, --tag=tag Select tag
--ifd=IFD Select IFD
-l, --list-tags List all EXIF tags
-|, --show-mnote Show contents of tag MakerNote
--remove Remove tag or ifd
-s, --show-description Show description of tag
-e, --extract-thumbnail Extract thumbnail
-r, --remove-thumbnail Remove thumbnail
-n, --insert-thumbnail=FILE Insert FILE as thumbnail
--no-fixup Do not fix existing tags in files
-o, --output=FILE Write data to FILE
--set-value=STRING Value of tag
-c, --create-exif Create EXIF data if not existing
-m, --machine-readable Output in a machine-readable (tab delimited) format
-w, --width=WIDTH Width of output
-x, --xml-output Output in a XML format
-d, --debug Show debugging messages
Help options:
-?, --help Show this help message
--usage Display brief usage message
-
dcfldd (disk imaging tool)
An image of a disk can be obtained using the dcfldd utility. To get the image from the disk, use the following command:
bs=512 count=1 hash=<hash type>
if=destination of drive of which to create an image
of=destination where copied image will be stored
bs=block size (number of bytes to copy at a time)
hash=hash type (optional)
Take a look at the dcfldd help page to explore various options for this tool using the following command:
dcfldd --help
Usage: dcfldd [OPTION]...
Copy a file, converting and formatting according to the options.
bs=BYTES force ibs=BYTES and obs=BYTES
cbs=BYTES convert BYTES bytes at a time
conv=KEYWORDS convert the file as per the comma separated keyword listcc
count=BLOCKS copy only BLOCKS input blocks
ibs=BYTES read BYTES bytes at a time
if=FILE read from FILE instead of stdin
obs=BYTES write BYTES bytes at a time
of=FILE write to FILE instead of stdout
NOTE: of=FILE may be used several times to write
output to multiple files simultaneously
of:=COMMAND exec and write output to process COMMAND
seek=BLOCKS skip BLOCKS obs-sized blocks at start of output
skip=BLOCKS skip BLOCKS ibs-sized blocks at start of input
pattern=HEX use the specified binary pattern as input
textpattern=TEXT use repeating TEXT as input
errlog=FILE send error messages to FILE as well as stderr
hashwindow=BYTES perform a hash on every BYTES amount of data
hash=NAME either md5, sha1, sha256, sha384 or sha512
default algorithm is md5. To select multiple
algorithms to run simultaneously enter the names
in a comma separated list
hashlog=FILE send MD5 hash output to FILE instead of stderr
if you are using multiple hash algorithms you
can send each to a separate file using the
convention ALGORITHMlog=FILE, for example
md5log=FILE1, sha1log=FILE2, etc.
hashlog:=COMMAND exec and write hashlog to process COMMAND
ALGORITHMlog:=COMMAND also works in the same fashion
hashconv=[before|after] perform the hashing before or after the conversions
hashformat=FORMAT display each hashwindow according to FORMAT
the hash format mini-language is described below
totalhashformat=FORMAT display the total hash value according to FORMAT
status=[on|off] display a continual status message on stderr
default state is "on"
statusinterval=N update the status message every N blocks
default value is 256
sizeprobe=[if|of] determine the size of the input or output file
for use with status messages. (this option
gives you a percentage indicator)
WARNING: do not use this option against a
tape device.
you may use any number of 'a' or 'n' in any combo
the default format is "nnn"
NOTE: The split and splitformat options take effect
only for output files specified AFTER digits in
any combination you would like.
(e.g. "anaannnaana" would be valid, but
quite insane)
vf=FILE verify that FILE matches the specified input
verifylog=FILE send verify results to FILE instead of stderr
verifylog:=COMMAND exec and write verify results to process COMMAND
--help display this help and exit
--version output version information and exit
ascii from EBCDIC to ASCII
ebcdic from ASCII to EBCDIC
ibm from ASCII to alternated EBCDIC
block pad newline-terminated records with spaces to cbs-size
unblock replace trailing spaces in cbs-size records with newline
lcase change upper case to lower case
notrunc do not truncate the output file
ucase change lower case to upper case
swab swap every pair of input bytes
noerror continue after read errors
sync pad every input block with NULs to ibs-size; when used
Cheatsheets
Another quality of the SIFT workstation are the cheat sheets that are already installed with this distribution. The cheat sheets help the user get started. When performing an investigation, the cheat sheets remind the user of all the powerful options available with this workspace. The cheat sheets allow the user to get their hands on the latest forensic tools with ease. Cheat sheets of many important tools are available on this distribution, such as the cheat sheet available for Shadow Timeline Creation:

Another example is the cheat sheet for the famous Sleuthkit:
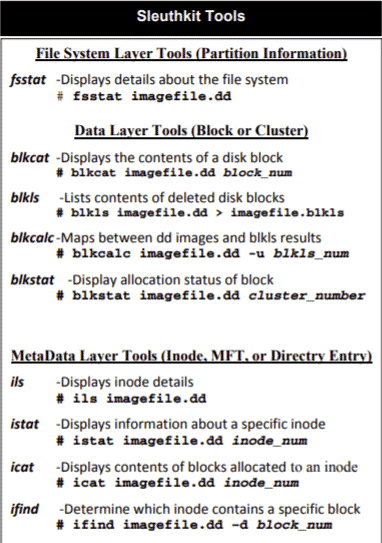
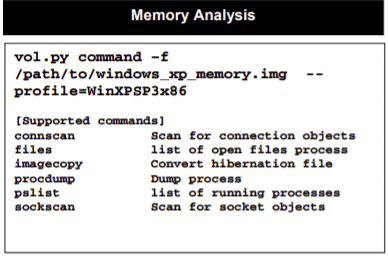
Cheat sheets are also available for Memory Analysis and for mounting all kinds of images:
Conclusion
The Sans Investigative Forensic Toolkit (SIFT) has the basic capabilities of any other forensics toolkit and also includes all the latest powerful tools needed to perform a detailed forensics analysis on E01 (Expert Witness Format), AFF (Advanced Forensics Format) or raw image (DD) formats. Memory analysis format is also compatible with SIFT. SIFT places strict guidelines on how evidence is analyzed, ensuring that the evidence is not tampered with (these guidelines have read-only permissions). Most of the tools included in SIFT are accessible through the command line. SIFT can also be used to trace the network activity, recover important data, and create a timeline in a systematic way. Due to this distribution’s ability to thoroughly examine disks and multiple file systems, SIFT is top-level in the forensics field and is considered a very effective workstation for anyone working in forensics. All the tools required for any forensic investigation are contained in the SIFT Workstation created by the SANS Forensics team and Rob Lee .