Well, you can consider a scenario in which you need to configure the computer systems in a computer lab at a school or a university and you want to prevent the students from wasting their precious time on using websites like Facebook or YouTube. Or maybe you are a system administrator at an IT organization and your job is to prevent the employees from accessing any websites other than the ones that are specified for their job.
In both these scenarios, the need of restricting certain websites on a browser is very prominently highlighted. Therefore, in this article, we will explain to you the method of restricting a website or multiple websites on Google Chrome so that none of the users are allowed to access the restricted websites.
Method of Restricting Websites on Google Chrome:
For restricting websites on Google Chrome, you will need to perform the following steps:
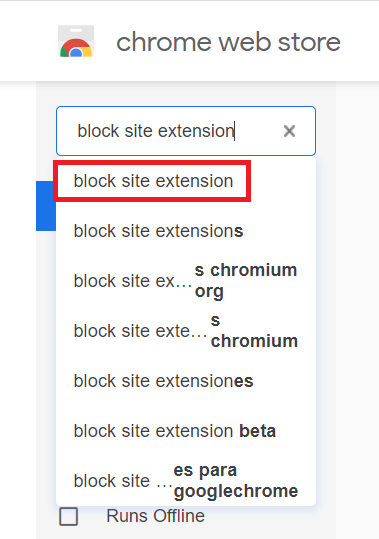
Launch Google Chrome by double-clicking on its shortcut icon located on your desktop. Now type Google Chrome Web Store in its search bar and then click on the search result to launch Google Chrome Web Store. Type block site extension in the search bar of Google Chrome Web Store and then click on the search result as highlighted in the image shown below:
Now scroll down to the Block Site- Website Blocker for Chrome and then click on the Add to Chrome button located beside it as highlighted in the following image:
As soon as you will click on this button, a confirmation dialogue box will pop up at the top of your screen. Click on the Add extension button of this dialogue box to provide your consent and to add the specified extension to Google Chrome as highlighted in the image shown below:
After doing this, you will be automatically redirected to the Block Site- Website Blocker for Chrome Settings page from where you can add any websites of your choice to the restricted list. Here, there is also a Whitelist Mode which can be enabled simply by checking the checkbox before it as highlighted in the following image. By adding websites to the list using the Whitelist Mode, you can allow only the websites mentioned in that list i.e. rest of all the websites will be blocked by default.
However, for the course of this discussion, we are not interested in the Whitelist Mode rather we would like to work with the default Blacklist Mode. For restricting a website on Google Chrome, you simply need to add those particular websites to the Block Sites text field. In this example, we wanted to restrict Facebook.com on Google Chrome. Therefore, we have typed Facebook.com in the respective text field and then clicked on the “+” icon to add this website to the blacklist of Block Site as highlighted in the image shown below:
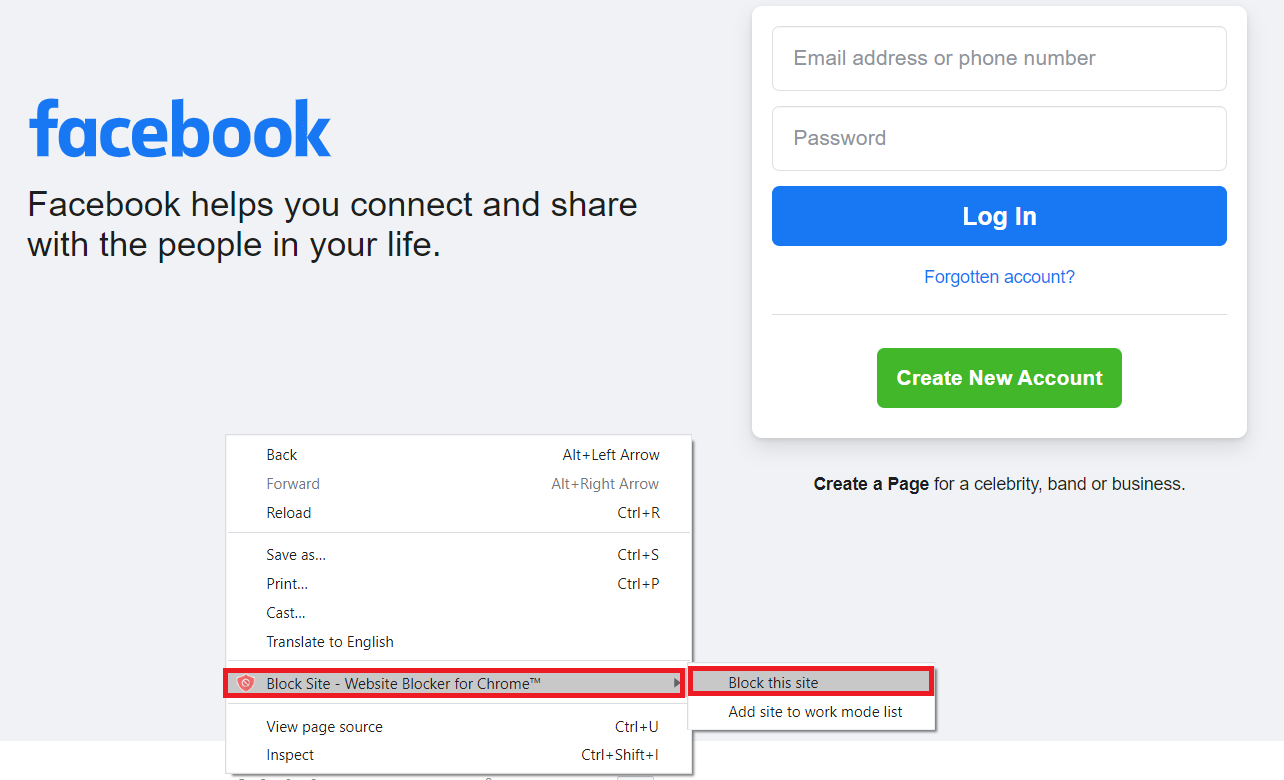
By doing this, you will no longer be able to access Facebook via Google Chrome unless you remove it from the blacklist. Another method of doing the same thing is by visiting Facebook.com via Google Chrome after enabling the Block Site extension. Now right-click anywhere on the Facebook welcome page to launch a cascading menu. Select Block Site- Website Blocker for Chrome from the cascading menu and then choose Block this Site from the sub-cascading menu for restricting Facebook.com on Google Chrome as highlighted in the following image:
Conclusion:
By making use of the method discussed in this article, you can easily restrict websites on Google Chrome and hence you can prevent the unnecessary usage of any irrelevant websites within an organization. Moreover, if you are a parent and you are concerned about your child’s usage of the Internet and you want him/her not to visit any websites that are not meant for him/her, even then this method can prove to be very helpful for you.


