Despite all the features and tools that are offered natively by the PostgreSQL server, it allows us to add additional functionality and features through the use of extensions.
PostgreSQL extensions refer to a set of external modules or libraries that are used to enhance the functionality of the database engines by providing extra features or data types. This makes the PostgreSQL database encapsulate a more comprehensive range of requirements.
This tutorial demonstrates how you can view the installed extensions in a PostgreSQL server using various commands and methods.
Prerequisites:
To follow this tutorial, you should have the following:
- Installed and configured PostgreSQL on your system
- Basic understanding of SQL and PostgreSQL
Purpose of PostgreSQL Extensions
PostgreSQL extensions serve multiple purposes including:
- Extending Database Functionality – Extensions provide additional features, data types, or functionalities that are unavailable by default. In addition, they allow us to add specialized capabilities to the database to meet the specific requirements.
- Simplifying Development – Extensions can streamline the development process by providing pre-packaged functionality that saves time and effort. Instead of building custom solutions, we can leverage the existing extensions to add the advanced application features.
- Enhancing Database Performance – Some extensions optimize and improve the performance of PostgreSQL databases. For example, they can introduce the advanced indexing techniques, query optimization, or caching mechanisms to speed up the queries and overall database operations.
The role of an extension heavily determines the intended purpose.
Install the Extension
Before we discover how to view the installed database extension, let us demonstrate how to install one for demonstration purposes.
One popular PostgreSQL extension we can install is the “PostGIS” extension. PostGIS adds support for geographic objects and allows you to store, query, and manipulate a spatial data in our PostgreSQL database.
Start by connecting to the PostgreSQL database using the “psql” command:
Replace the username with your target PostgreSQL username and database_name with the database name to which you want to connect. Then, enter the username’s password on the prompt.
The next step is to install the PostGIS which is already available in your database, and all you need to do is enable it.
Run the following command:
The command activates the PostGIS extension on the current database.
After the installation, you can start using the PostGIS extension’s features. PostGIS provides a rich set of functions and operators to work with spatial data. Check the following resource to learn more.
To check the installed extension version, run the following query:
This should return the installed PostGIS version.
Before installing an extension, checking whether it is already available in your PostgreSQL installation is a good practice. For example, we can use the following command to list the available extensions:
To install an extension in a specific schema, we can specify the schema using the SCHEMA parameter:
PostgreSQL Show Extensions
Once you installed your desired extensions, you can show them using the SHOW EXTENSIONS command:
The given command displays a table with information about the installed extensions.
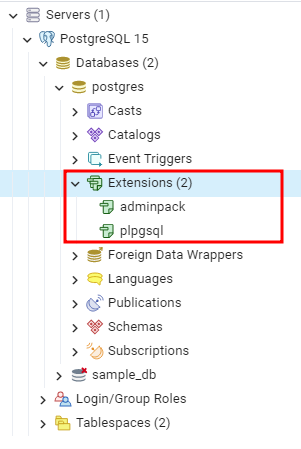
You can also view the extensions that are installed in a specific database using the PgAdmin 4 utility. Log into PgAdmin and expand to Servers -> PostgreSQL -> Target Database – Extensions.
Conclusion
We explored the role of extensions in PostgreSQL. We also explored how to install and view the installed extensions in PostgreSQL server.

