And in the case of ‘offset’ :
Simple LIMIT clause
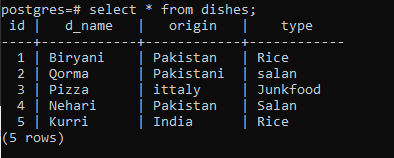
Moving towards examples of the topic under discussion. Consider a table named “dishes”. The content of the table up to 3 rows from the start is to be displayed as output. And this selection is done by sorting the data in rows according to the id column. ‘LIMIT’ is the keyword used to control the view created for the user in the table. Firstly, we will display all the content of the table ‘dishes’ by using a select command
Now we will apply the query to display the rows up to 3rd id.
Through the snap, you can see the output in which the last two lines are deducted because of the limit constraint that is applied to the table.
LIMIT clause with an OFFSET clause
The second example involves the use of ‘OFFSET’ along with the ‘LIMIT’ keyword. This clause jumps/skips the rows of the ‘nth’ offset number. The difference between the limit and the offset clause is that limit counts the number up to which we want to display the data, whereas offset removes that particular row or rows from the table by providing the offset number in the command. Now we will apply both clauses to the query, so we get the desired output.
The above command shows that limit “3” is used, which means the resultant table will contain only 3 rows in the table, and Offset “1” means that the first row will be deducted from the output. Hence from 5, only three rows are displayed due to limit and offset.
Use of LIMIT clause with the ORDER clause
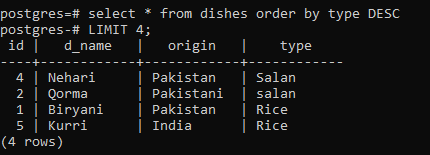
In addition to LIMIT, we can also use the order clause to display table data. This will work so that all the content will be arranged in an order specified in the query. Then the limit portion will be considered to be executed. Let’s have a look.
This query depicts that the result is firstly arranged following the specified column ‘type’. So once the 5 rows are arranged opposite the alphabetical order of the ‘type’, then the first 4 rows are displayed.
LIMIT as NULL
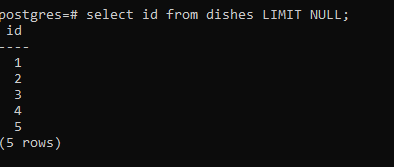
If we specify the ‘LIMIT’ clause as null, it doesn’t apply any change on the table. Here we have displayed only the ‘id’ column just to check the effectiveness of the ‘LIMIT’ clause.
Ties … Fetch first
This example is the use of “ties” in the limit clause. This helps to get all the data that is even used repeatedly in any column of the table. For that specific purpose, we are going to create a new table first that has a single column of id
Then insert values in it.
Normally when we introduce all the columns at the time of table creation, but here in the case of random numbers. A column named ‘numbers’ is created. This function is a built-in function to generate the random numbers and each number of the id column. For this purpose, we use a specific statement, ‘ALTER’. That will add a column in the table as shown below in the image taken.
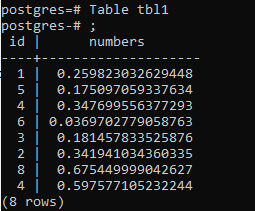
Similarly, we added some more rows to the table. The resultant table is as follows.
Now on this table, we will apply the ‘TIES’ clause with the factor “fetch-first”.
If we fetch the first rows of the table, what usually happens is that Postgresql pauses working at the fixed row numbers when there come the same numbers. To overcome the problem, in addition to “ties” the “order by” clause is also needed because without that, the result will be quite random. Now apply this condition on the table with a query.
The ‘fetch first” portion will get all the records arranged in ascending order by the id column. According to the command, the first 5 rows will be selected.
OFFSET with TIES
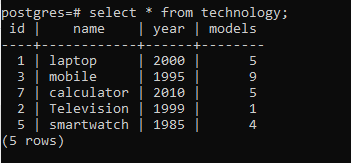
Consider another table named “technology”. Here we are interested in applying fetch_first, TIES, and OFFSET clauses in a single command. These three combined and didn’t promise to return exactly the same number of rows you have specified in the query.
Here we want to specify 2 rows for fetch-first with an offset of 3. So firstly, all the data is organized in descending order, then the first three rows are removed; hence we get the last two rows ordered by the model’s column of the table. The simple syntax is:
LIMIT with a subquery
This is an example of limiting the number of rows by using a sub-query to the table named worker. You can apply all the commands to a single table. But to explain different constraints, we need to have a variety in table creation, which is not available yet on a single table. So, the worker table has the following attributes.
One thing that should be kept in mind is to use the order by clause only with the ties clause when they suit each other; otherwise, you need to use a sub-query if you want specific rows with another column in the table.
First, the sub-query portion is solved.
Conclusion
‘Postgresql limit rows’ is a solution to hide some data from the user due to some specified reasons. By using ‘OFFSET’, ‘ORDER clause’, and ‘TIES’ with the fetch-first concept is discussed to reduce the ambiguity of combining all of them in a single statement. I hope this content will help you in handling tables with the LIMIT clause.

