Implementation
Open PostgreSQL pgAdmin panel. First, it will ask for the password. At the top menu bar, there is an option of Tools. Select that option and then a drop-down will be opened, select the query tool option. This will lead you to the dashboard part where we write the query and execute them.
Declare Array Columns
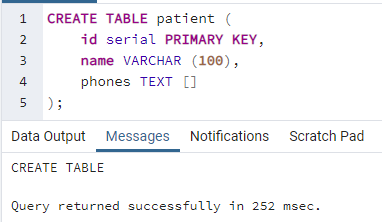
First, we need to declare an array. As arrays are the data type of any column in the table. So, we will create the table first. The name of the table is patient to store the information regarding a patient. The table will contain id, name column as integer, and varchar data types, but the third one is to store the contact number. Contact numbers can be more than one, so here we have used the data type as an array in the form of text [].
Now, execute the command by selecting the ‘execute or refresh’ symbol at the toolbar. A message is displayed to show that a table is created.
Insert Data in PostgreSQL Array
After the table is created, now we will insert values, array literals in the table. Two methods are used mainly to insert data in the array. Both are accomplished by using an INSERT statement.
The first method deals with inserting values in the table by using an array constructor to add data in the specified column having an array as a data type. This constructor helps in constructing an array and then inserting this array of data into the table. Let us now talk about the example. Here, we have added two phone numbers in the phone column. It means an array has value in two indexes.
This declaration through an ARRAY constructor is done by using square brackets.
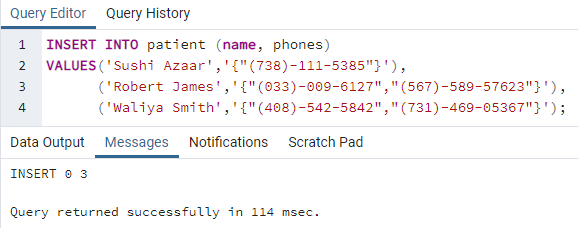
The second method contains the curly brackets to be used. One thing should be noted that while using curly brackets, we use single quotes to wrap the array portion. Whereas, in the case of text items of an array, we use double quotes as we do for the strings. Now in the example, we have added three sample rows in the table, having one number in the array of the first row and two numbers in the array of the second and third row.
You can see the resultant message that 3 rows are added to the table.
View Array Literals
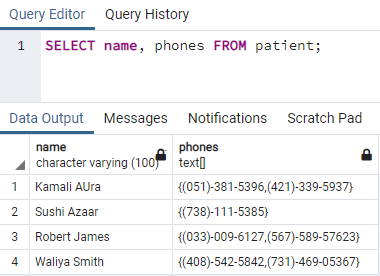
Now, when we are done with data entry, we will see the inserted data from the table patient by using a SELECT command.
The above-attached image shows that each array contains two phone numbers in each row except for the second id.
Query Array Literal
The elements of an array are accessed by using subscript in the square brackets []. The numbering approach used by PostgreSQL is the one-based numbering of elements of the array by default. Hence, it is proved that the first element of the PostgreSQL array is present at the 1st index.
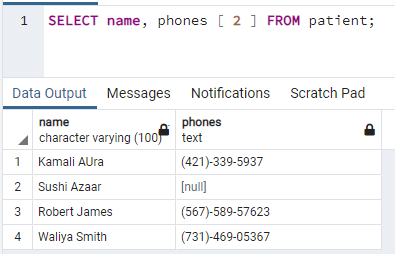
The first result we want is to fetch the name of the patient along with the second phone number they provided. So, we have used 2 subscripts here to fetch the number present on the second index.
It will bring the names and 2nd phone numbers of all 4 patients except the patient with the second id. Because we have not provided a number in that array at the second position.
This part of the tutorial will fetch some records in the array of a table by applying conditions. So, we have used a ‘WHERE’ clause here to specify the condition. To filter the rows, we have used a where clause with the condition of finding the name of a patient who has a number ‘(421)-399-5937’ as a second number they have provided. So, we use the below-given command.
These resultant values show that the first-row record of the patient contains the number at the second index of the phone’s array.
Modify Array Literals
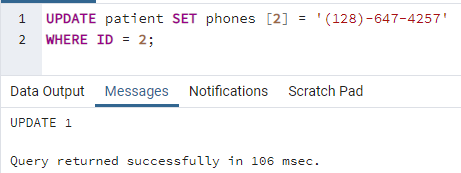
To update existing data in an array of the table, we have an UPDATE query. This takes a WHERE clause to specify the row, where we need to modify the data. In this example, we have added a number at a second index of the phone’s array as this place was empty before.
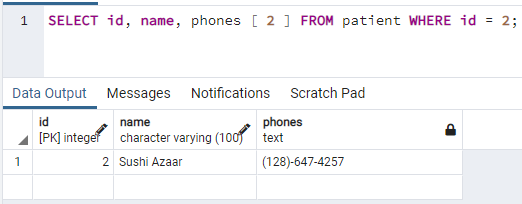
This will search id 2 first and then modify the array by adding a new number at the second index. Now, we will see the update we have made.
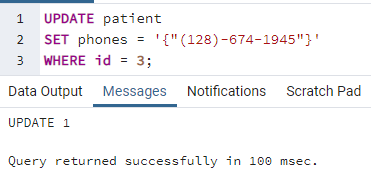
Now, we will move towards another example of modifying data in which the whole array is updated. Here, we will enter a new number to the specified row in the table.
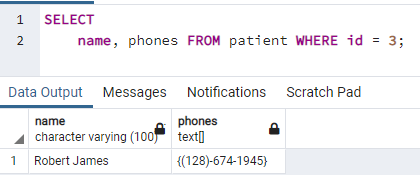
The 3 ids of the table will be modified in such a way that the previous data from the array of the 3rd row is removed and a new number is added. We will see the changes by using a SELECT statement.
Search in PostgreSQL Array
The search function in the array of PostgreSQL is used to get the results by using a number to whom it belongs without knowing the id. This is done by adding an ANY() function in the command. Directly enter the number and then the particular name will be obtained.
Hence, the name of the patient is obtained to whom that number belongs.
Expand an Array
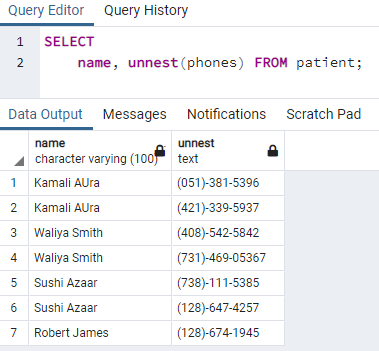
PostgreSQL provides a function of unnest(), to expand the array as a whole in the list of rows like the rows of tables. The below command will expand all the phone numbers of the phone’s array with a new line in the table.
You can see that all the data in the array is expanded with the same names of a patient in each line.
Conclusion
‘How to use Postgres array literal’ contains information regarding the creation of an array within the Postgres table. This feature in the Postgres database is very effective as it can store more than one value of the same data type at a time in the table. Array performs many functions like data searching and updating of data present in the array.


