This tutorial explains what Nmap flags are and what they do with real scenario examples.
Nmap is probably the most important network and security tool in the market. Among its features there are port scanning, vulnerability scanning, hosts discovery, footprinting capabilities and even more functionalities brought by the Nmap Scripting Engine (NSE).
After reading this tutorial you will be able to become an advanced Nmap user, not only by using flags, but also by learning syntax tips and the Nmap Scripting Engine with additional functions.
All examples shown in this article include screenshots, making it easy for all users to understand how to apply them.
The Nmap Syntax
When running a scan using Nmap, first we need to call the program, then we need to introduce flags (Scan type) and finally the target(s) to be scanned.
A basic example of this would be a simple port scan targeting specific ports as shown below, where the port 80 of the host linuxhint.com is scanned to learn its state.
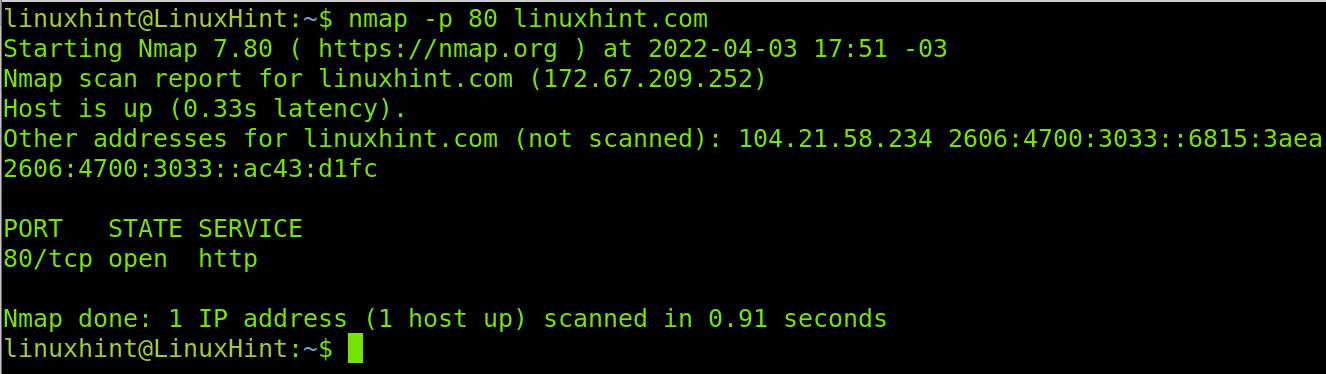
The -p (Port) flag or parameter shown in the example above is used to define one or more ports. You can add more ports by separating them using commas, this will be explained later in this article.
Understanding the Nmap Output: Port States
Before continuing with the explanation on Nmap flags, it is important for readers to understand Nmap outputs. Regarding this, there are 6 port states which may be reported by Nmap:
- Open: the port is open and an application is listening through it.
- Closed: the port is closed; no application is listening.
- Filtered: a firewall prevents Nmap from reaching the port.
- Unfiltered: Port is accessible but Nmap is unable to check its state.
- Open|filtered: Nmap is unable to determine if a port is open or filtered.
- Closed|Filtered: Nmap is unable to determine if a port is closed or filtered.
Now you know the Nmap syntax and basic output meaning we can proceed learning Nmap flags.
Nmap Flags to Scan Ports
The most widely used Nmap feature is port scan. To use Nmap properly, it is necessary to know how this flag can be implemented to fit the user needs.
As shown in the first section of this tutorial (The syntax section), to specify a port you just need to type the -p (Ports) flag followed by the port you want to be scanned, as shown below.

In the example above, Nmap is instructed to check the state of the port 443 of the linuxhint.com host.
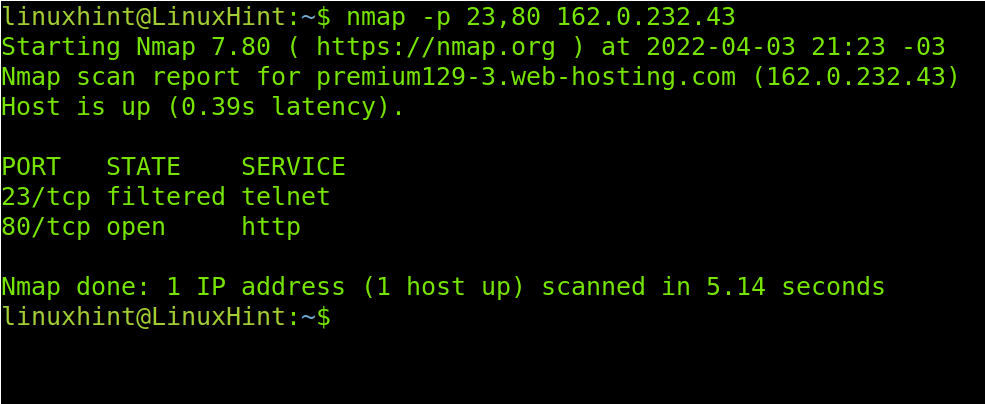
You also can specify more than one port by implementing a comma. In the following example Nmap is instructed to check ports 80 (http), 443 (https), 21 (ftp) and 22 (ssh).

As you can see, all the specified ports were analyzed. Ports 80 and 443 are open while ports 21 and 22 are filtered by a firewall.
Of course, with Nmap you also can define targets using IP addresses, subnets, etc.
You also can specify a ports range by implementing a hyphen as shown in the following example, in which all ports from the 79 to 90 are scanned.
Note: If the range is too large, the output may skip closed/filtered ports and show open ports only.

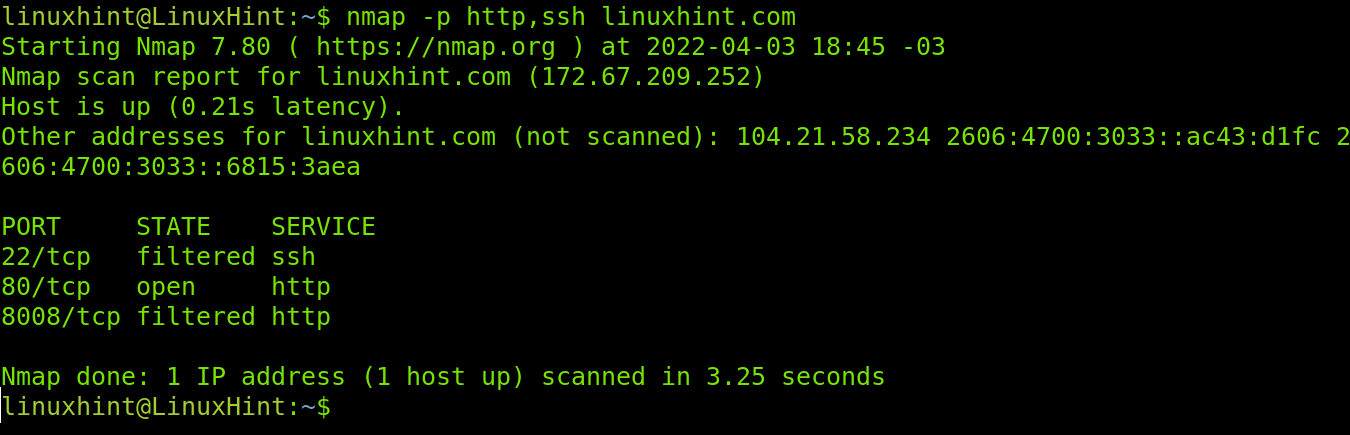
It is important to clarify when using the -p flag you also can specify the service by its name, not only by the port number. In the example below, ports HTTPS and SSH are scanned.
When you don’t specify ports, by default Nmap scans the 1000 most commonly used ports. If you want to scan a target and find only open ports among these 1000 ports, you can use the –open flag.
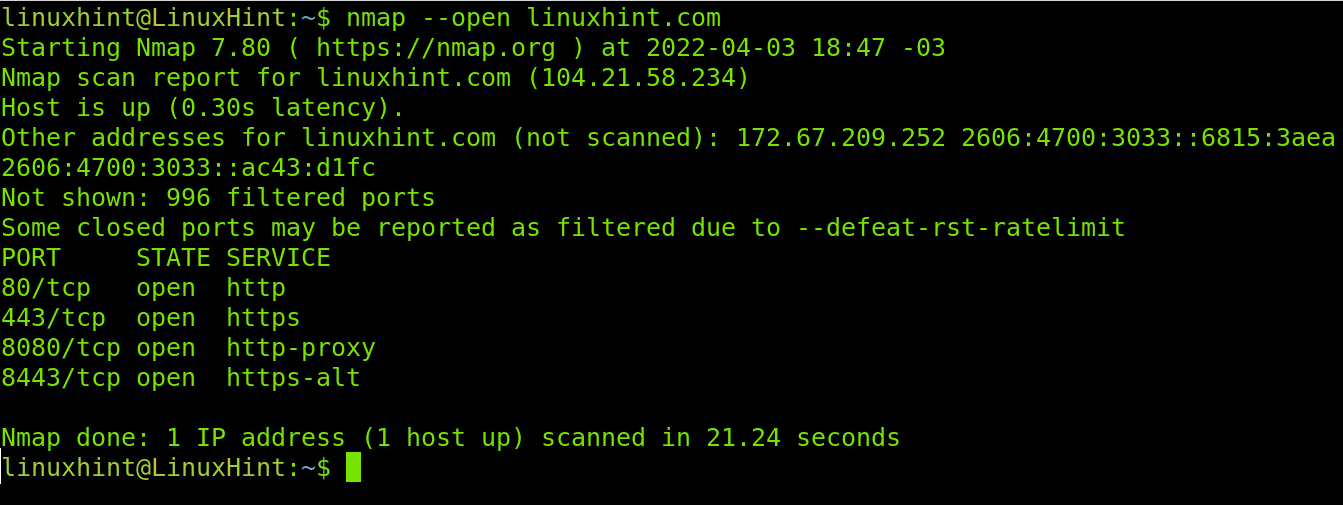
As you can see, Nmap found ports 80,443, 8080 and 8443 are open.
Nmap Flags for OS and Software Version Detection
Another important Nmap feature is the capability to detect OS and software versions of our target. Nmap is a great tool for footprinting. We can use different flags, and combine them for better results.
The first flag explained in this section is the -O (OS) flag used to detect the target operating system.
Note: You need root privileges to use the -O flag for operating system detection. Use the sudo prefix.
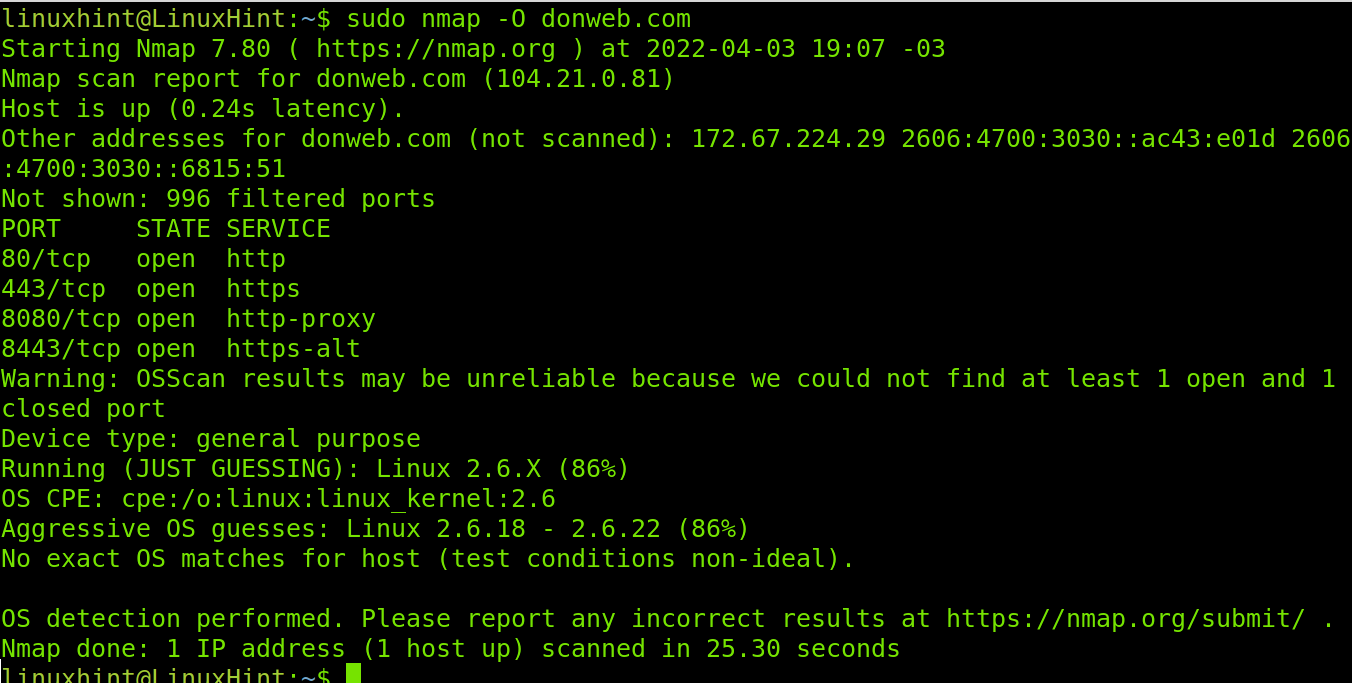
Nmap reports conditions were not ideal to detect the target’s operating system. Yet it is 86% sure it is using a Linux system with kernel 2.6.18 or 2.6.22.
To detect service versions, you can use the -sV (Service Version) flag as shown below.

In the screenshot above, Nmap detected Pure-FTPd for the ftp service, EXIM 4.94.2 and Dovecot for mail service, ISC BIND 9.8.2rc1 for DNS and LiteSpeed as web server.
The -sV flag supports different intensity levels, from 0 to 9, where 0 is a light intensity, and 9 the most aggressive one. The default level when using the -sV flag, if not specified, is 7.
Below, you can see an example of a scan with the lower intensity level. As you will see, no version is detected.

Now, you can see the output of a -sV scan with maximum intensity against the same target.
Now the result is different, and while the versions were not detected we know the reason. LinuxHint.com is protected by cloudflare. With this output we learned we can get the versions using other tools like Cloudfail or Shodan.

Nmap Flags to Define Targets
Other Nmap basic flags and syntax techniques are useful to define targets to scan. This section shows how to run them.
Note: Additionally, to flags, this section also covers some syntax techniques.
In previous examples we only scanned one target. You also can target many devices.
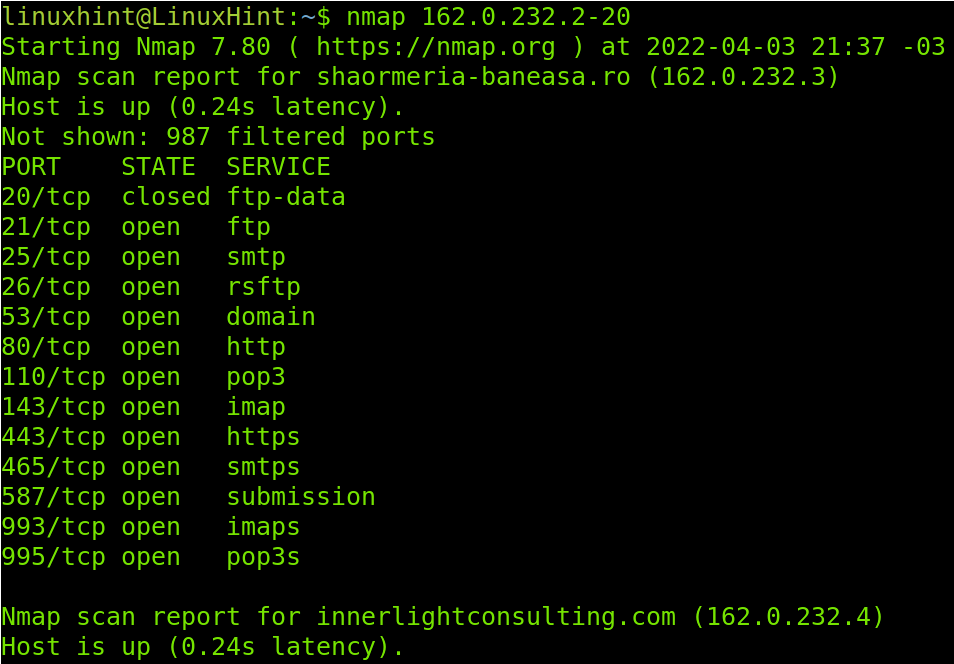
The following example shows how to target an IP range by implementing a hyphen. The scan will target all IP addresses between 162.0.232.2 and 162.0.232.20. Of course, the screenshot can’t include all the results I see in the console.
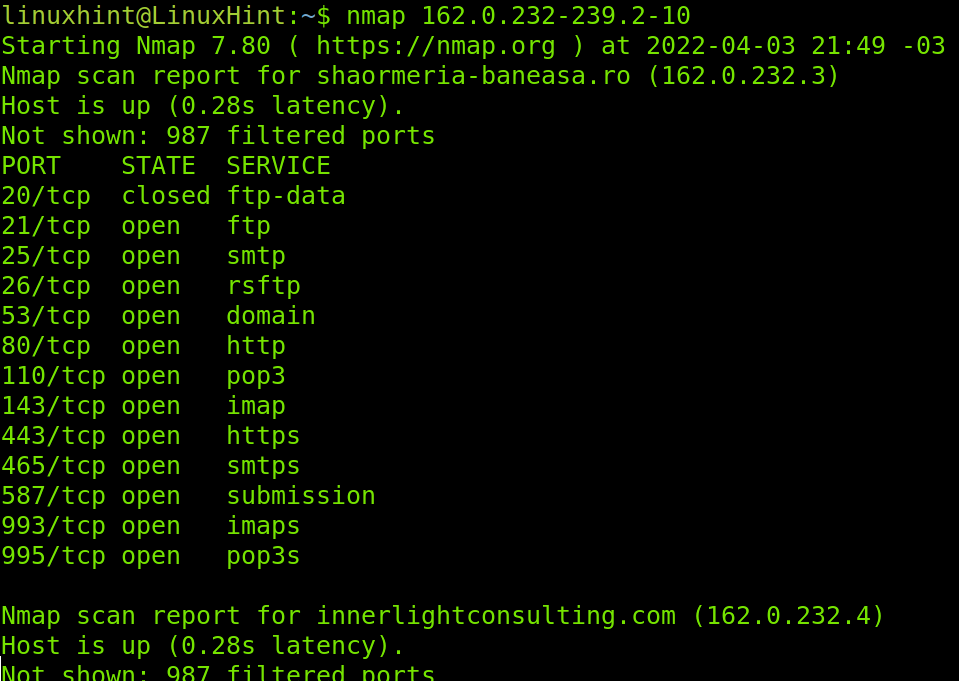
You can specify ranges in more than one octet. The example below specifies ranges in the last to octets by implementing a hyphen in both of them.
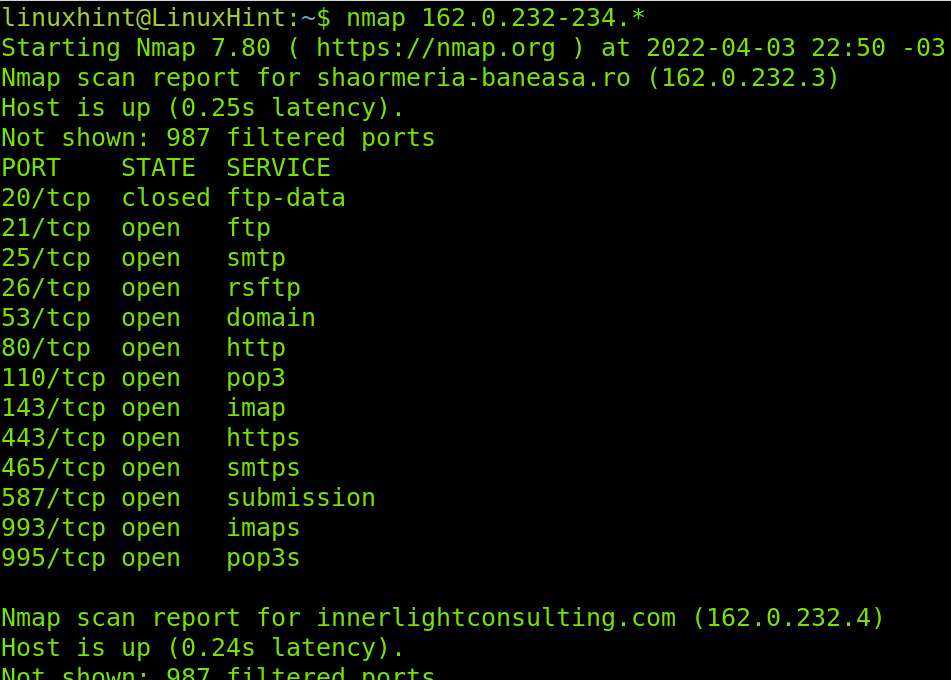
If you want to scan a whole octet you also can use a wildcard (*). You also can use wildcards in more than one octet and you can combine IP ranges with wildcards as shown in the following example.
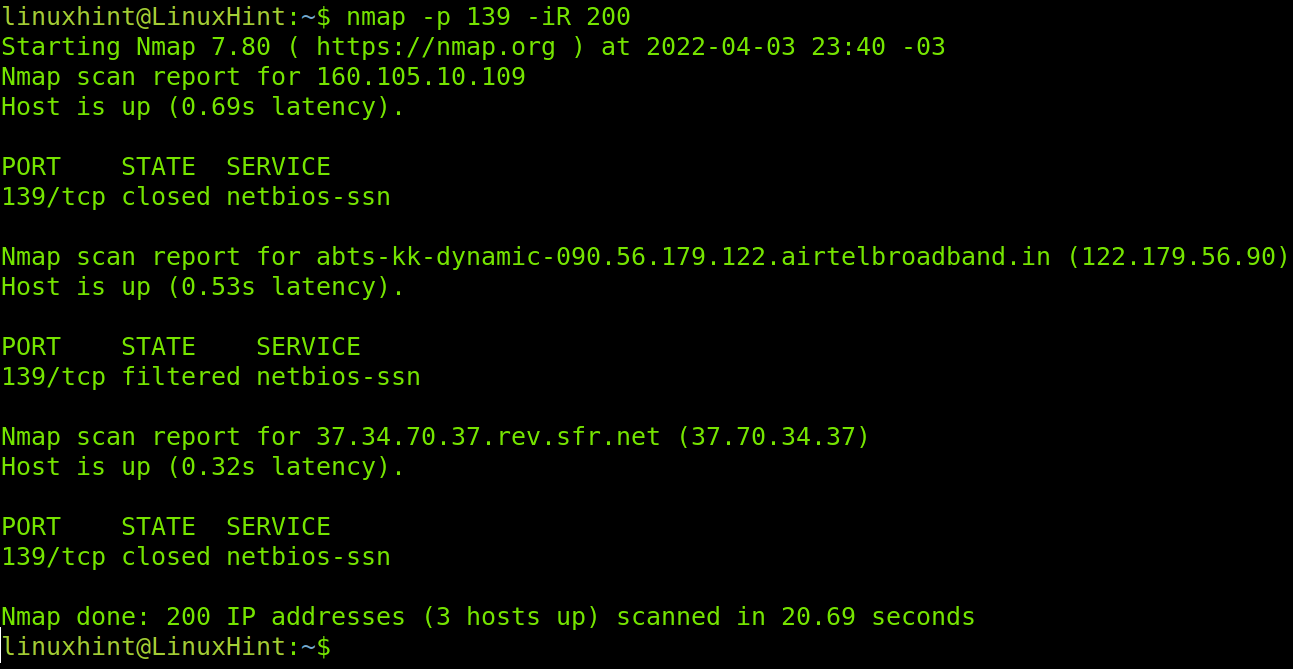
The -iR flag instructs Nmap to find hosts randomly, this flag depends on an argument and numerical instructions, it requires the user to define how many hosts or targets Nmap should generate.
In the following example, I instruct Nmap to generate 200 random targets to scan for the NetBios port.
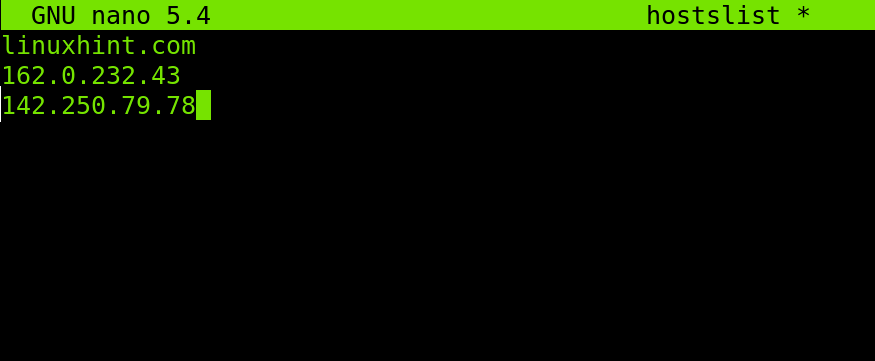
You also can use Nmap to load files containing as many hosts or IP addresses as you want. Hosts can be listed with new lines as shown in the screenshot below, or separated by comma, space or tab.
To apply the example below to create a file containing hosts and IP addresses, you can add many as you want. In my case, I named the file hostslist.
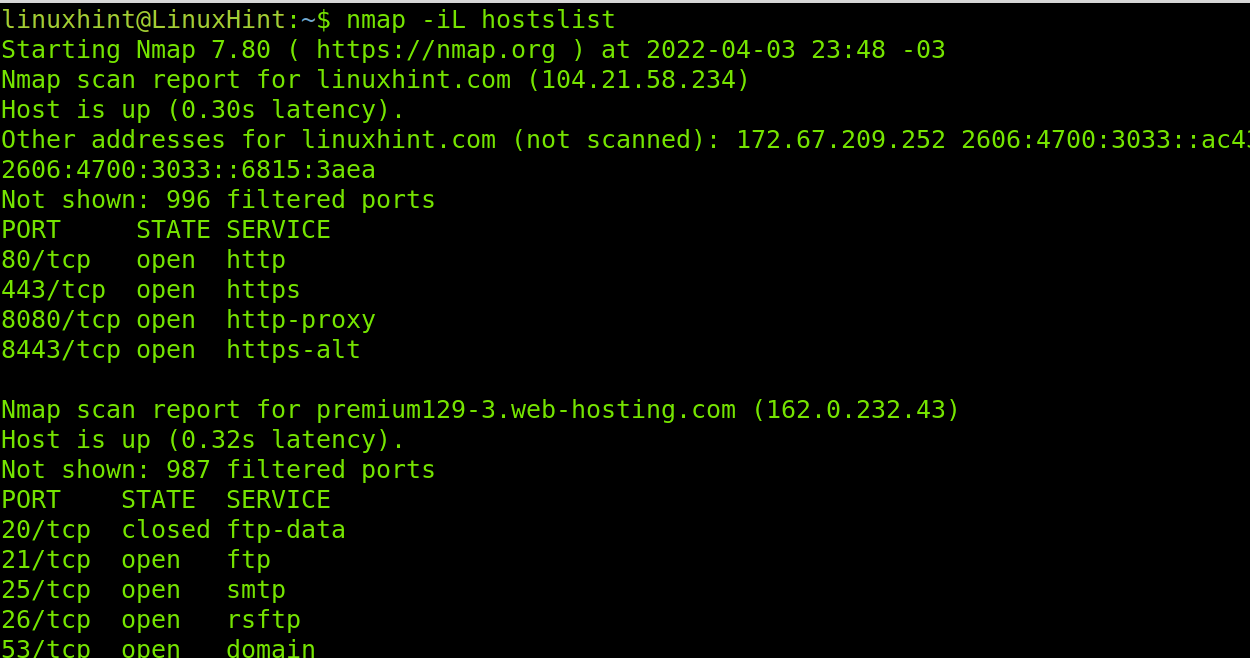
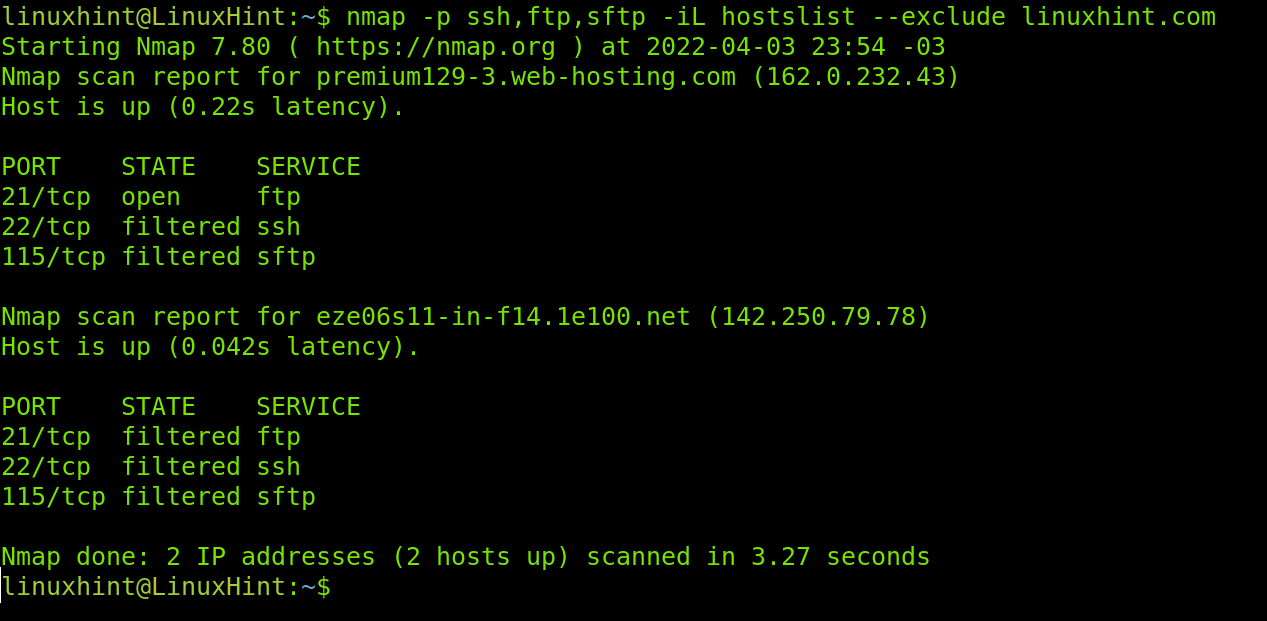
The flag to load the hosts/IPs list is -iL. Below, you can see an example using the list created in the screenshot above.
The –exclude flag is useful to exclude IP addresses or hosts from scans when we scan IP ranges or target files. In the following example I’ll use the hostlist again to scan ports ssh, ftp and sftp but I instruct Nmap to exclude linuxhint.com from the list. As you see in contrast with the result shown in the -iL flag example linuxhint.com wasn’t scanned.
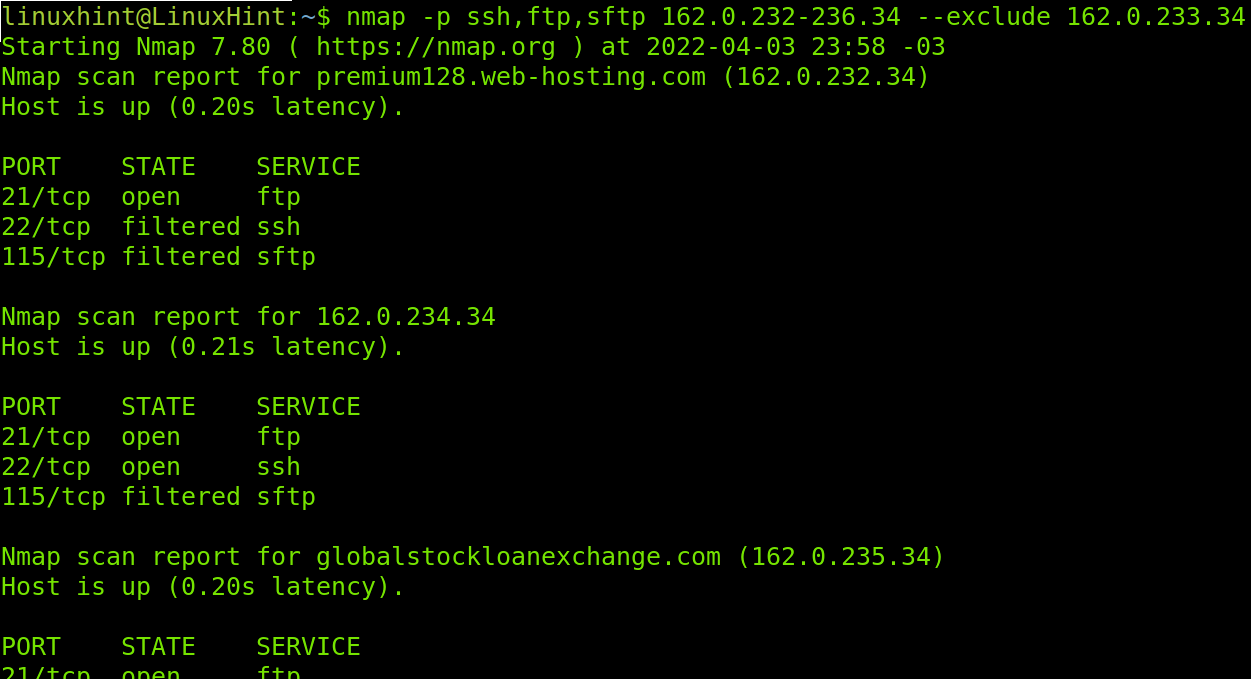
You also can use the –exclude flag when scanning ports ranges as shown in the example below, in which the IP 162.0.233.34 is excluded, not scanned.
Other Common Nmap Flags
This is the last section of this tutorial and explains additional non categorized flags.
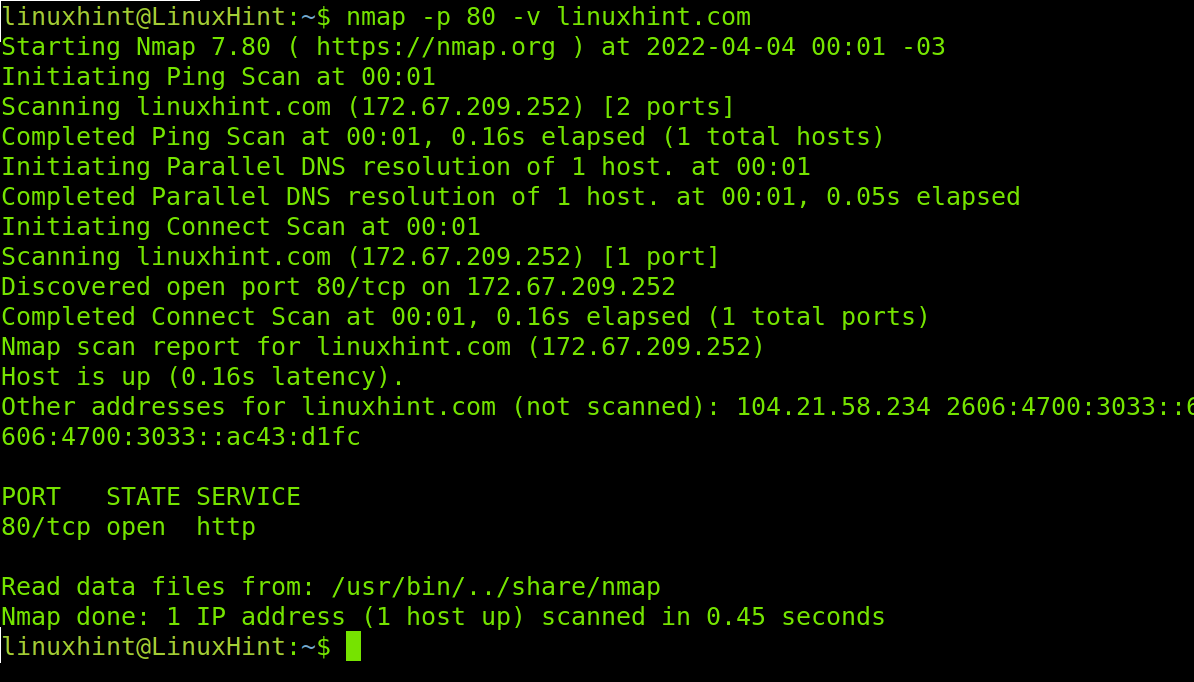
-v: The -v flag (verbosity) will print information on the scan process. By default Nmap doesn’t show the process, this parameter will instruct Nmap to show what’s going on during the scan.
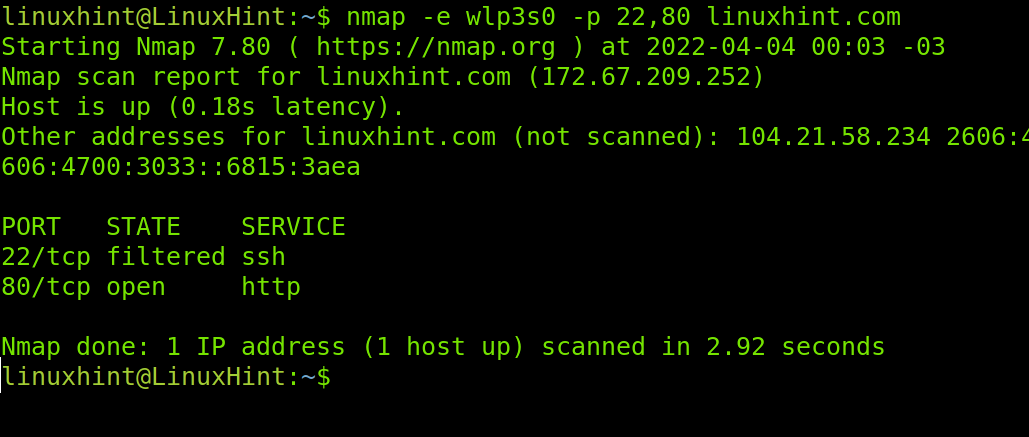
-e: This flag allows us to specify a network interface (e.g. eth0, wlan0, enp2s0, etc), useful if we are connected both through our wired and wireless cards. In my case my wireless card is wlp3s0, to instruct Nmap to use that interface to scan ports 22 and 80 on LinuxHint.
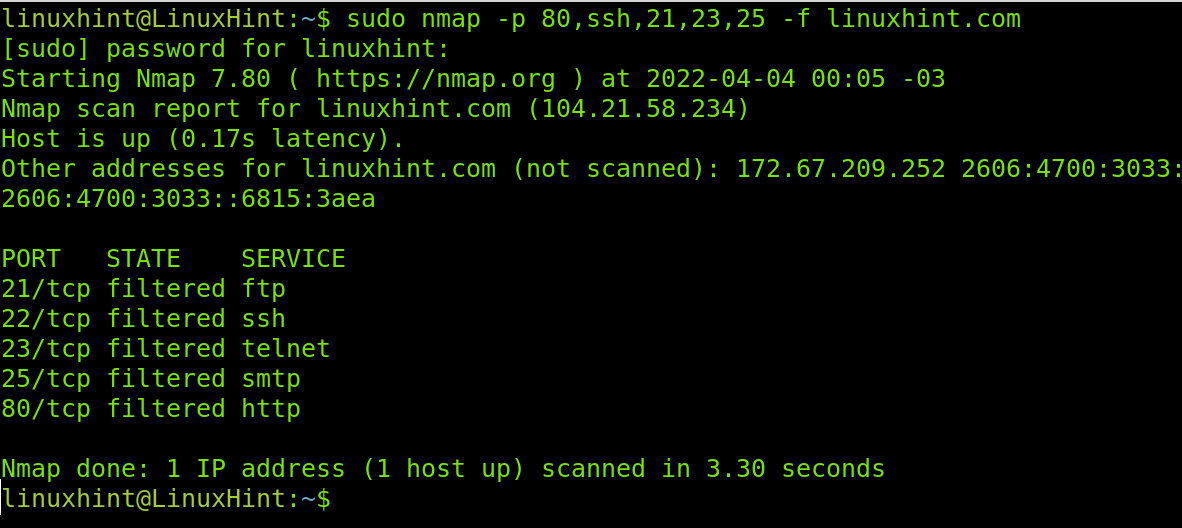
-f: The -f (fragment packets) flag is also used to try to keep the scan process undetected by fragmenting the packets making it harder for firewalls or IDS to detect the scan. This option isn’t compatible with all Nmap features. It is important to clarify to use this feature you need root privileges, use the sudo prefix.
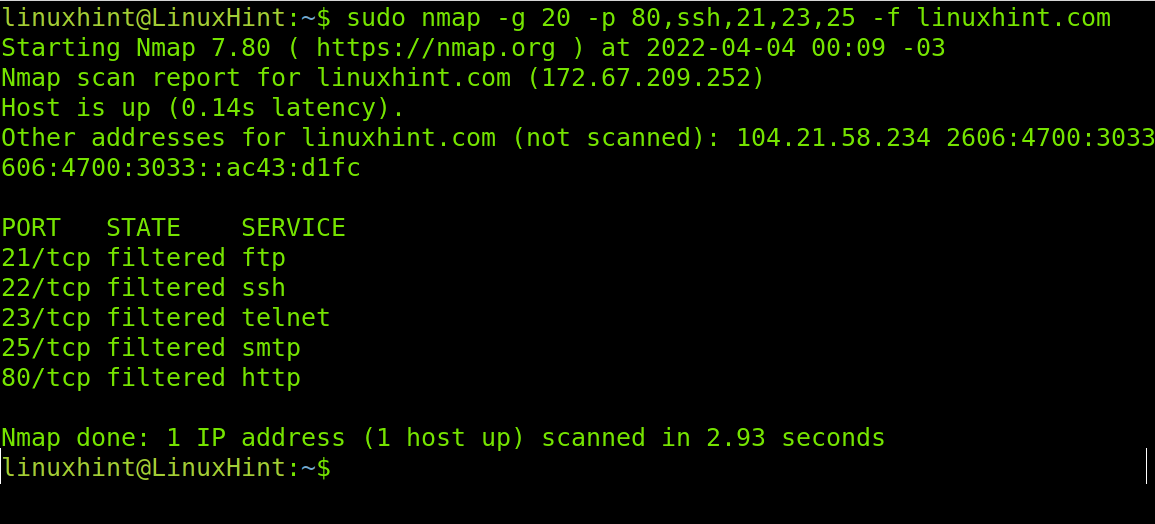
–source-port / -g: flags –source-port and -g are equivalent and instruct Nmap to send packets through a specific port. This option is used to try to cheat firewalls whitelisting traffic from specific ports. The following example will scan the target from the port 20 to ports 80, 22, 21,23 and 25 sending fragmented packets to LinuxHint.
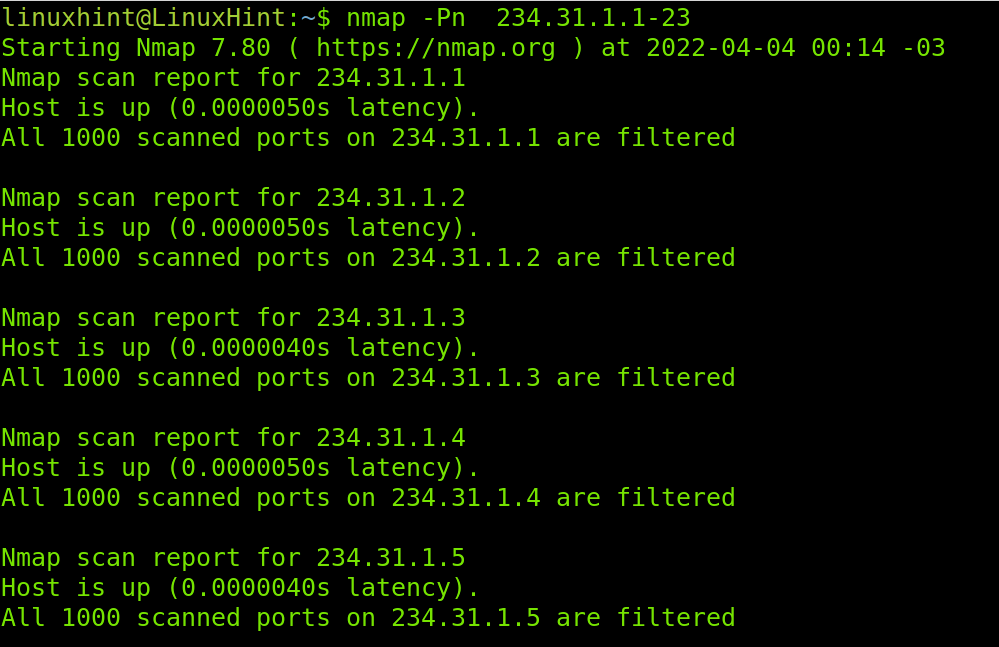
-Pn: The parameter -Pn (no ping) will scan ports of the network or provided range without checking if the device is online, it won’t ping and won’t wait for replies. Yet, it is useful for host discovery.
That’s all about Nmap flags in this tutorial. Yet, before finishing I want to introduce you to another Nmap excellent feature, the Nmap Scripting Engine. Keep reading below.
Introduction to the Nmap Scripting Engine (NSE):
The Nmap Scripting Engine (NSE) is one of the most useful Nmap features for automated tasks. It also contains amazing scripts to find vulnerabilities on targets. Users can write their own scripts or use a database with existing scripts.
The syntax to use NSE is the following:
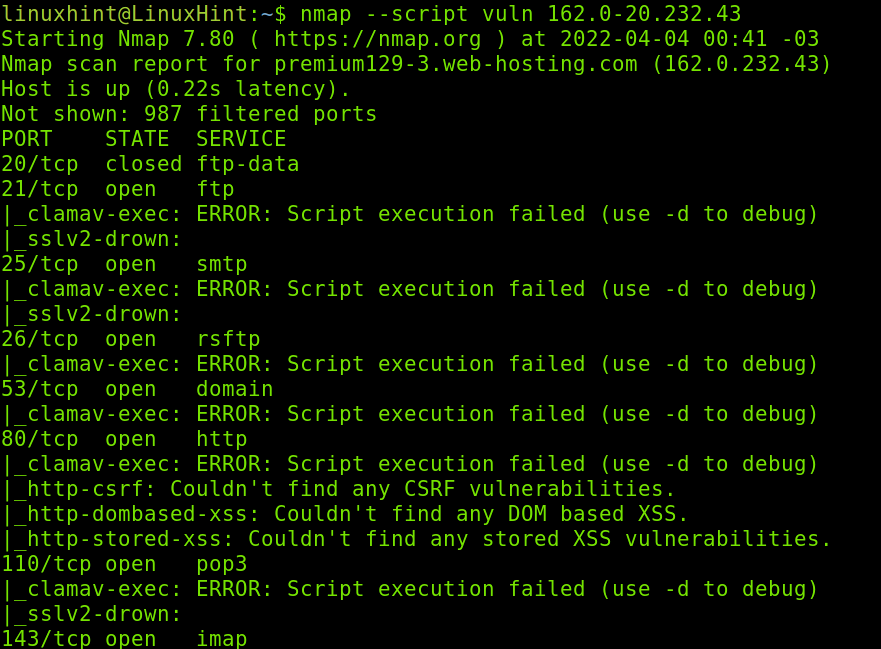
In the example below, I will use the vuln script, used to detect common vulnerabilities on a target. I will launch this scan against an IP range.
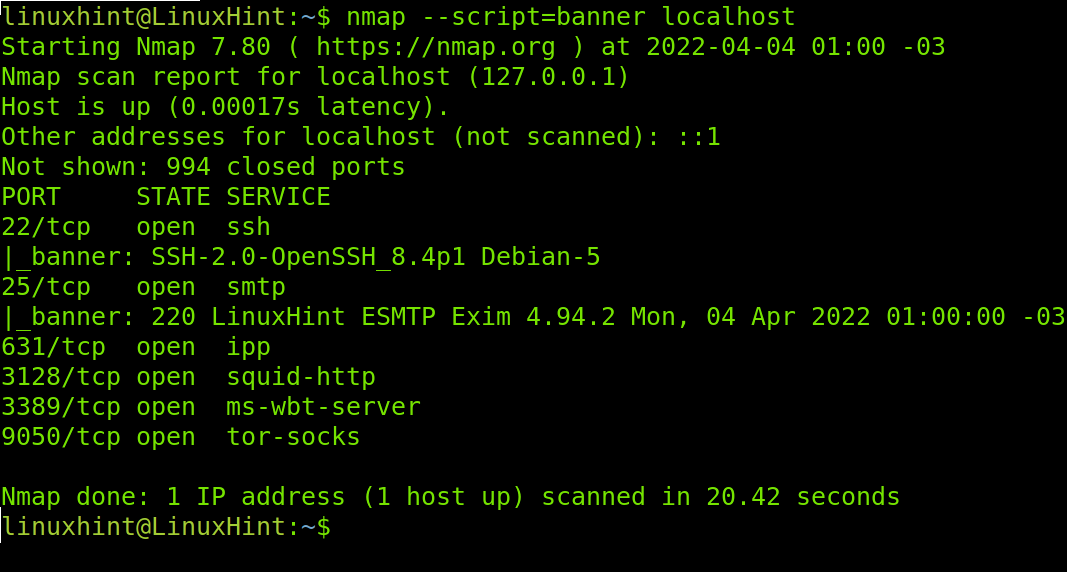
The next example shows how to use the NSE for banner grabbing to identify software versions in your target. Identifying versions was explained in the second section of this tutorial using the -sV flag. This is an additional NSE feature which, combined with -sV can return additional information on your target software.
The script name is banner, and its usage is shown below.
The NSE database needs to keep up to date for you to enjoy it. You can update the Nmap Scripting Engine database by executing the command below with root privileges.
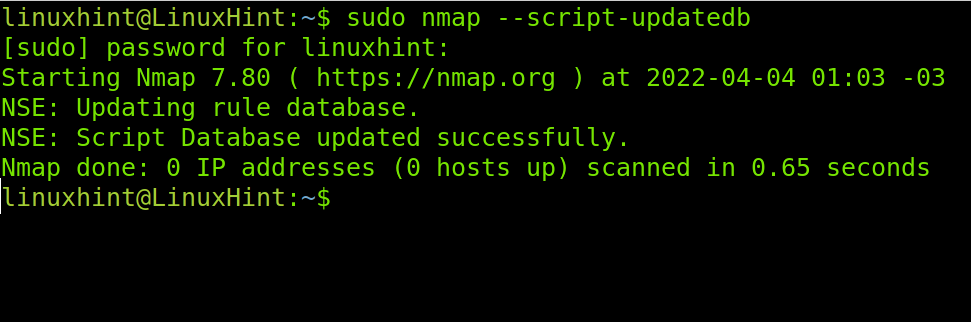
Now, your NSE database is updated.
That’s all for this introduction to NSE. You can explore more scripts at https://nmap.org/nsedoc/scripts/, where scripts are categorized and easy to browse.
Conclusion
As shown in this tutorial, Nmap syntax and flags are very easy to understand and implement. You don’t need to be an advanced user to apply the flags described previously but you need to hold networking and security knowledge to understand the behavior behind some features like the Nmap Scripting Engine.
Nmap is an open source, very potent tool maintained by an expert community, with a lot more features which were not included in this tutorial to avoid turning this tutorial into a book. It is one of the first security tools to audit vulnerabilities and diagnose networking problems.
This tutorial is designed for Nmap new users and is a great introduction to get started. We have published a lot of additional Nmap articles you can find at the LinuxHint Nmap section.
Thank you for choosing LinuxHint to learn what Nmap flags do. I hope this tutorial was useful for you. Keep following us for more professional Nmap tutorials.